SSI certification meets/exceeds global safety & quality
standards set by:
ISO – International Organization for
Standardization
RSTC – Recreational Scuba Training Council
ANSI – American National Standards Institute
SSI founded 1970. Training is the same standard at
any SSI Dive Center worldwide.
About 71–72 % of the Earth is covered by
water.
The SSI Training Process (p.
6–7)
3 steps to certification:
Digital Learning (self-paced)
Academic Sessions + Pool/Confined Water
Sessions with your SSI Dive Professional
Open Water Training Dives
Certification options
Open Water Diver
Scuba Diver
Basic Diver
Academic sessions
6
3
1
Pool/confined water sessions
6
3
1
Open water training dives
4
2
1
What it allows
Dive with a buddy, in conditions & depths
like those in your training
Dive under direct supervision of a dive
professional, to limited depths
Dive under direct supervision of an Open Water
Instructor, valid 6 months
Notes
SSI's most popular program
~half the OWD content; continue to OWD any
time
Taster before committing; credits toward OWD if you continue
within 6 months
Instructor may adjust the number of sessions to
your needs/schedule, and may add extra in-water
sessions until you're comfortable (SSI: capable divers, not
just cards).
Expectations for You (p. 7–8)
Water fitness
Before open water training you must show a minimum level of
physical ability and water fitness (water fitness
evaluation).
No need to be a strong swimmer, but you must be comfortable
in water deeper than your head.
Expectations
for Your Instructor and Training Center (p. 8)
SSI training philosophy prioritises your comfort, safety and
dive experience.
SSI sees 4 components for creating capable divers →
the SSI Diver Diamond.
The SSI Diver Diamond (p. 8–9)
Part
Key point
Knowledge
From Digital Learning + academic sessions; replaces
fear/misunderstanding with enthusiasm (e.g. sharks = indicator
of ocean health, seeing one is a rare privilege — not mindless
attackers)
Skills
"Comfort through Repetition": learn the basics,
then repeat under supervision until the skill needs no conscious
thought (e.g. move effortlessly, change buoyancy without
touching equipment)
Equipment
Personally owned, well-fitted gear is more
comfortable and safer than unfamiliar rental gear. Renting →
staff help you select/inspect rentals and advise the minimum personal
gear to own
Experience
Only gained by actually diving; instructor may add
extra training dives; every dive refreshes skills
The Total Diving System (p.
10–12)
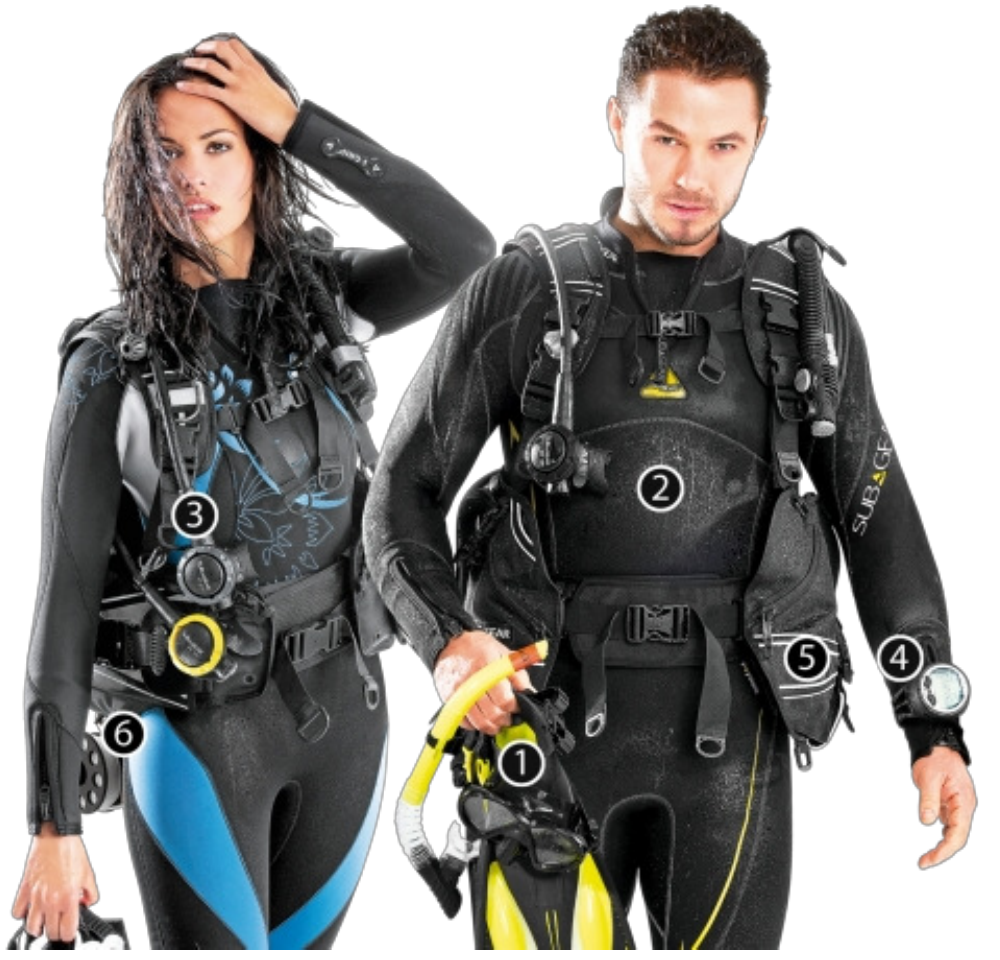
= all the equipment you need to dive, in 6
subsystems:
#
System
What it is / includes
1
Snorkeling
Move, breathe and see at the surface: mask, snorkel, boots,
fins, mesh bag. Mask: fit & comfort matter
most. Snorkel = breathe face-down at surface. Boots = comfort/fit in
fins + protect feet. Fins = propulsion with least effort. Mesh bag =
carry + drip dry
⚠️ Arguably the most important equipment;
first component of life support; supplies a
sufficient amount of breathing gas (air or Nitrox) in
all conditions (→ Section 2)
4
Information
Integrated part of the Delivery System. Usually a dive
computer: air, depth, time, temperature, ascent/descent rates,
repetitive dives. Log dives in the logbook
5
Buoyancy
⚠️ Also life support. Buoyancy control for surface
flotation, controlled descents, swimming attitude, controlled ascents.
BC should carry a visual + audible signalling device
and a diver's tool (knife or rescue shears). Many BCs
are weight-integrated (quick-release weight pockets
instead of a weight belt)
6
Accessory
Extends your system for specific purposes/Specialty
Training: tools, spare parts, approved lubricants/cleaners;
e.g. lights (night), camera (photo),
navigation aids/recovery gear (search &
recovery)
Hollow reeds as snorkels; goat/sheep-skin air
bags
Breathing through a reed fails below ~30 cm (water
pressure); straight tube forced swimming on your back; bags needed lots
of weight and got squeezed flat
~330 B.C.
Diving bell (designed by Aristotle, used by
Alexander the Great) – open-bottom "upside-down bucket"
Air compresses as it sinks; air becomes fouled with
CO₂ → bell must be brought up
Late 18th / early 19th c.
Pumps deliver air at depth → surface-supplied suits
and bells; first diving helmet ~1800
Enough air must be pumped to keep water out; diver must not tip
over
Mid-1800s
Fully enclosed suit → salvage diving (Great
Britain); caissons = pressurised dry chambers for
bridge/tunnel work
Workers fell ill after surfacing ("rheumatism"), many died →
caisson disease = "the bends"
Late 1870s
Paul Bert studies gradual decompression
→ decompression chamber
After Bert
J.S. Haldane (for the Royal Navy) – first
dive tables, stage decompression
Effects of
Pressure on the Surface and Underwater (p. 21–24)
Weight of air and water
Pressure = force per unit area. Units:
bar (metric); psi and
atmospheres (imperial).
Air weighs 1.29 g/L. 1 atmosphere ≈ 1
bar = weight of a 1 cm² column of air from sea level to the
edge of the atmosphere (~400 km). You don't feel it
because it pushes equally from all sides.
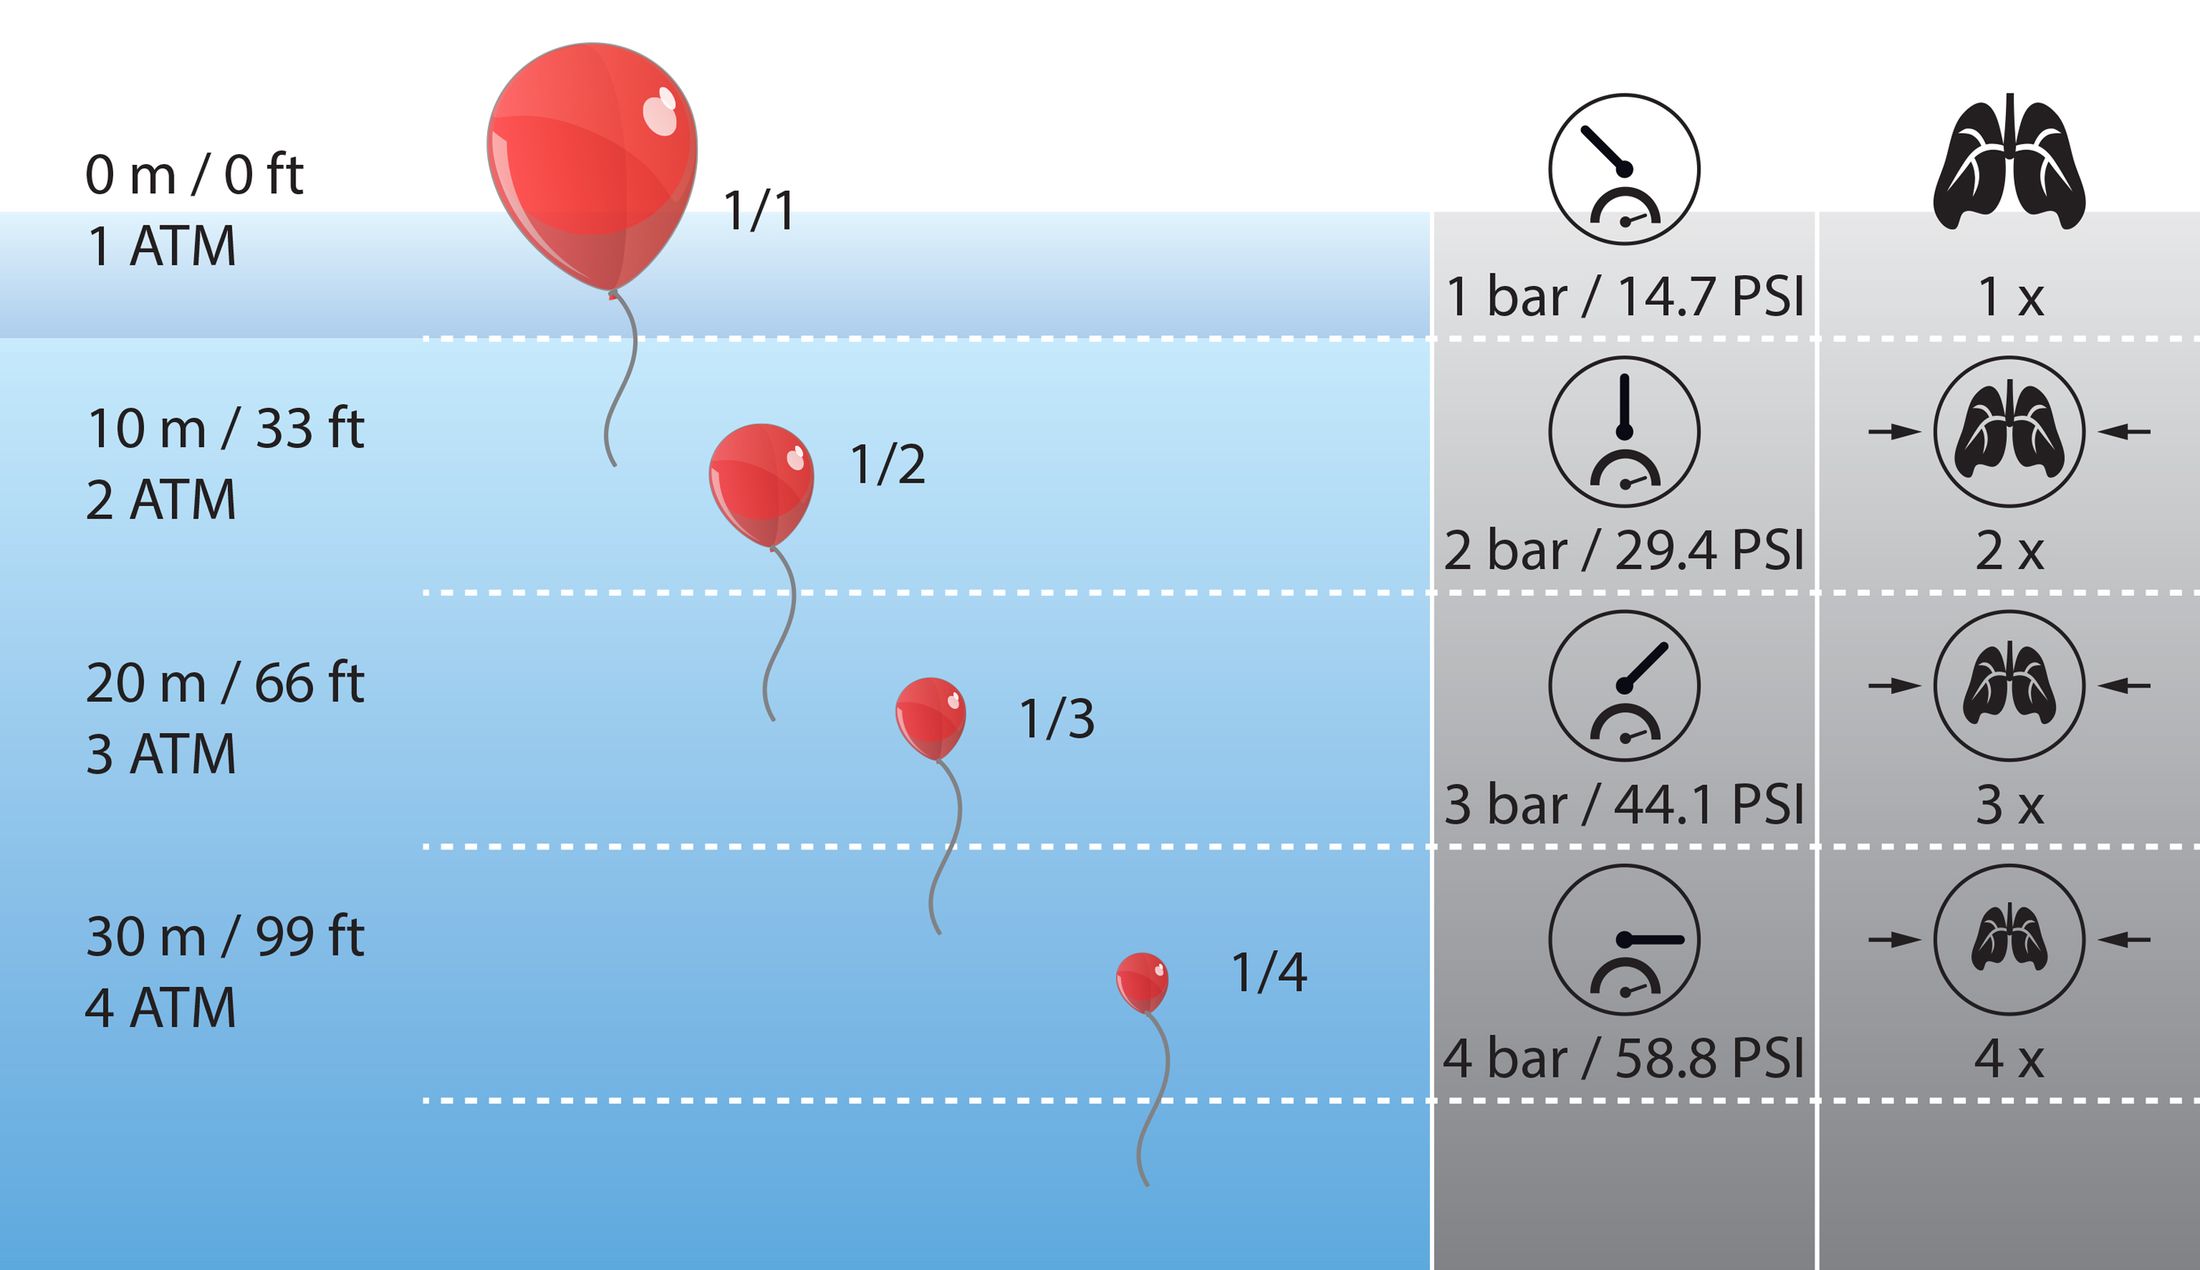
Water is about 800× heavier than air → pressure
rises quickly underwater:
Weight
Depth that adds 1 bar
Salt water
1.025 kg/L
10 m (msw)
Fresh water
1.0 kg/L
10.2 m (mfw)
So 1 atm = 1 bar = 10 m of salt water = 10.2 m of fresh
water.
Salt water is denser → pressure increases a bit faster. The manual
uses salt water for all calculations: +0.1 bar
per metre (1 bar / 10 m).
Imperial: 1 bar ≈ 14.7 psi, 10 m ≈ 33
ft.
Absolute vs. gauge pressure
Term
Meaning
At the surface
Absolute (= ambient) pressure
Total pressure on an object = 1 bar of air
+ the water pressure
1 bar
Gauge pressure
What a gauge reads (gauge shows 0 at 1 bar) = absolute − 1
bar
0 bar
Quick formula (salt water): absolute pressure = depth ÷ 10 +
1 bar. Example: 30 m → 4 bar absolute, 3 bar
gauge.
Why pressure matters to the
body
Injuries happen when there is a pressure difference
between the ambient pressure and an air space in the
body (or a gas space against the body, e.g. the mask).
Body is about ¾ liquid → liquids are
incompressible → no problem.
Gases compress and expand → lungs, ears, sinuses,
even tiny air pockets in dental fillings are affected.
Boyle's Law
At constant temperature: gas volume changes
inversely with absolute pressure, gas
density changes directly.
Example: a 100 L balloon at the surface taken to
20 m: 1 bar × 100 L = 3 bar × V2 → V2 ≈ 33
L.
⚠️ The greatest relative pressure and volume change is
between 0 and 10 m (pressure doubles, volume halves) →
start equalizing immediately when you begin to descend.
(Same zone on ascent: air expands most near the surface.)
Air spaces get squeezed on descent unless you add
air to them to match ambient pressure.
Squeeze:
Primary Effects of Pressure on Descent (p. 24–28)
Squeeze = uneven application of
pressure on a body air space. Always uncomfortable; if not
dealt with quickly → tissue damage.
Equalization = adding air to body
air spaces as the outside pressure increases → prevents squeeze injuries
(ear pain, ear and sinus squeeze, etc.).
Body air spaces that can be squeezed (5): ears, sinuses,
lungs, teeth, intestines. Plus equipment: mask
and suit.
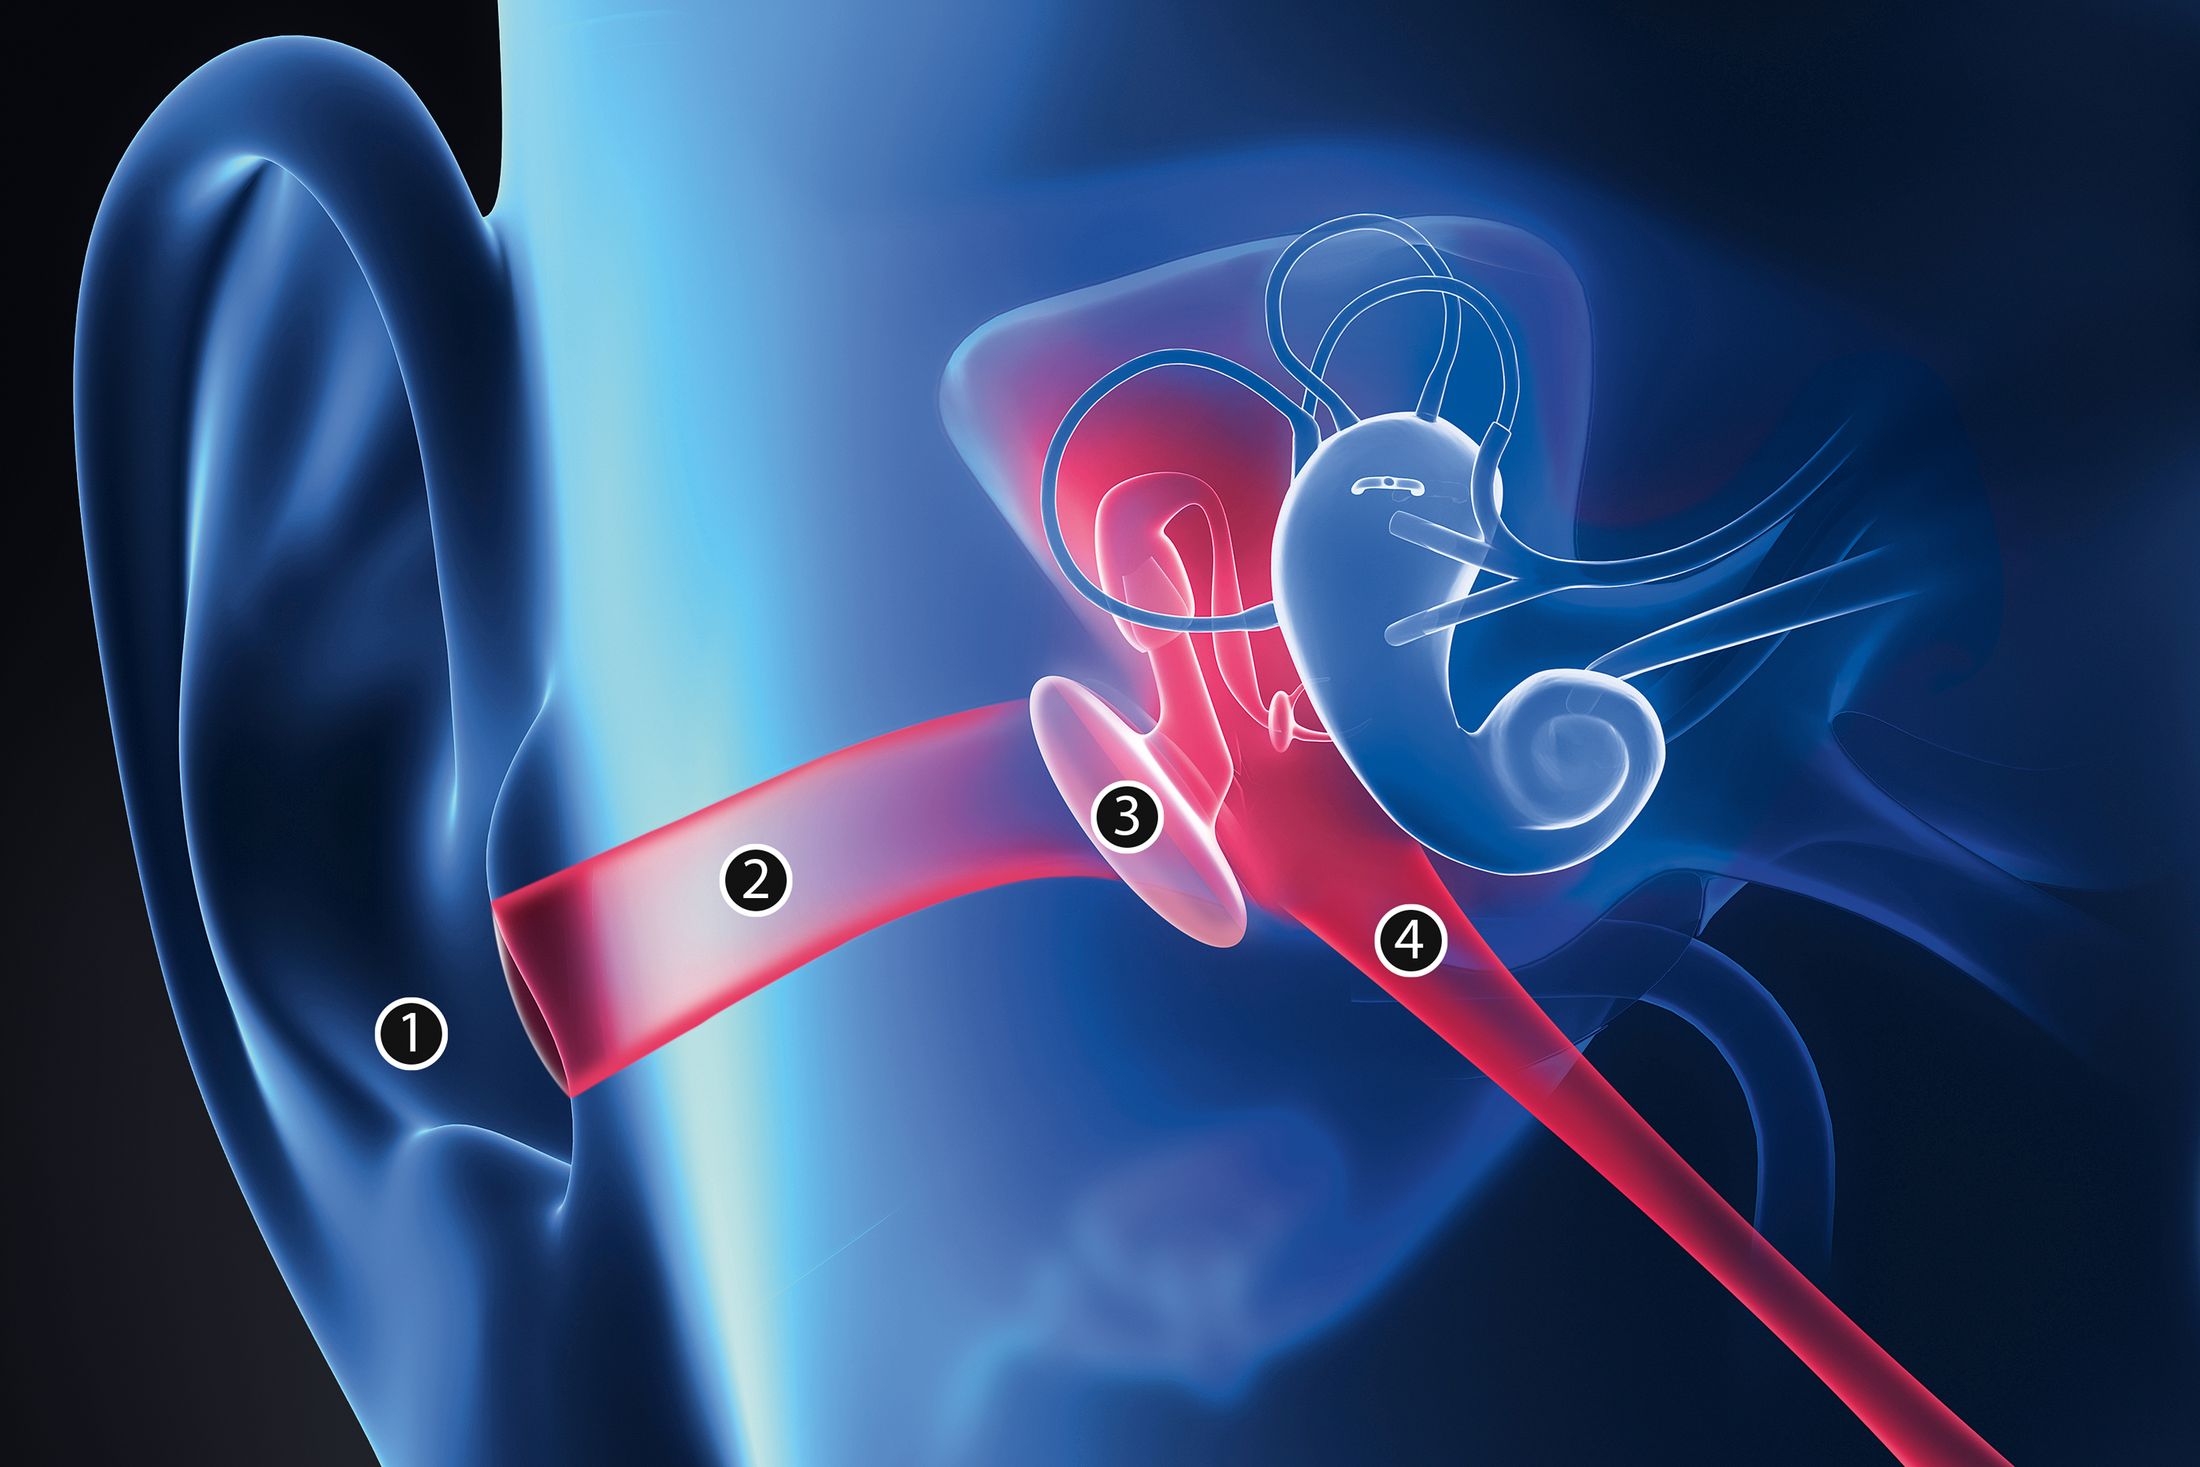
Eardrum + its connective tissue = the most
squeeze-sensitive area.
Middle and inner ear contain the balance and
hearing organs.
Round and oval windows (thinnest membranes in the
body, between middle and inner ear) are the reason to blow
gently when equalizing. If they rupture → inner-ear fluid leaks
→ ringing/roaring, hearing loss, severe vertigo
and vomiting (dangerous underwater).
Eustachian tube connects middle ear ↔︎ back of the
throat → lets air into the middle ear → key to
equalizing.
Ear squeeze (aerotitis / barotitis media):
On descent water pushes the eardrum inward; if no
air is added through the Eustachian tube → squeeze.
Main symptom: pain (same feeling as at the bottom
of a pool). Pain comes before the eardrum ruptures, but
damage may already be starting → ⚠️ never wait for pain before
equalizing.
Injury possible with only 0.1 bar difference =
1 m of depth. Just 30 cm more can
perforate the eardrum.
Perforated eardrum → immediate hearing loss; water
entering the middle ear → vertigo.
⚠️ Ear squeeze happens on descent, very rarely on
ascent. Pain on ascent → stop, then ascend slowly.
⚠️ Ear pain after the dive or blood in the ear
canal (perforated eardrum) → put nothing in
the ear, see a doctor.
Sinuses
4 pairs: frontal, maxillary, ethmoid, sphenoid.
Air-filled spaces in the skull bones, lined with mucous membrane, linked
to the nose by narrow ducts that congestion can
block.
Sinus squeeze (aerosinusitis): congestion traps air
→ on descent membranes can rupture → air is replaced by blood and
tissue.
First sign: sharp pain or wedging feeling right above the
eyes. Keep descending → minor damage → slightly bloody
nose after the dive. Usually no treatment needed; if pain or
congestion persists → doctor.
⚠️ Prevent: don't dive with a cold or congestion.
No decongestants unless your doctor knows you will dive
on them.
Lungs
Lung (thoracic) squeeze does not happen in
scuba – only when snorkeling/freediving.
Descending just 1–2 m without full lungs → the
small leftover air volume is compressed → lung walls can collapse;
deeper, lung lining can rupture (blood/fluid in the lungs).
Prevent when freediving: take a full breath before
descending, stay above 20 m, and don't
release air until back at the surface.
Equipment squeezes
Cause
Effect
Prevention
Mask squeeze
Air in the mask compresses; blood in eye tissue is at ambient
pressure
Burst capillaries in/around the eyes (little pain); severe cases:
optic nerve damage, blindness
Properly fitted mask; exhale through your nose into the mask
every metre of descent
Suit squeeze
Drysuit (or loose wetsuit): trapped air compresses,
suit folds pinch the skin
Red marks/bruises; harmless, gone in a few days
Proper fit; add air to the drysuit while
descending
⚠️ Any visual distortion after a mask squeeze →
see a doctor immediately.
Equalization Techniques (p.
28)
Methods relax the muscles that open the Eustachian
tube so air enters the middle ear at ambient pressure:
Swallowing
Rotating (moving) the jaw
Valsalva: pinch your nostrils and blow
gently until equalized. ⚠️ Never blow hard or
force it. Use it carefully and only if swallowing and jaw
movement don't work.
Rules for equalization
⚠️ Breathe continuously – never hold your breath
(keeps the lungs equalized on descent and ascent).
⚠️ Never wait for pain – start right away,
relax and equalize often. Descend
feet first / upright or along a descent
line if possible.
Never dive with a cold or congestion – mucus blocks
the Eustachian tube.
⚠️ Never dive with earplugs.
⚠️ Pain on descent → stop descending (fins or
line), ascend until the pain stops, try again. Still
pain → don't dive.
Pain on ascent → stop, then continue
slowly.
Reverse Squeezes (p. 28–29)
Happen only on ascent: pressure drops → trapped air
expands. Rare.
General fix: ascend very slowly, stop now and then,
let the gas escape.
Probably a tiny air pocket under a filling, near the nerve
Pain in a tooth
Ascend slowly, end the dive, see a dentist
Intestinal squeeze
Gas-producing food before diving; the gas expands
on ascent
Stomach pain/discomfort
Ascend slowly, let the gas escape. Avoid gassy food before
diving
Tooth squeeze is more likely with tooth decay, dental
infection, recent extraction or fillings.
The Snorkeling System (p.
30–35)
Your own, personally fitted gear = more comfort. Total
Diving System = 6 sub-systems; this section covers the
Snorkeling System: mask, snorkel, fins, boots,
gloves/mitts, exposure suit, mesh bag.
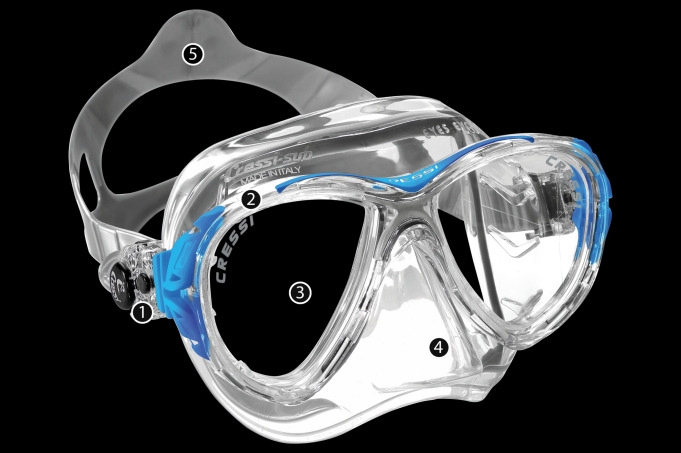
Mask
Purpose: clear vision (puts an air layer in front
of the eyes – our eyes are made for air), protects face and eyes,
keeps water out of the nose, some cold protection.
⚠️ Never use goggles below the surface: nose not
covered → can't equalize → eye damage.
Good mask: fitted to your face, double seal at the
edge, flexible/comfort strap with locking devices,
tempered glass lenses, non-allergenic
silicone (sometimes harder near the frame, softer at the face),
good peripheral vision.
Fit test: put the mask on without the
strap, inhale gently through the nose → if it
stays, it fits.
Glasses wearers: prescription lenses in the mask –
often better than contacts (pressure changes).
Prep: clean with mask-cleaning compound; apply anti-fog
before every dive; clean again if anti-fog alone stops
working.
Mask clearing: tilt head back, press the
top of the frame, exhale gently through the nose.
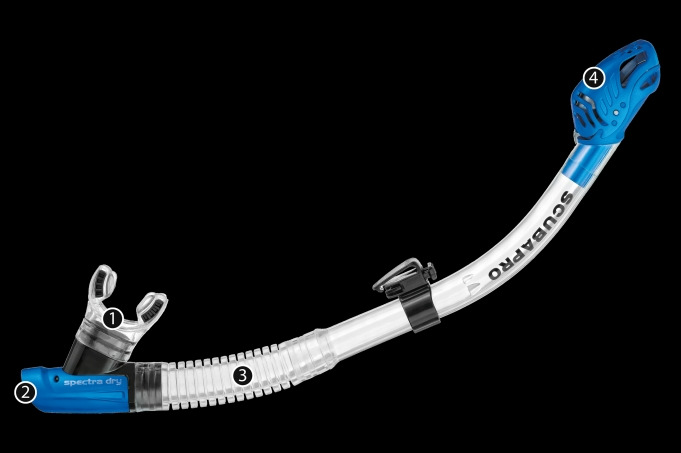
Snorkel
Lets you breathe on the surface without lifting your head;
saves cylinder air when surface-swimming to the dive
site.
Good snorkel: smooth inside, large bore,
self-draining purge valve and vent, flexible material,
comfortable mouthpiece.
Use: deep breath → dive → snorkel fills with water → at the surface
most water drains through the purge valve →
exhale sharply to blow out the rest.
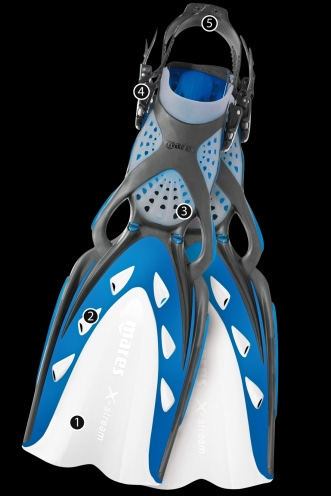
Fins
Divers don't use their arms: fins = 100 % of
propulsion. Built for effortless, moderate
speed over long distances, not for speed.
Kick with straight legs from the hips, not from the
knees.
Materials: technopolymer (thinner, lighter, more
thrust; bright colours help your buddy see you) or
rubber.
Types: full-foot (no boots) and
open-heel (worn with boots).
Wide, fairly rigid blade = more thrust. Fins should
be nearly neutrally buoyant in fresh and salt
water.
Other parts
Item
Purpose
Dive boots
Worn with open-heel fins; protect against chafing, cold and abrasion
when walking
Gloves / mitts
Warm, flexible hands in cold water; protect from abrasion and
irritants. ⚠️ Not permission to touch marine life; some
sites ban gloves
Exposure suit
Thermal protection (wetsuit, drysuit, dive skin…) – more in Section
2
Mesh bag
Carries your gear; easy fresh-water rinse after a
salt-water dive
Maintenance
Mark gear with your name/initials; record it in
your logbook.
After every dive: rinse in fresh
water, dry in a cool, well-ventilated
place.
Take special care of your mask.
Adaptation to the
Aquatic Environment (p. 36–37)
Why snorkel/freedive skills matter: stranded at the
surface → inflate BC, snorkel in, swim.
Constant waves: water is always moving → don't fight
it, relax and use the movement.
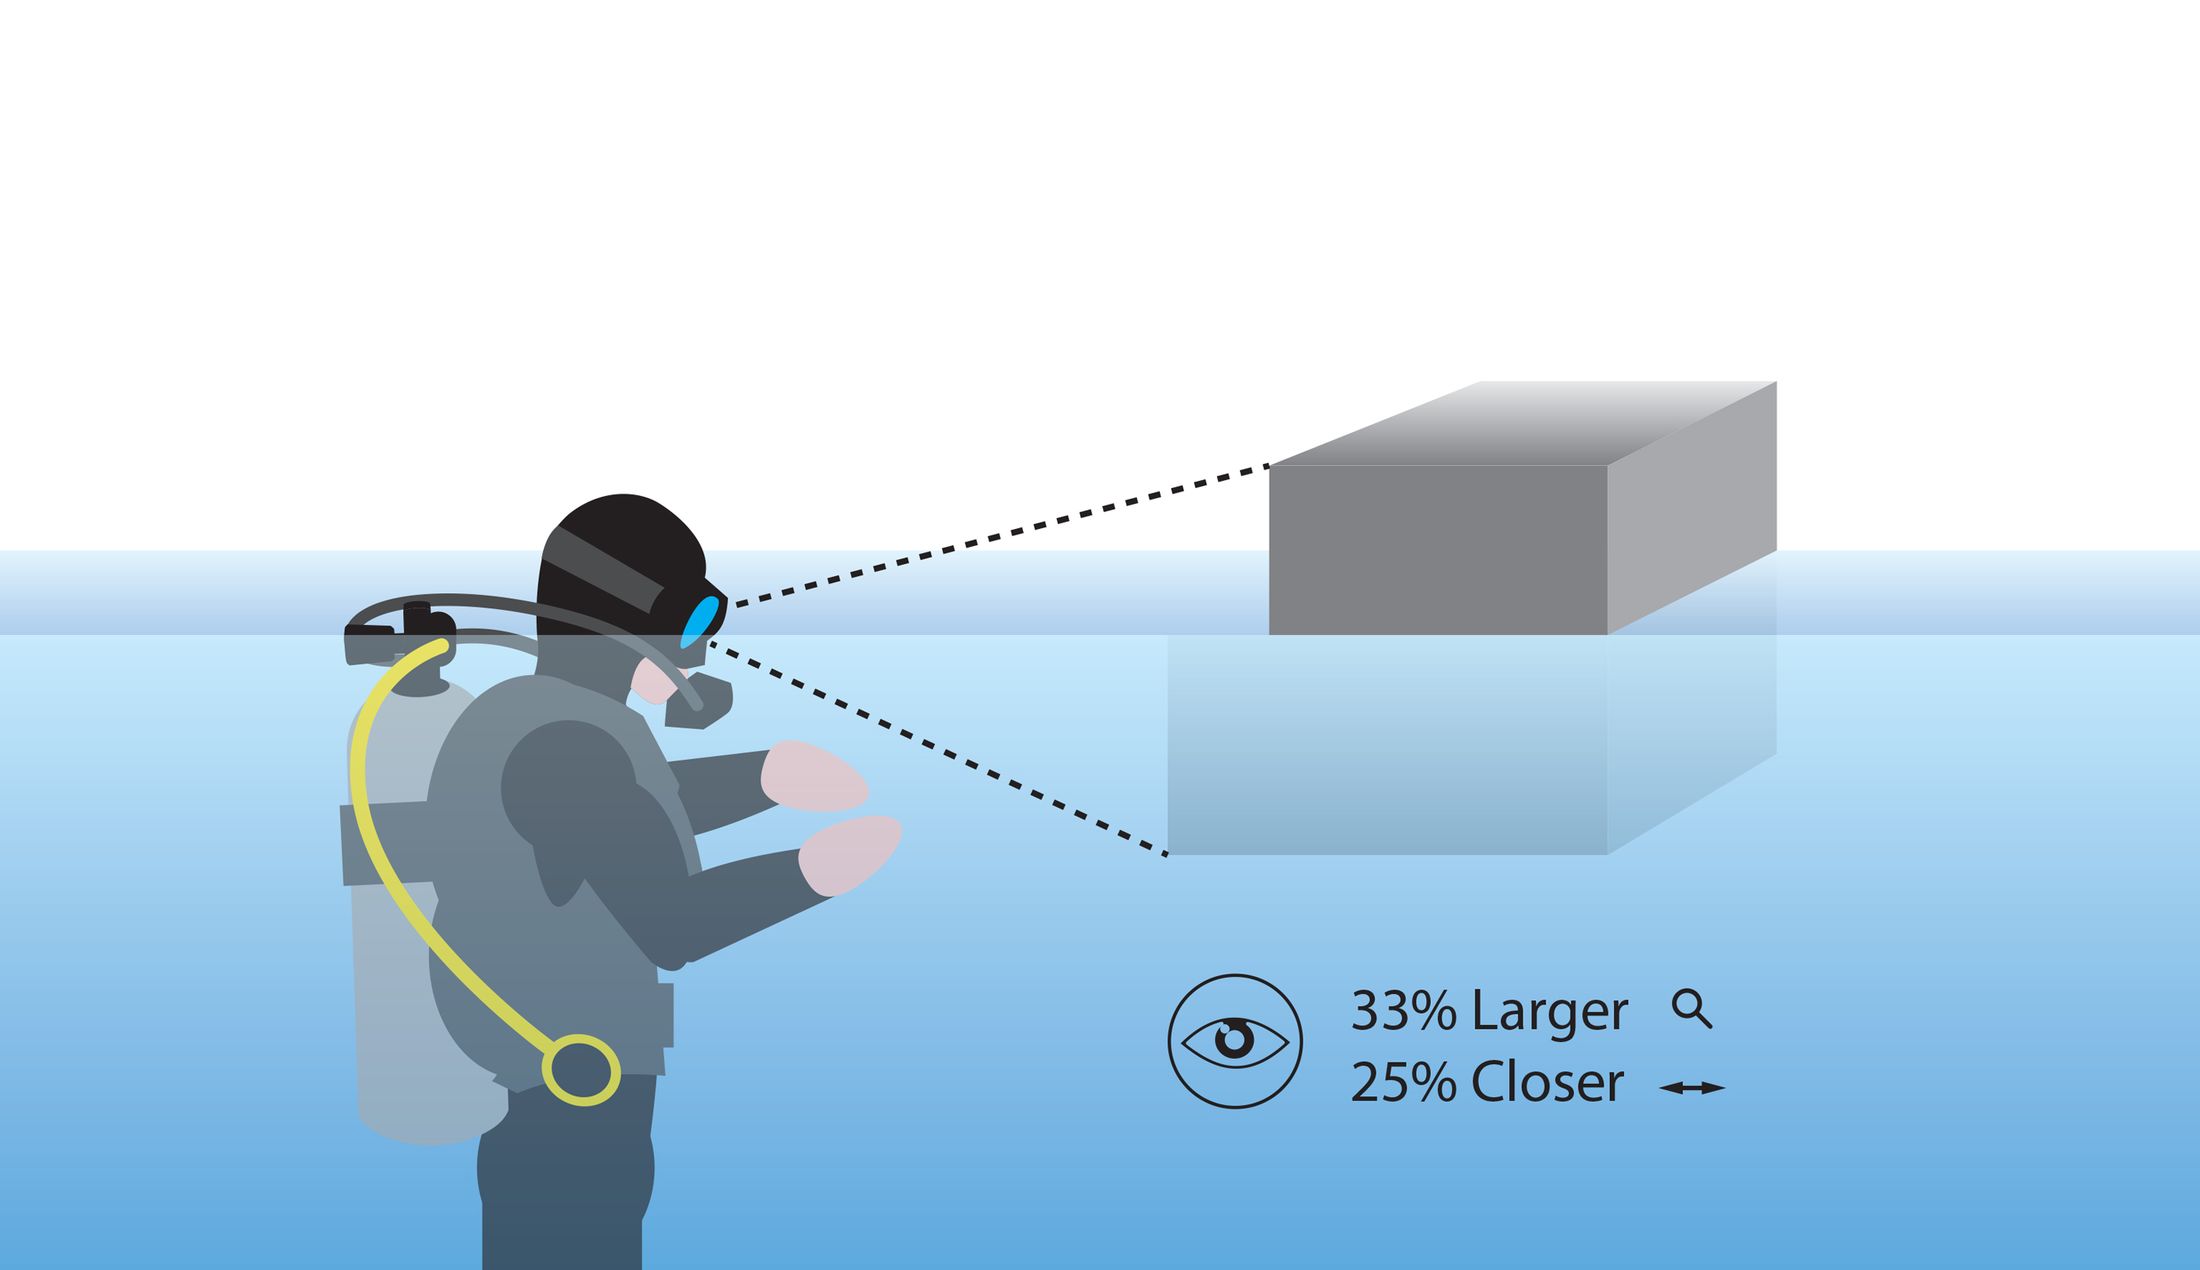
Vision underwater
Refraction: light bends going from water into the
air in your mask → objects look
33 % larger
25 % closer
Example: a 1 m fish 1.25 m away looks like a 1.33 m
fish about 1 m away
Term
What it means
Refraction
Light bends at the mask → bigger & closer
Illumination
Amount of light; depends on sun position, clouds, surface waves
(rough water = less light)
Diffusion
Light scatters on water molecules → softer, less
intense
Absorption
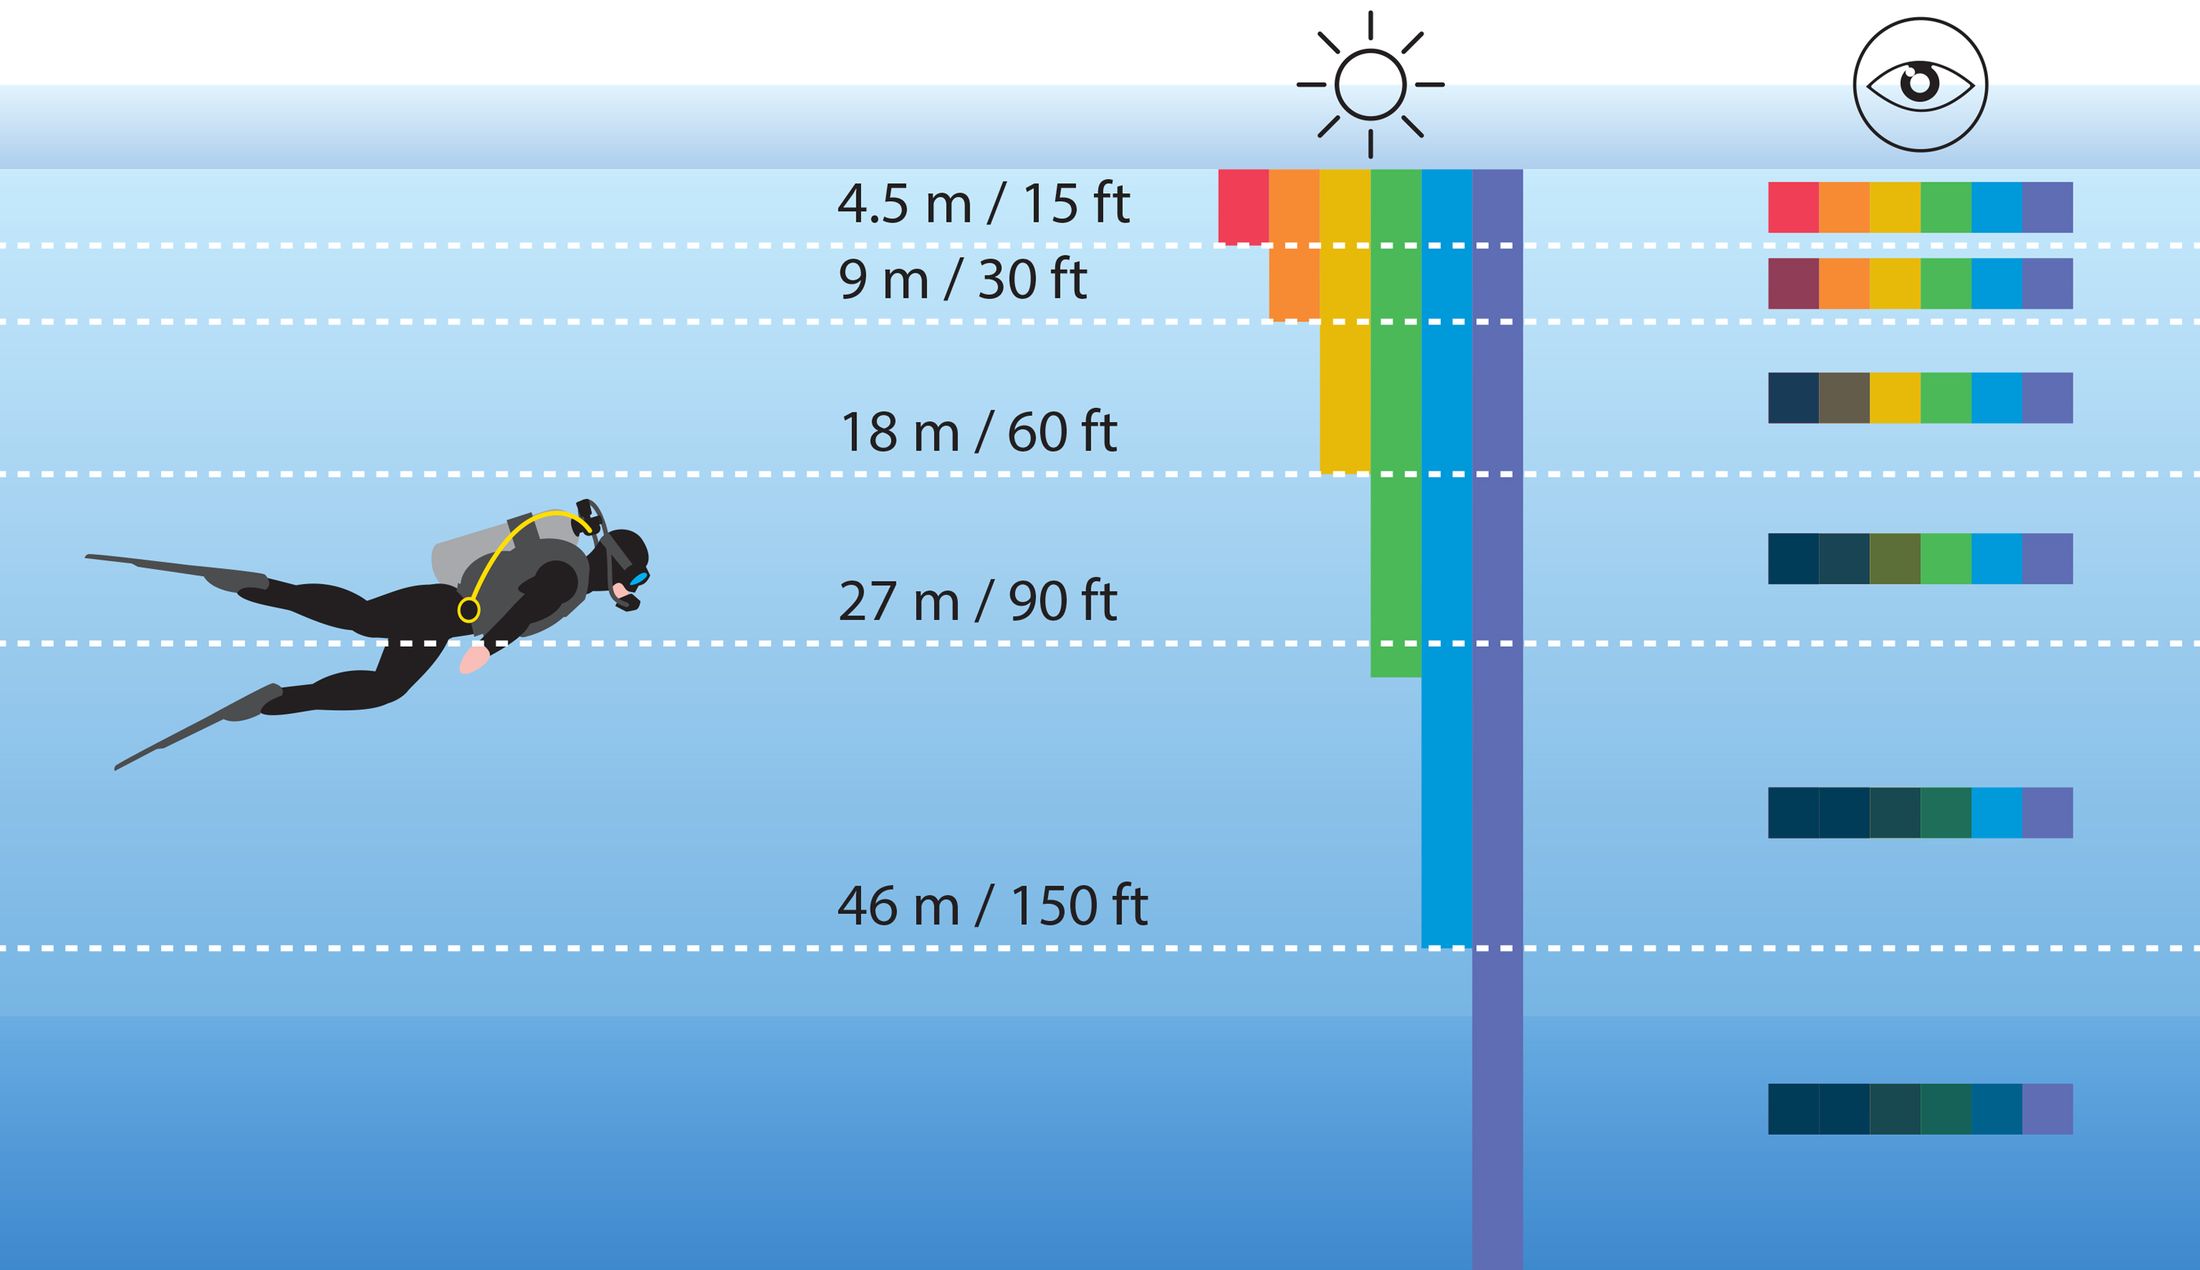
Colours disappear with depth: warm colours first
(red → orange → yellow), until only blue/violet
remain
Turbidity
Particles in the water → reduced visibility
→ All 5 factors together mean the same dive site can look very
different over the course of a day.
Approximate depth at which each colour disappears (from the diagram):
red ~4.5 m · orange ~9 m · yellow ~18 m · green ~27 m · blue ~46
m → only violet remains.
Water temperature
Range: about 0 °C to 26 °C+. Surface vs. depth can
differ by 10–20 °C.
Cold water is denser → sinks → layers of different
temperature = thermoclines (they occur in
all bodies of water).
⚠️ You lose body heat 25–30× faster in water than
in air:
Conduction = direct contact with the water
Convection = water moving across your skin
→ Wear thermal protection on every dive.
Underwater Communication (p.
38–39)
No talking underwater → hand signals.
⚠️ Agree on signals and communication with your buddy before
every dive.
Sound underwater:
travels 4× faster than in air
seems to come from all directions → hard to tell
where it comes from (ears not adapted to the speed)
travels farther underwater (great distances), but
passes poorly between air and water
Backups: writing slate / wet notes. Get attention:
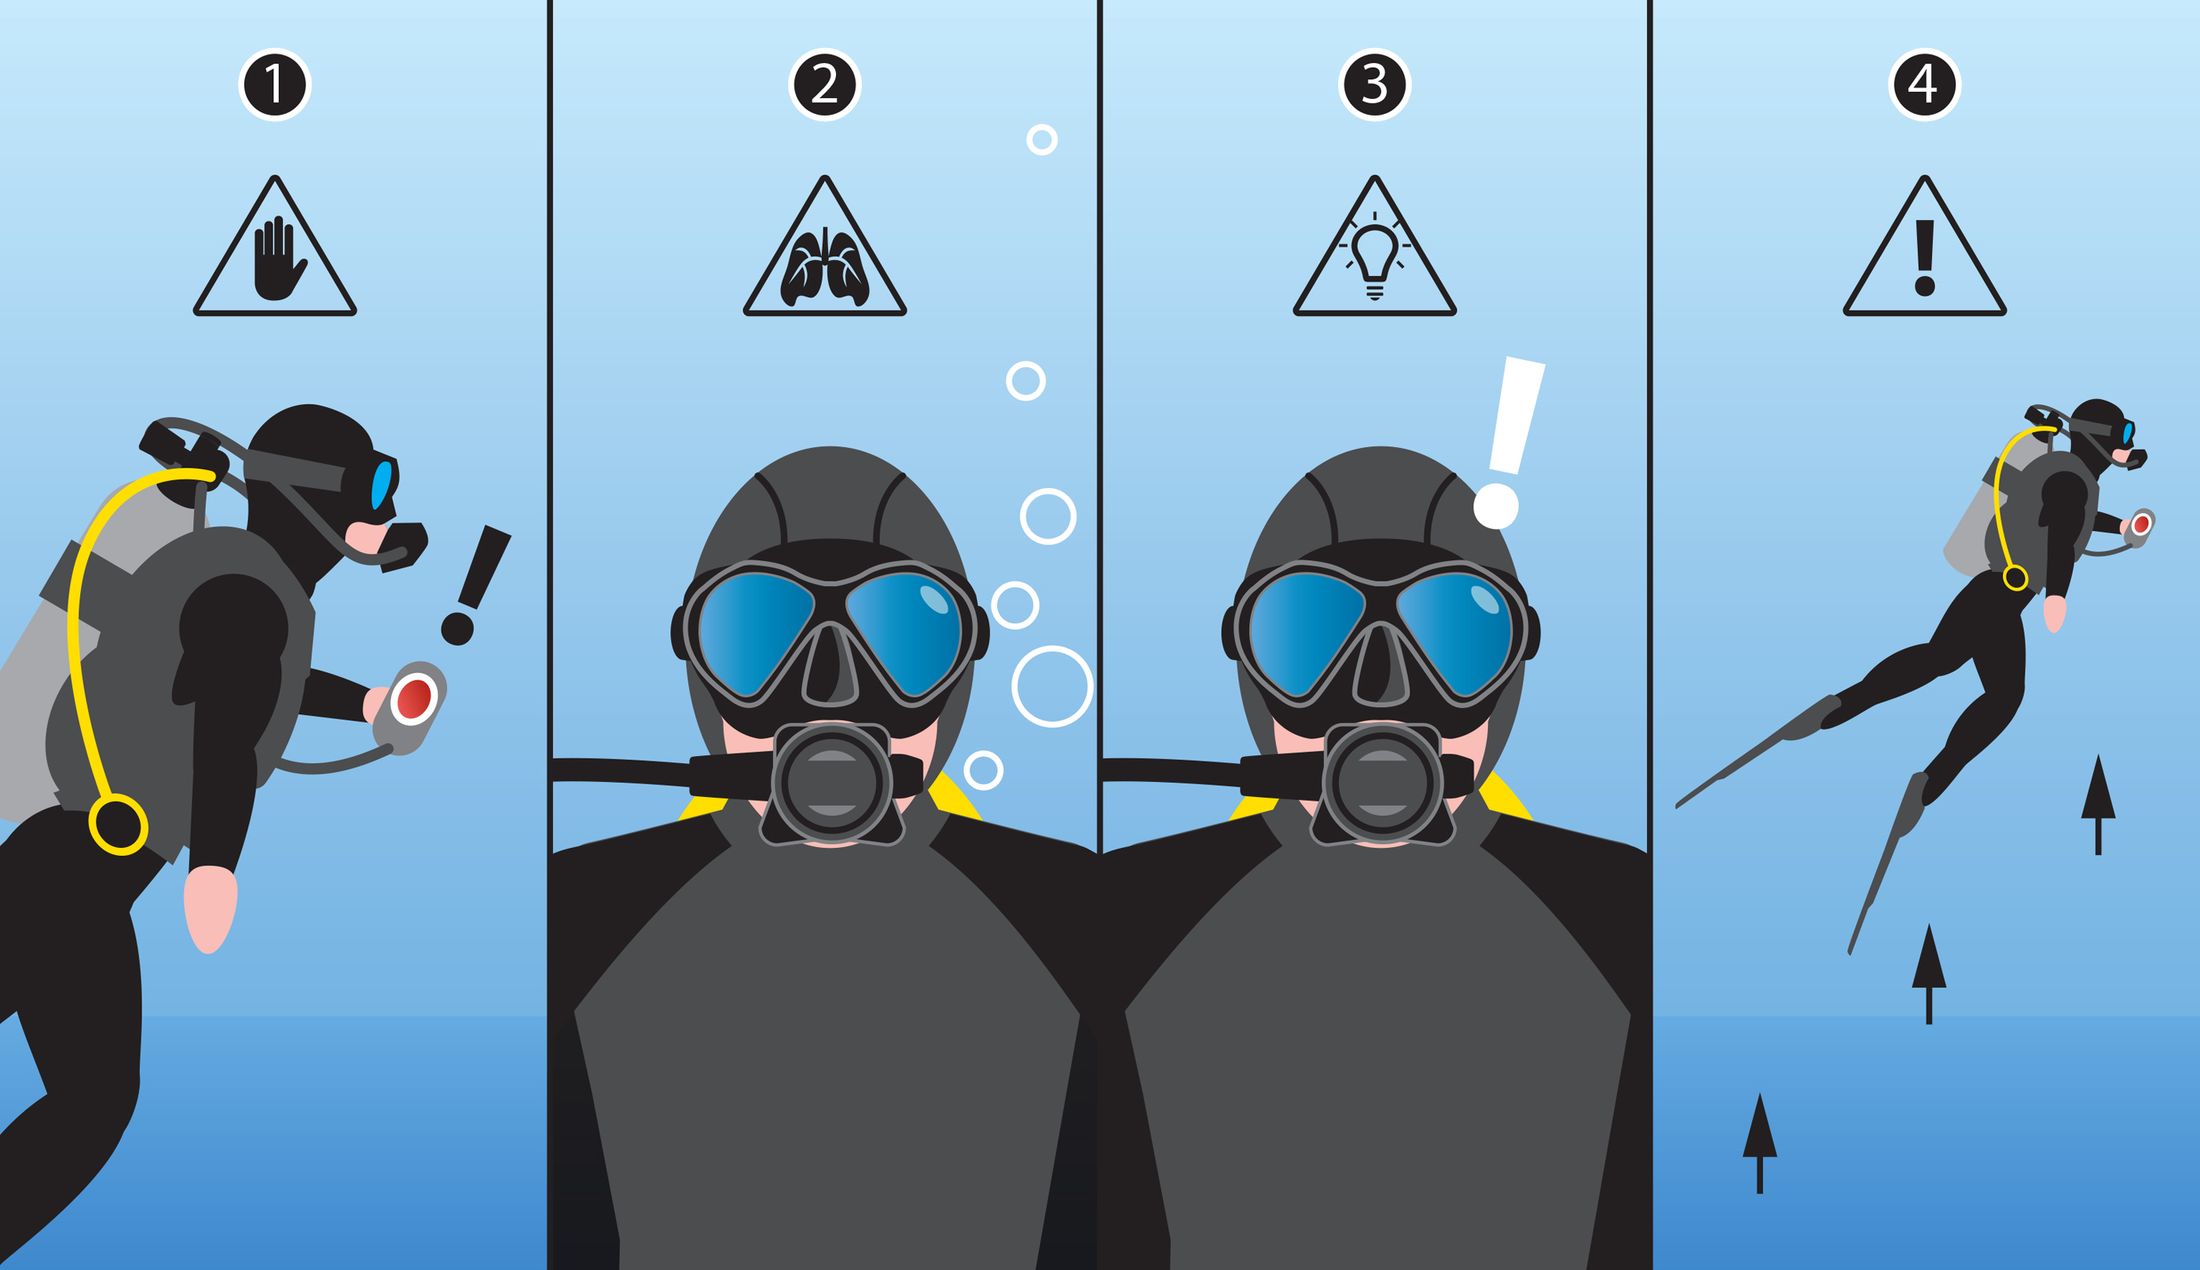
bang the cylinder with your diver's tool, or use a
shaker – both heard from a distance.
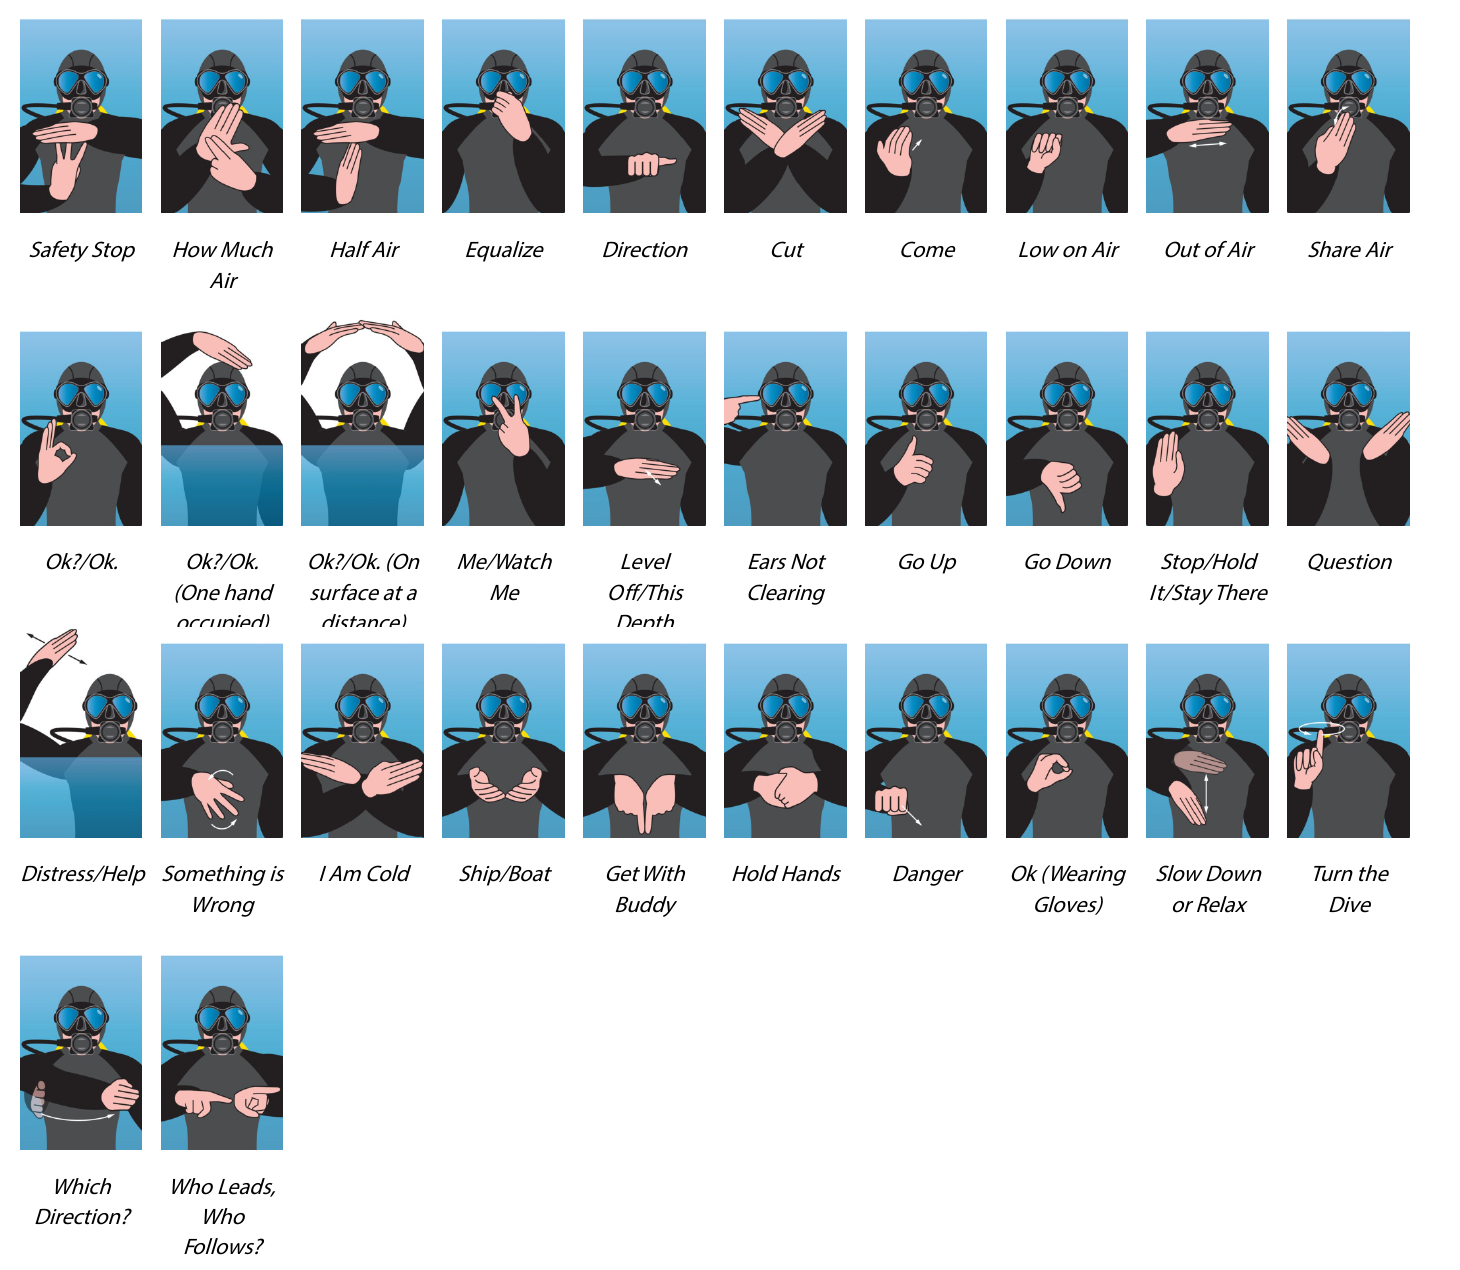
Signals in the chart: safety stop · how much air · half air ·
equalize · direction · cut · come · low on air · out of air · share air
· OK (normal / one hand occupied / on the surface at a distance) · me,
watch me · level off, this depth · ears not clearing · go up · go down ·
stop, hold, stay there · question · distress/help · something is wrong ·
I am cold · ship/boat · get with buddy · hold hands · danger · OK with
gloves · slow down/relax · turn the dive · which direction? · who leads,
who follows?
Key signals (as shown in the chart):
Signal
How
OK?/OK
Thumb and index finger form a circle
OK at the surface
One hand on top of the head (other hand busy), or both arms forming
an O over the head (at a distance)
Distress / help (surface)
Wave one arm side to side over your head
Go up / go down
Thumb up / thumb down
Stop / hold
Flat hand, palm out
Something is wrong
Flat hand rocking side to side
Low on air
Fist on the chest
Out of air
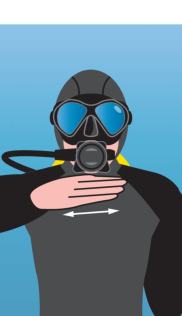
Flat hand moving across the throat
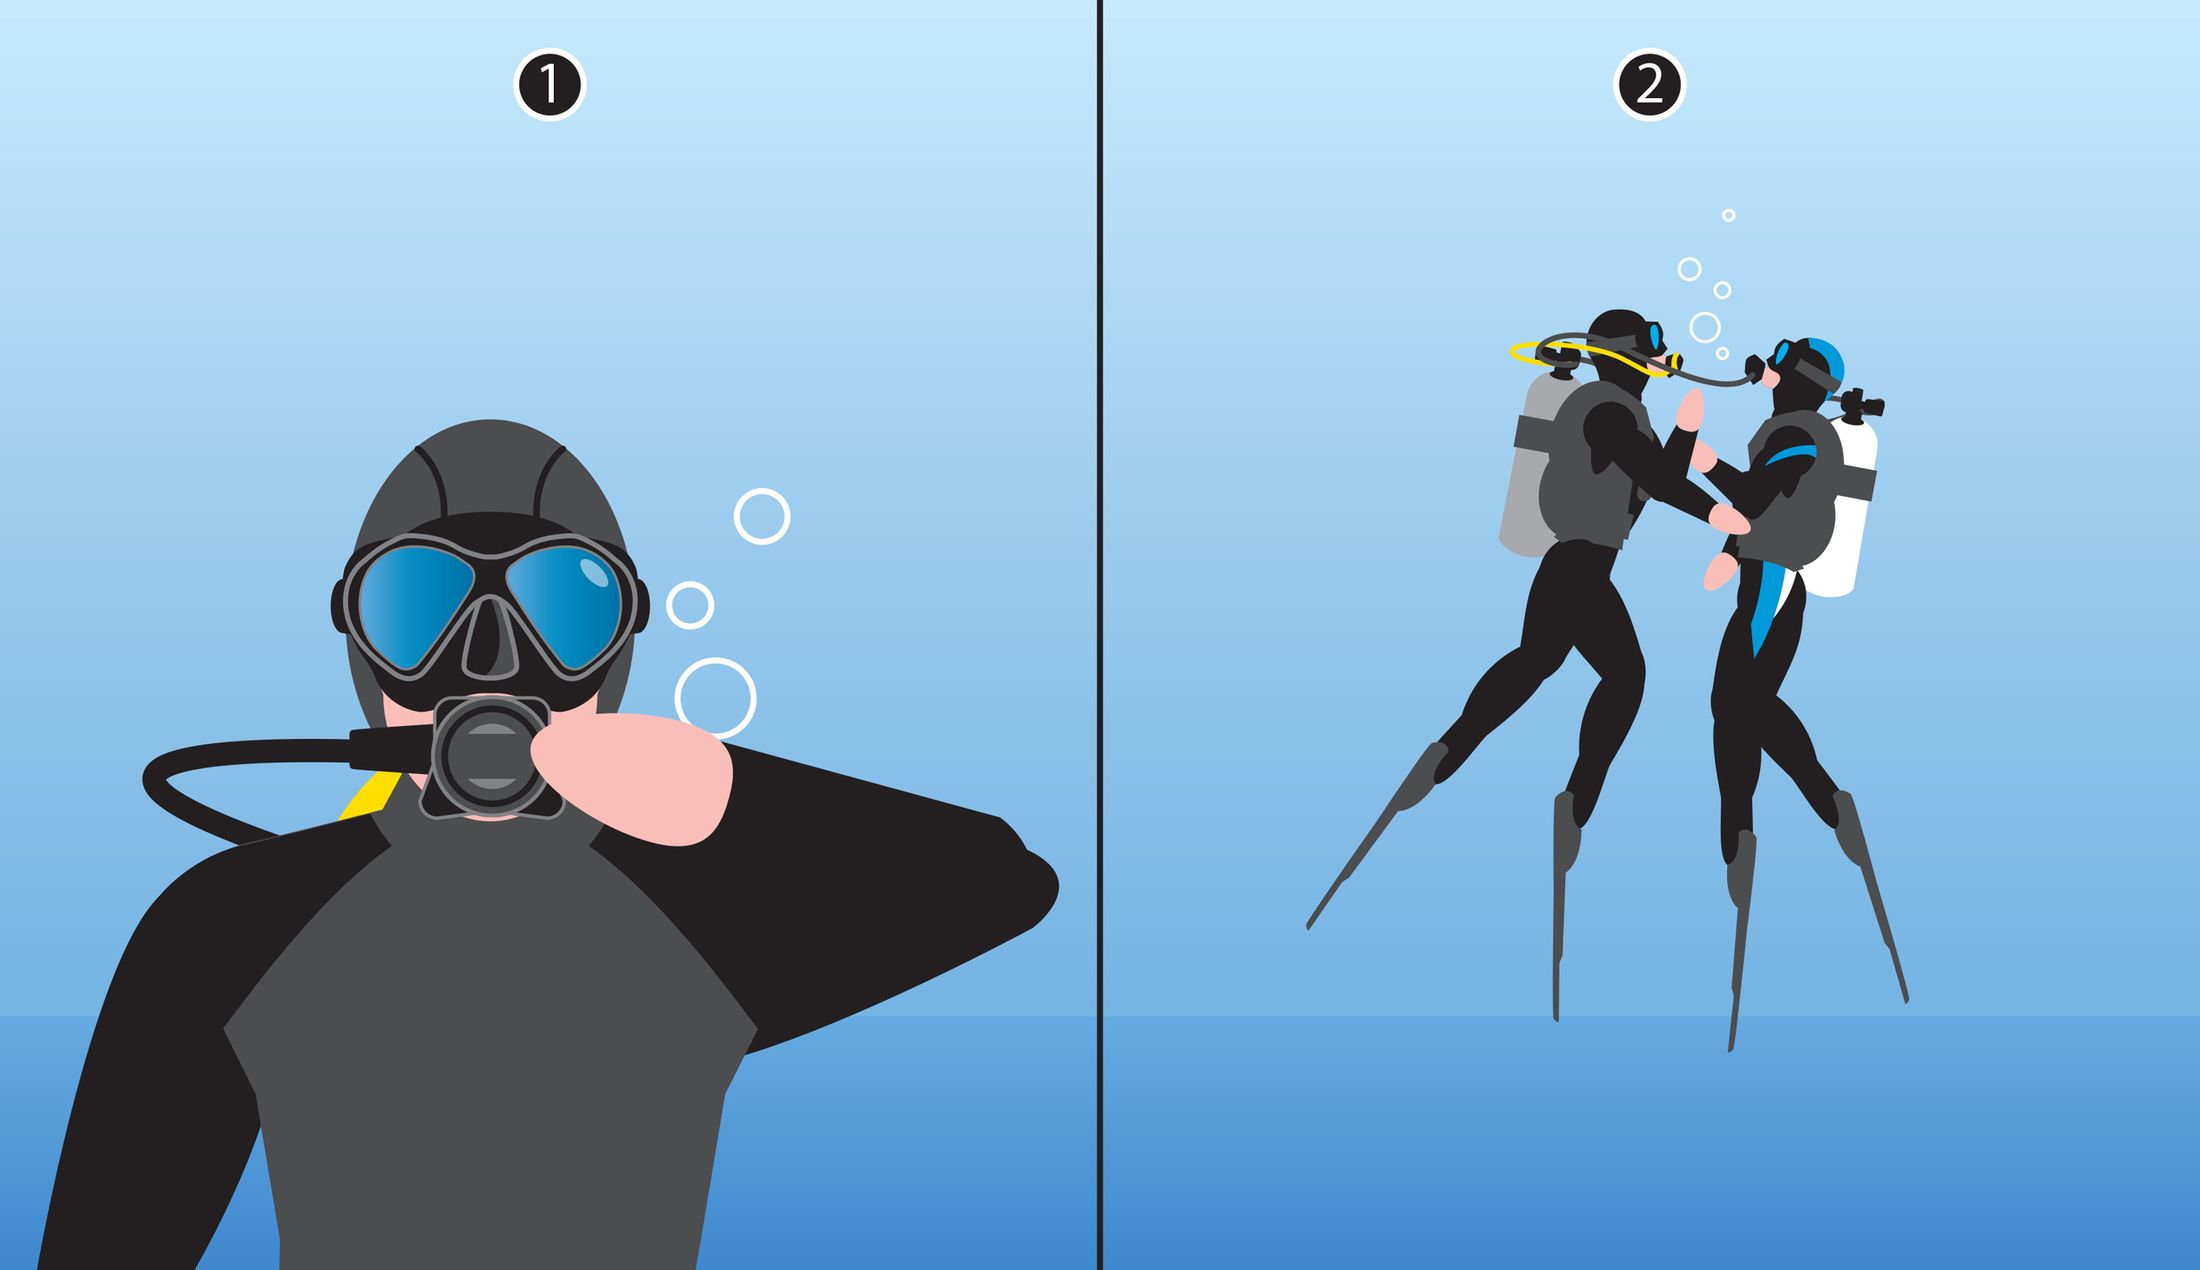
Share air
Fingers pointing to the mouth/regulator
Ears not clearing
Point to the ear
Equalize
Pinch the nose
Level off / this depth
Flat hand, palm down, moving sideways
Safety stop
Flat hand above three raised fingers
Me / watch me
Two fingers pointing at your eyes
Section
2 – Using Your Life Support Equipment Underwater
Heat Loss in the Water (p.
43–44)
Any water below 37 °C can lower your core
temperature → hypothermia is easier than you think.
Air = insulator, water = conductor: 21 °C feels
fine in a room but chilly in a pool.
Three ways divers lose heat
Way
What happens
External conduction
Body gives off heat directly to the water (molecule to molecule) →
biggest source of heat loss
Internal conduction
Compressed gas cools as it expands → your body warms every breath
you take at depth
Convection
Water keeps moving across your body; warmed water is replaced by
colder water, again and again
Blood shunting: when the body can't keep the brain
and torso warm, it slows blood flow to the arms and legs.
⚠️ Being cold disturbs nitrogen uptake and release
(Section 3) → stay warm on every dive.
Nitrogen build-up is controlled by time, depth and ascent
rate.
The Exposure System (p. 44–46)
Three key features of a good suit: thickness, fit, seam
integrity
Thickness → stops heat loss by
conduction (external and internal)
Fit + seams → stop heat loss by
convection
Then add layers as needed: rash guard → fleece →
wetsuit (any thickness) → drysuit.
Hoods, gloves and boots = 30–40 % of your thermal
protection (most heat escapes through head, hands and
feet).
Wetsuit
Best wetsuits use evenly blown neoprene with
closed cells of air or nitrogen. The gas
bubbles insulate, not the rubber.
Nitrogen cells are denser and compress less → they
stay warm better. More nitrogen = warmer.
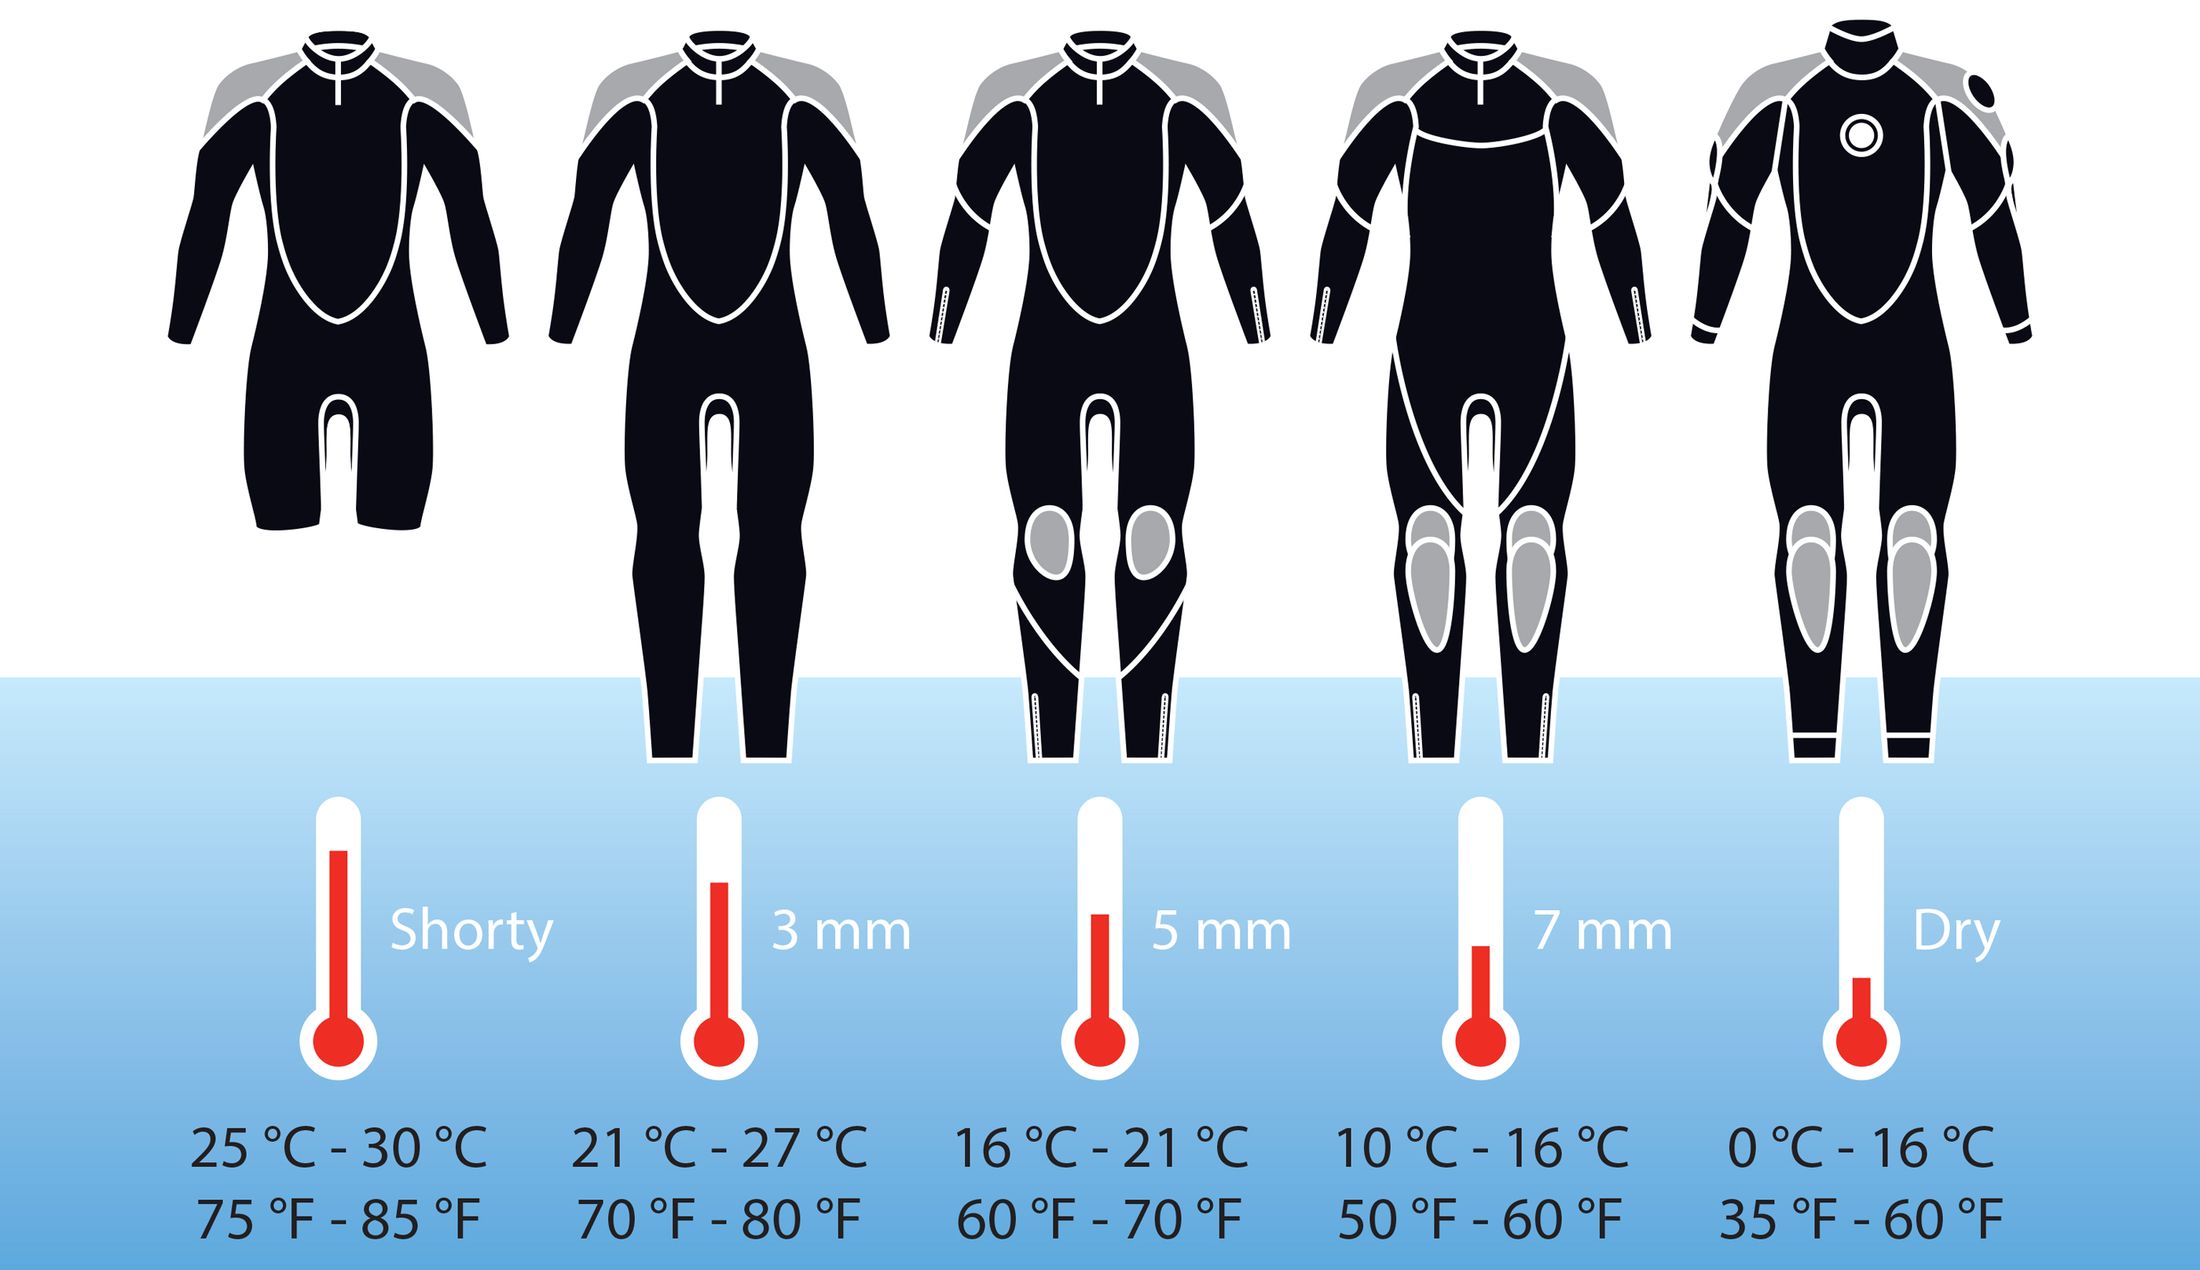
Suit guide by water temperature:
Water temp
Suit
25–30 °C
Shorty
21–27 °C
3 mm full suit
16–21 °C
5 mm
10–16 °C
7 mm
0–16 °C
Drysuit
Drysuit
For cool to cold water.
Air goes in through an inflation valve (fed by an
inflator hose from the regulator first stage), for
warmth and to prevent suit squeeze.
⚠️ On ascent, let air out through the exhaust
valve.
Diving dry is very different from wet → Drysuit specialty.
Suit care
After diving: soak in wetsuit shampoo, hang to
dry.
Never store folded or compressed → permanent
creases break the bubbles and create cold spots.
Store on a wetsuit hanger, cool and dry. A
well-cared-for wetsuit lasts about 5 years.
Developing Proper
Breathing Patterns (p. 46–48)
Breathing underwater is the same as on land. Excitement may speed it
up at first; with comfort it slows down.
Regulator = automatically lowers cylinder pressure
to ambient pressure.
Recreational scuba = open-circuit demand system
Demand: air flows only when you inhale
Open circuit: exhaled air is released into the
water (lost)
Rebreathers (closed circuit) recycle the gas →
longer dives, no bubbles → separate course.
The regulator must give a "sufficient amount of gas at
ambient pressure". How much is sufficient depends on
environment, workload and physical condition.
Best breathing pattern
Deep inhalation + even exhalation → deep, balanced,
rhythmic, continuous (no pause, no breath-holding). Relax; it
becomes automatic with experience.
Air consumption
Situation
Air use
At rest
6–12 L/min
New diver, warm & comfortable
12–15 L/min
Example: 12 L cylinder × 200 bar = 2400 L; at
15 L/min at the surface → lasts 160
min.
Air use can go up 3–4× because of: heavy
work, cold (poor thermal protection), poor fitness, wrong reaction to
stress/anxiety.
Sharing air with another diver → 2× or more.
Cylinders are filled to 150–300 bar → still a
limited supply.
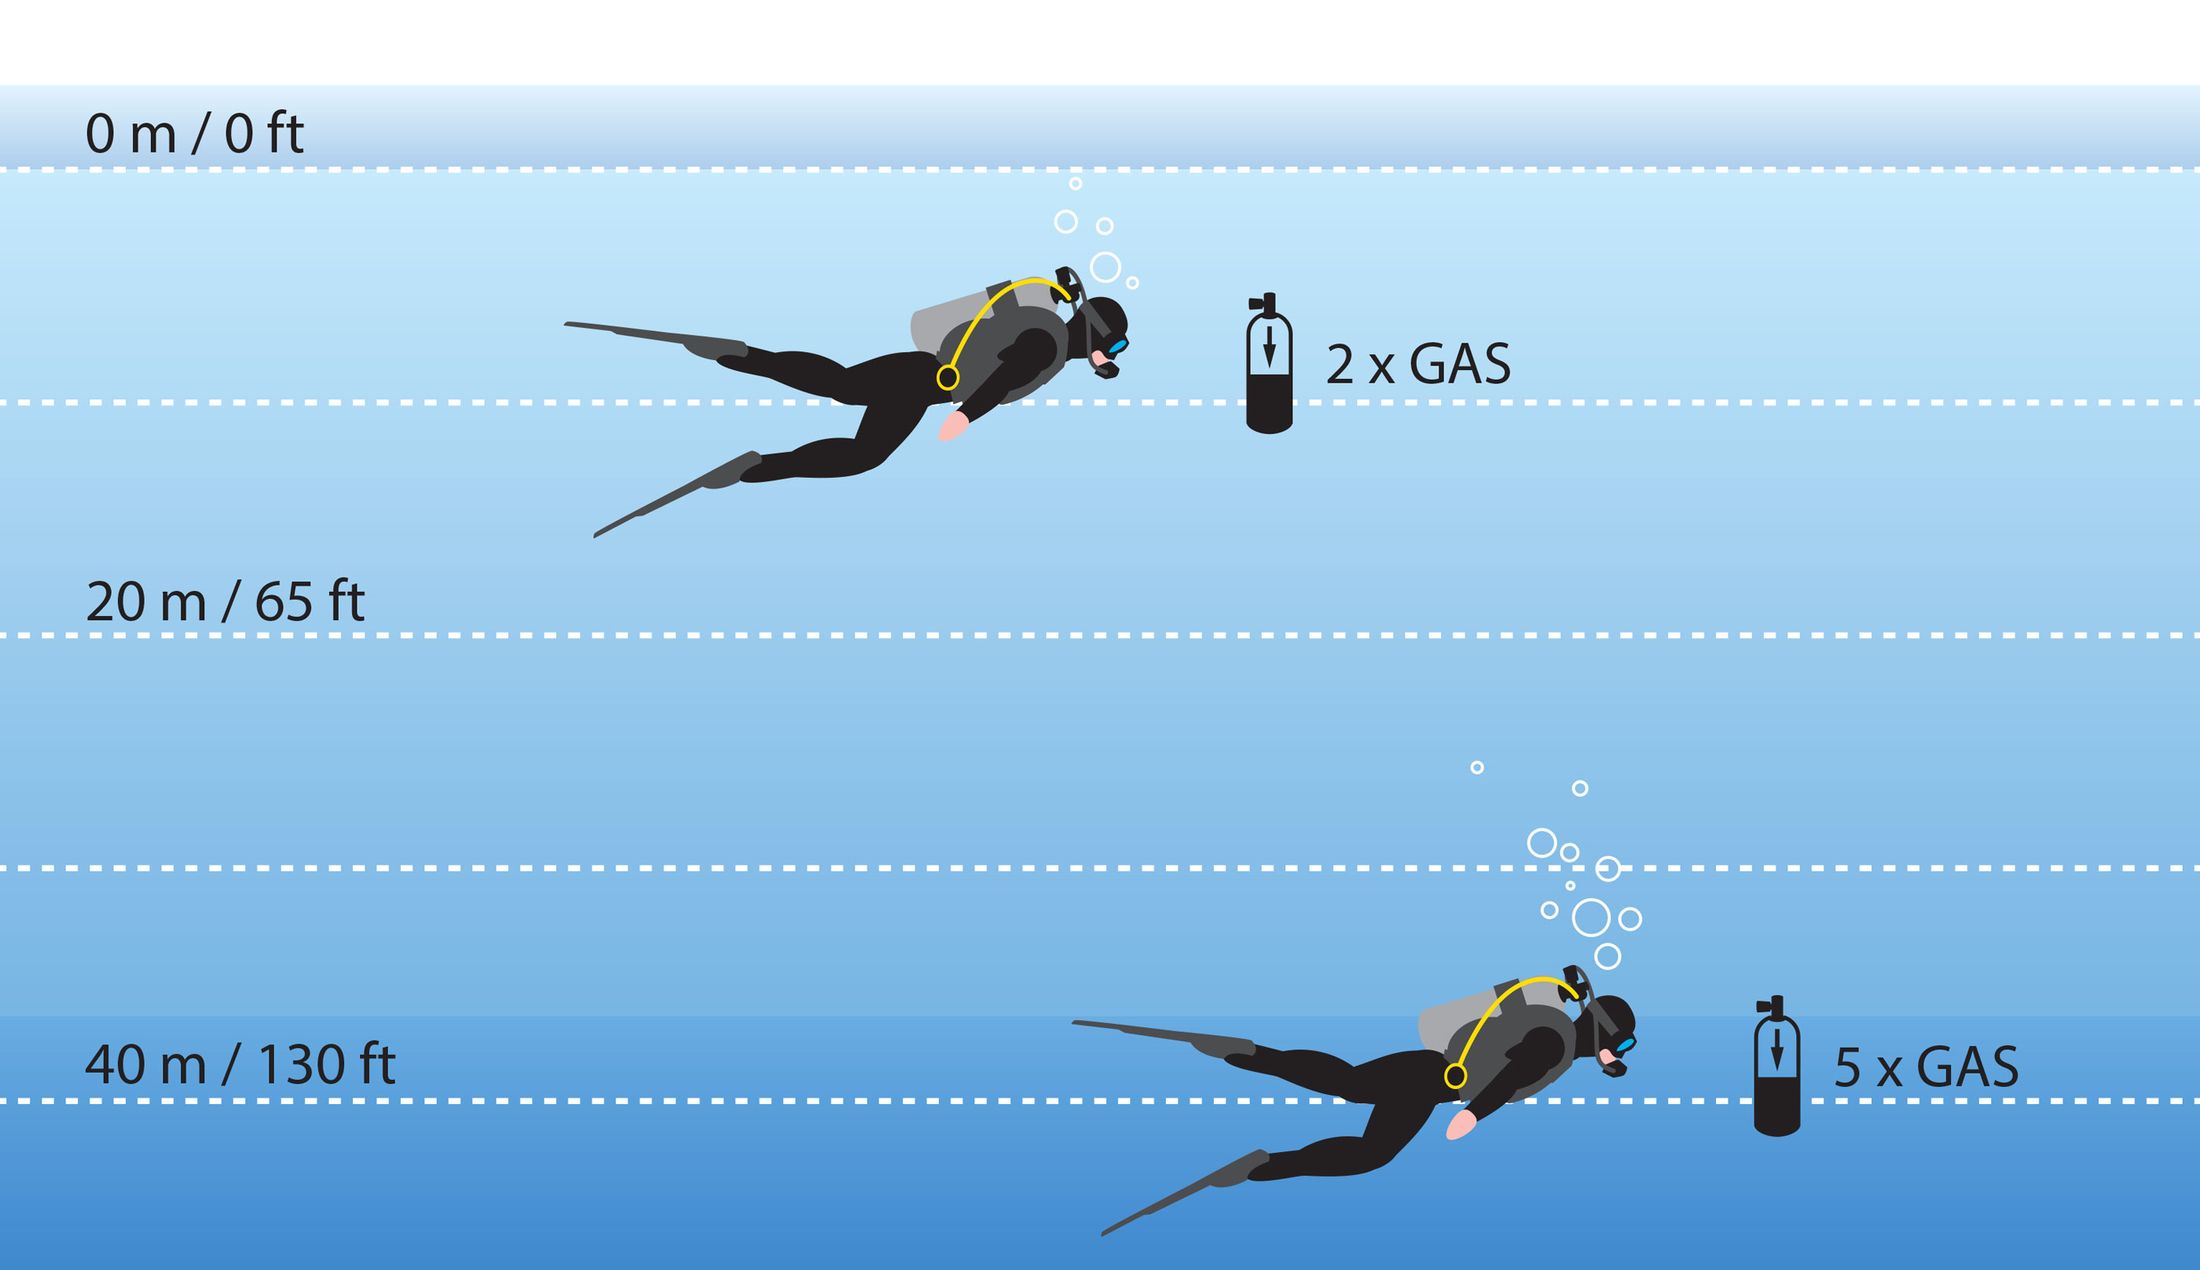
Depth and air use (Boyle's
Law)
Air use rises in direct proportion to absolute
pressure:
10 m = 2 bar → 2× surface use
40 m = 5 bar → 5× surface use
Comparing two depths = ratio of their pressures (e.g. 4 bar
vs 2 bar → 2× as much air).
Regulator and body position
A good regulator must deliver enough air at depth whatever
the cylinder pressure. Cheap ones breathe harder under heavy
demand or as cylinder pressure drops.
Choosing the regulator = the most important
decision when buying a Delivery System.
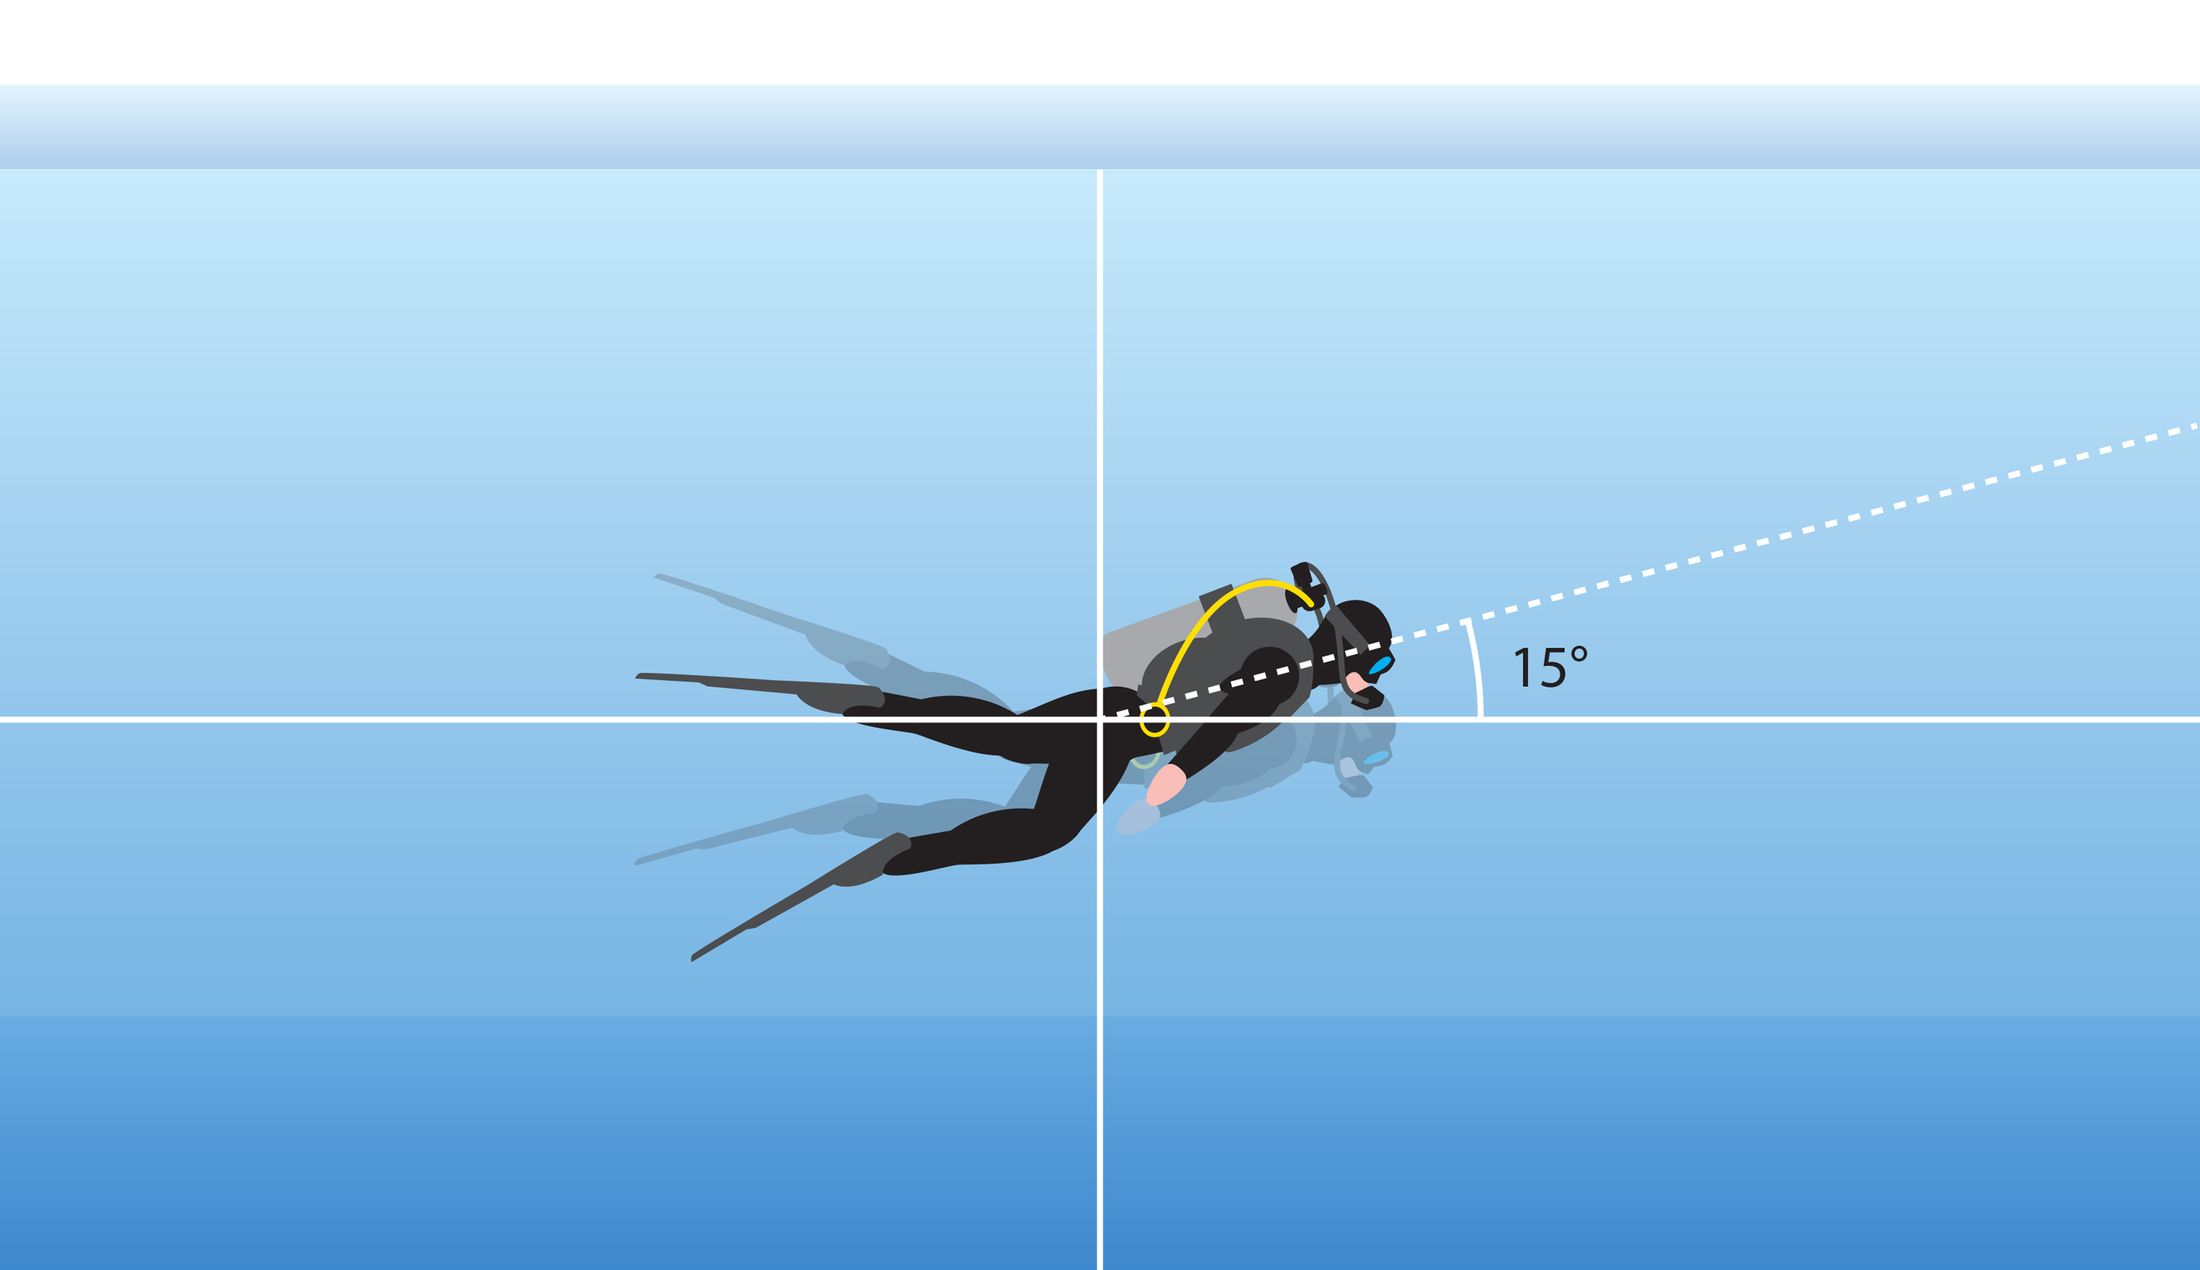
Swimming attitude: 15–20° above horizontal → mouth
and lungs level = easiest breathing (BC helps you hold it, Section
4).
The Delivery System (p. 48–53)
SCUBA =
Self-Contained
Underwater Breathing
Apparatus = the Delivery System of the
Total Diving System.
Delivery System = regulator + alternate air source +
high-pressure cylinder.
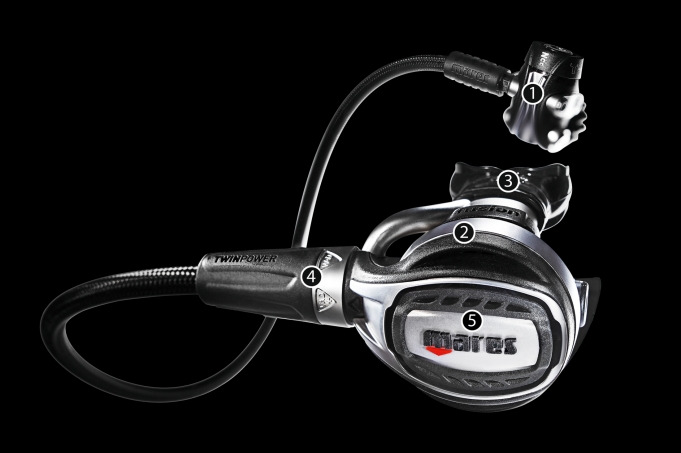
Regulator
Part
Function
First stage
Lowers cylinder pressure to about 10 bar above
ambient. Types: unbalanced, balanced,
dual-balanced, over-balanced → best regulators have a
balanced type
Second stage (primary)
Lowers the 10 bar over ambient to ambient
pressure → what you breathe
Alternate second stage ("octopus")
Brightly coloured, longer hose,
for sharing air in an emergency; held on the BC with a mounting
clip
Integrated alternate
Alternate second stage combined with the BC inflator
hose → one hose less
Cold water
Alternate should be a completely separate regulator
(1st + 2nd stage) on a second valve outlet or a separate cylinder
⚠️ Fill only with clean, filtered compressed air or
nitrox (with training). Never pure
oxygen underwater (Section 3).
Nitrogen limits you: narcosis below ~30 m, and
decompression sickness limits time at depth.
Enriched air nitrox = less nitrogen → specialty
course.
Cylinder valves
Two types (same as the regulator): INT/yoke and
DIN, both with an on/off handle.
⚠️ The valve gives no low-air warning → check your
pressure often and surface with at least 50 bar.
⚠️ Burst disc (required on all valves): breaks at
about 1.5× the working pressure → protects against
overfilling or heat (a car trunk can reach 90 °C →
pressure rise could make a cylinder explode).
Sizes
Steel or aluminium; pressures 150–300
bar; volumes 1–18 L.
Most common: aluminium, 12 L, 200 bar, about 18
kg.
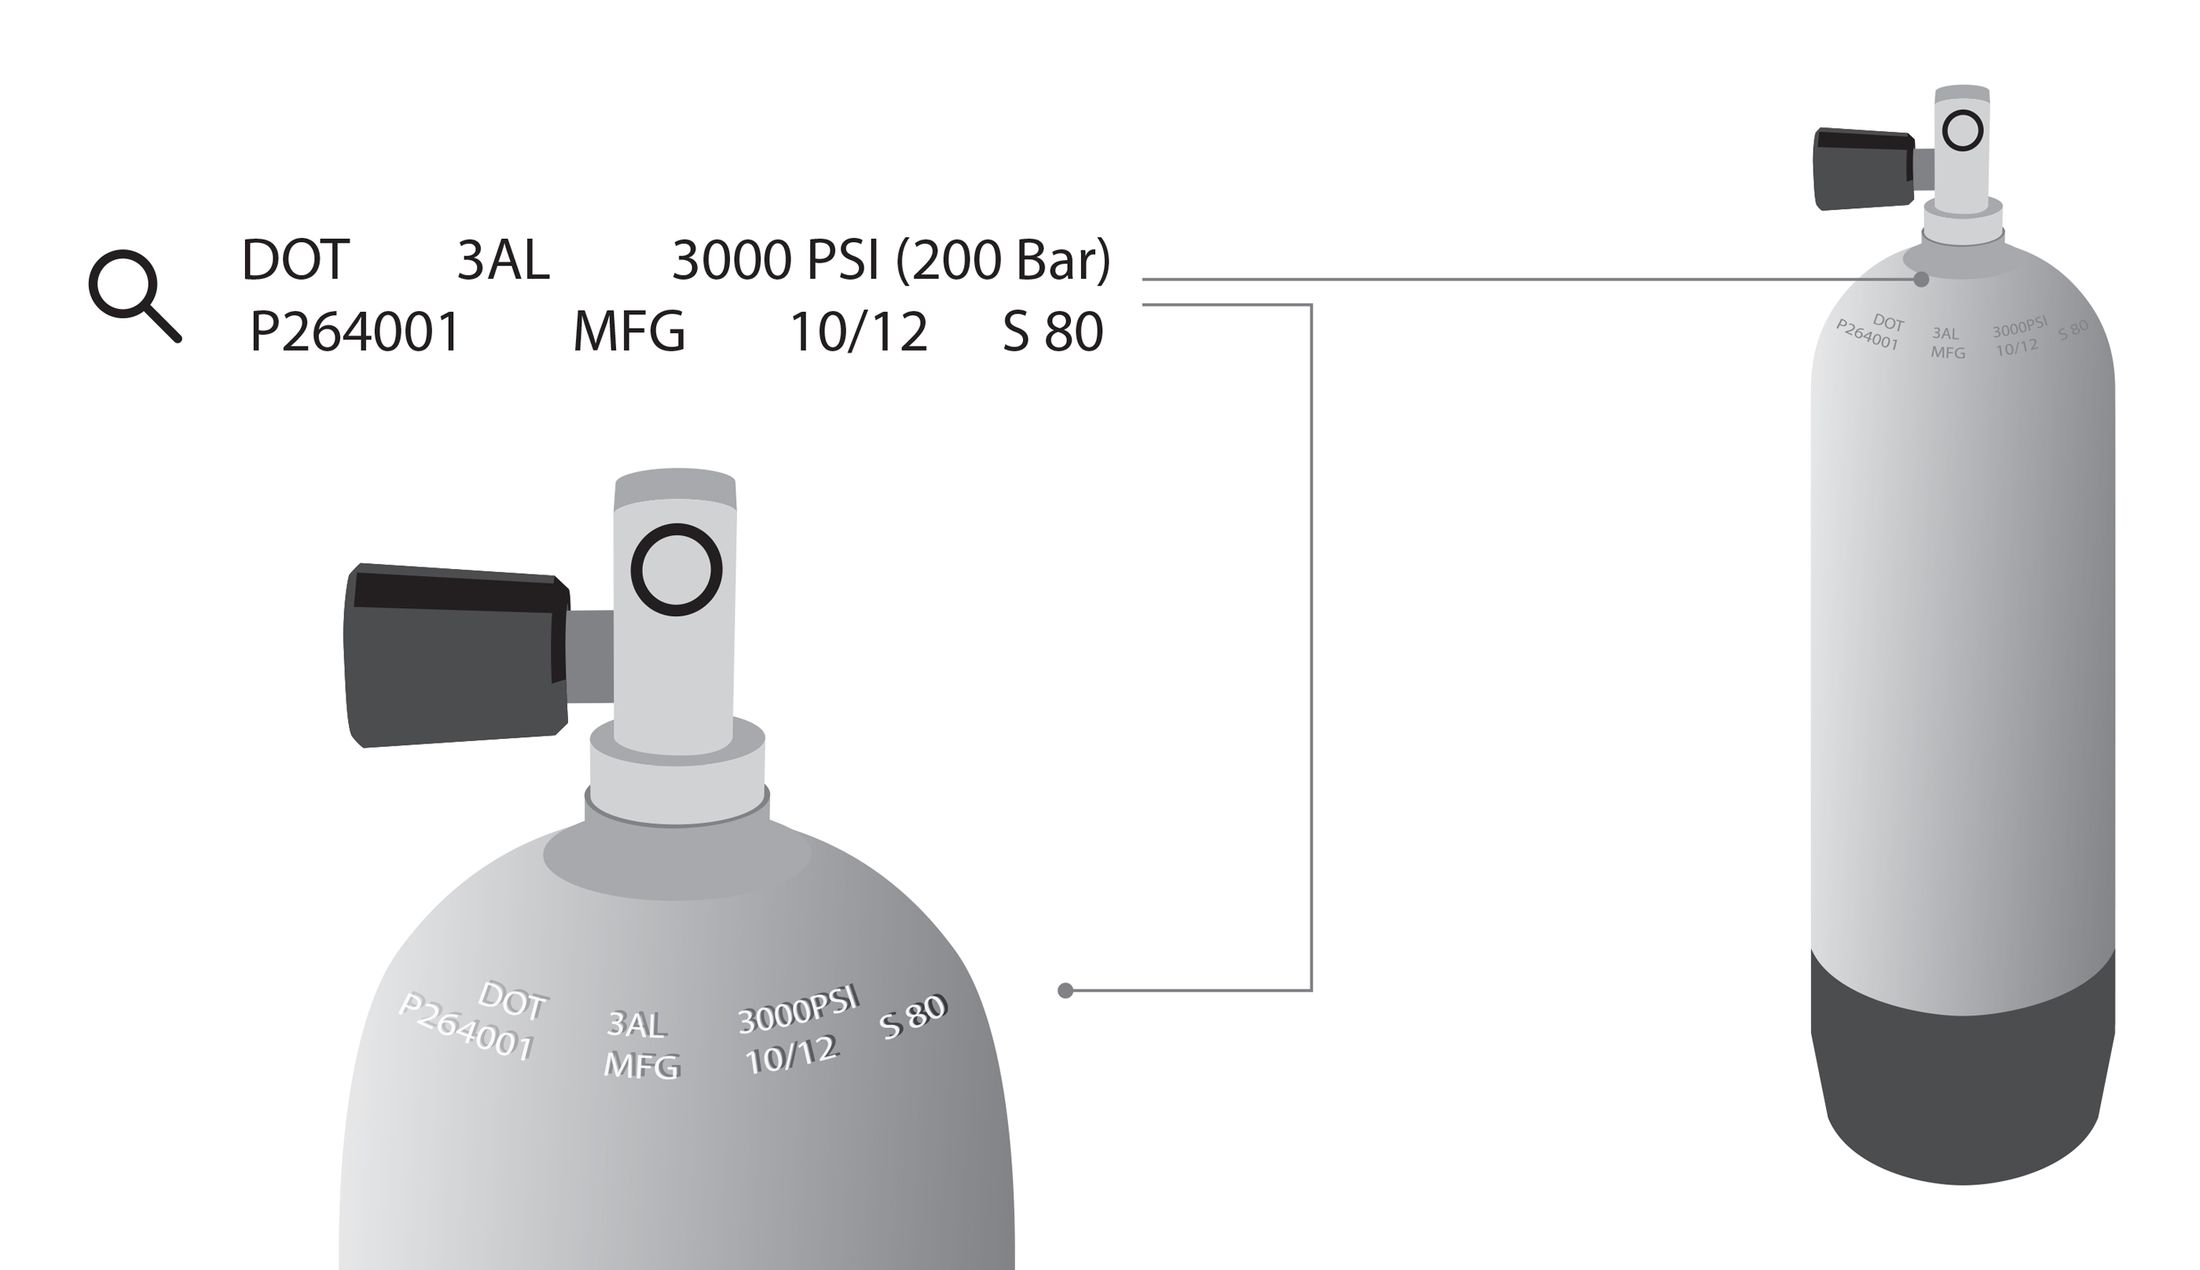
Cylinder markings (on the
neck)
Show material, manufacture date, size and pressure.
US example:
Marking
Meaning
DOT (USA) / CTC (Canada)
Authority that regulates making and testing of HP cylinders
3AL / 3AA
Aluminium alloy / steel
3000
Rated pressure in psi (≈ 200 bar)
P264001
Serial number
MFG
Manufacturer
10/12
Date made (month/year)
S 80
Holds 80 cubic feet of air at 3000 psi
Markings on older or specialty cylinders may differ by country.
Caring for the Delivery
System
Rinse in fresh water after every dive, especially
salt water.
⚠️ Put the dust cap on the first stage and
don't press the purge while rinsing → water gets in →
corrosion.
Never store an unwashed regulator in the dive bag (salt build-up).
Store cool, dry, out of the sun.
Don't bend or stress the hoses, especially where they enter
the first stage.
⚠️ Service once a year, however little you dive:
seals pressed against metal wear out even in storage. Service replaces
O-rings, seats and seals.
Service sleeve on the regulator = record of the
date of the last service.
Caring for the cylinder
Moisture inside → corrosion weakens the walls, and
you can't see it from outside.
Test
When
What it does
Hydrostatic test ("hydro")
At intervals set by local law
Measures how elastic the walls are → shows fatigue. Pass → test date
+ tester code stamped on the neck. Fail → cylinder
destroyed
Visual Inspection (VIP)
At least once a year (SSI introduced it in
1970)
Inside and outside check. Fail → hydro required
regardless of date
VIP+
With the yearly VIP
Also checks the valve and the
threads (contamination, stress cracks)
⚠️ SSI centres won't fill a cylinder without a
current hydro and visual date.
⚠️ Most important: keep moisture out → never empty it; keep
at least 30–50 bar inside.
Store cool, dry and secured so it can't fall. In a
car: bottom forward, secured so it can't roll.
The Information System (p.
54–58)
Helps you plan and follow your dive plan.
Components: dive computer + analog instruments (if the
computer doesn't give everything) + logbook.
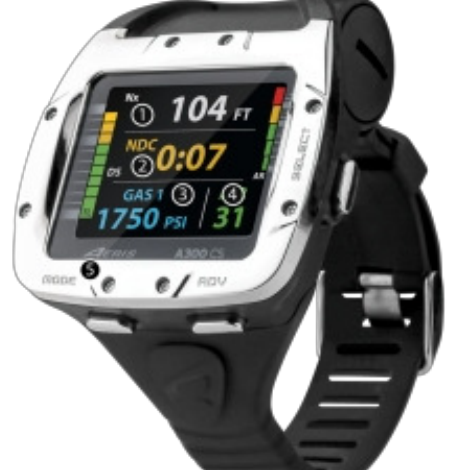
Dive computer
Switches on automatically in the water; records
depth, time, temperature (some also remaining
air time). At the surface it tracks your surface
interval.
Types: wrist, air-integrated, air-integrated hoseless, watch style.
Most can download dives to a PC/Mac.
Feature
What it does
Planning mode
Shows no-decompression times for planned depths and
the current surface interval
Dive mode
Shows depth, actual bottom time, remaining no-deco
time; warns of fast ascent; tracks
residual nitrogen for repeat dives; air-integrated →
remaining air time
Logbook mode
Stores the last 5–100 dives (depth, time, temp,
alarms, altitude)
Alarms
Audible + visual: max depth, ascent too fast, near
no-deco limit, low battery, (air-integrated) low
air
Time to fly / altitude
How long to wait before flying; adjusts limits for
altitude diving
PC integration
Download and analyse dives, air use
Computers are the most efficient way to dive → ⚠️ read the
manual thoroughly before diving with it.
Analog instruments
Instrument
Key facts
SPG (submersible pressure gauge)
Your "fuel gauge": shows gas left. Connects to the
high-pressure port of the first stage. ⚠️ Check
often
Depth gauge
Calibrated in msw (metres sea water); some have a
max-depth indicator and altitude compensation.
Digital is more accurate
Timing device
Computer (most common), dive watch (set the
one-way bezel at the start of the dive) or dive
timer (starts/stops automatically by pressure, also logs
surface time). Watch rated to at least 100 m or, better, 20
bar
Compass
Shows direction when you can't navigate by natural features, and the
way back
Thermometer
Record temperatures to predict conditions and suit needs; often
built into computers
Compass types:side-reading (read
from top or side) · top-reading navigational (accurate
headings, return navigation) · digital (more
information, but needs a battery).
⚠️ Metal (wrecks, mineral deposits) can make a
compass point the wrong way.
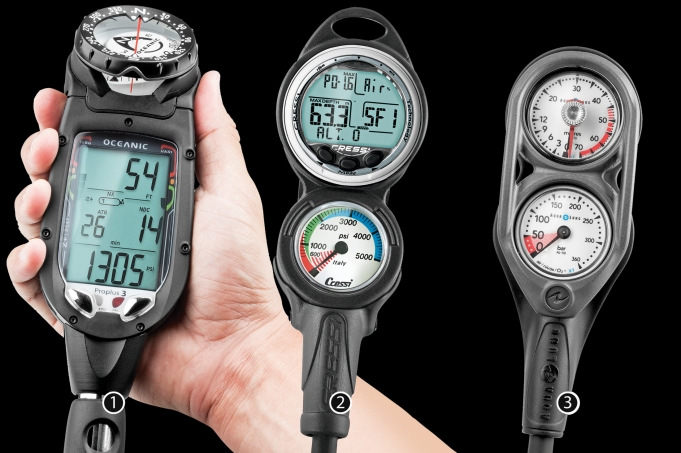
Three common configurations
#
Contents
Note
1
Air-integrated computer + compass
Best information, everything at a glance
2
Non-air-integrated computer + analog SPG +
compass
Most common
3
All analog gauges (± compass)
Traditional, rarely used now
Logbook
Permanent record of your training and dives →
proves experience, helps you evaluate and improve
dives.
Also available as a paper version or cordura binder (equipment
section, maintenance records, medical info).
The Concept of Buoyancy (p.
58–59)
Good buoyancy control = easy, safe dive. Many serious diving
problems come from poor buoyancy control.
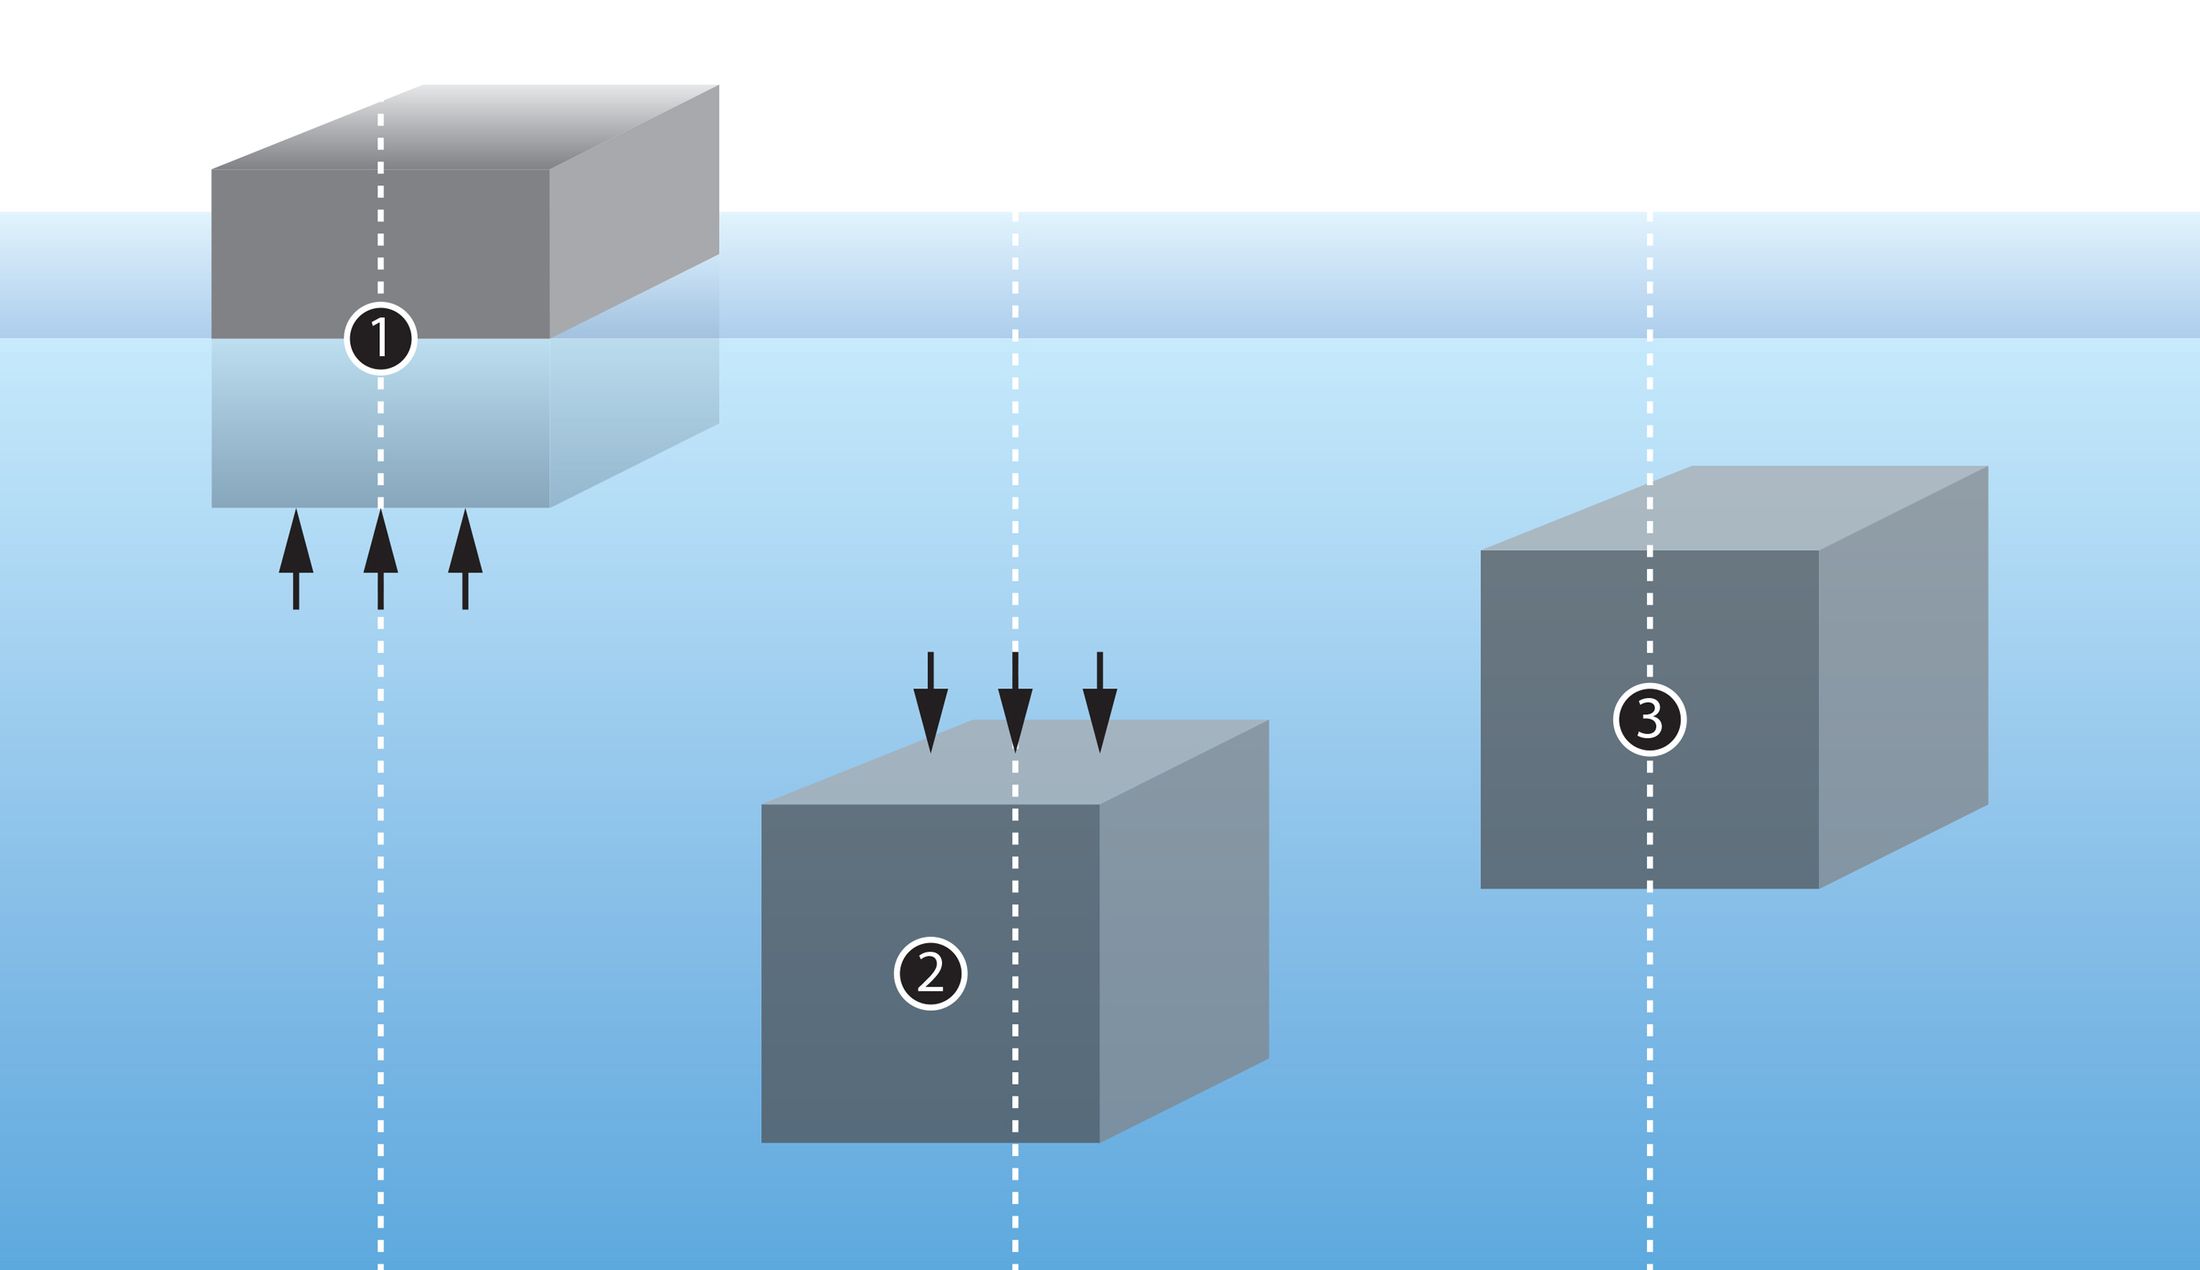
Buoyancy = a fluid pushing up on
an object in it.
Archimedes' Principle: an object in a liquid is
pushed up by a force equal to the weight of the liquid it
displaces.
Density = weight per volume. Denser liquid
→ more buoyancy.
Salt water 1.025 kg/L vs fresh water 1
kg/L → you float more easily in salt water.
Light, large object → floats. Heavy, small object → sinks.
Buoyancy
Object weighs… than the water it displaces
Result
Positive
less
Floats
Negative
more
Sinks
Neutral
the same
Hovers, neither sinks nor rises
The Buoyancy System (p. 60–63)
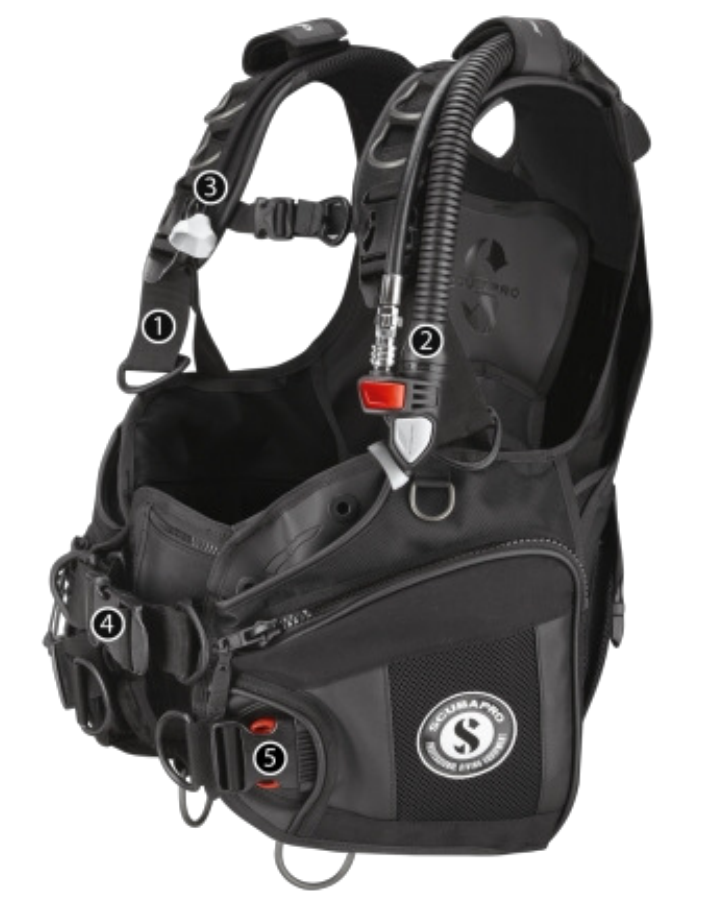
Buoyancy System = BC (with inflator) + weight system
(weight belt or BC weight pockets).
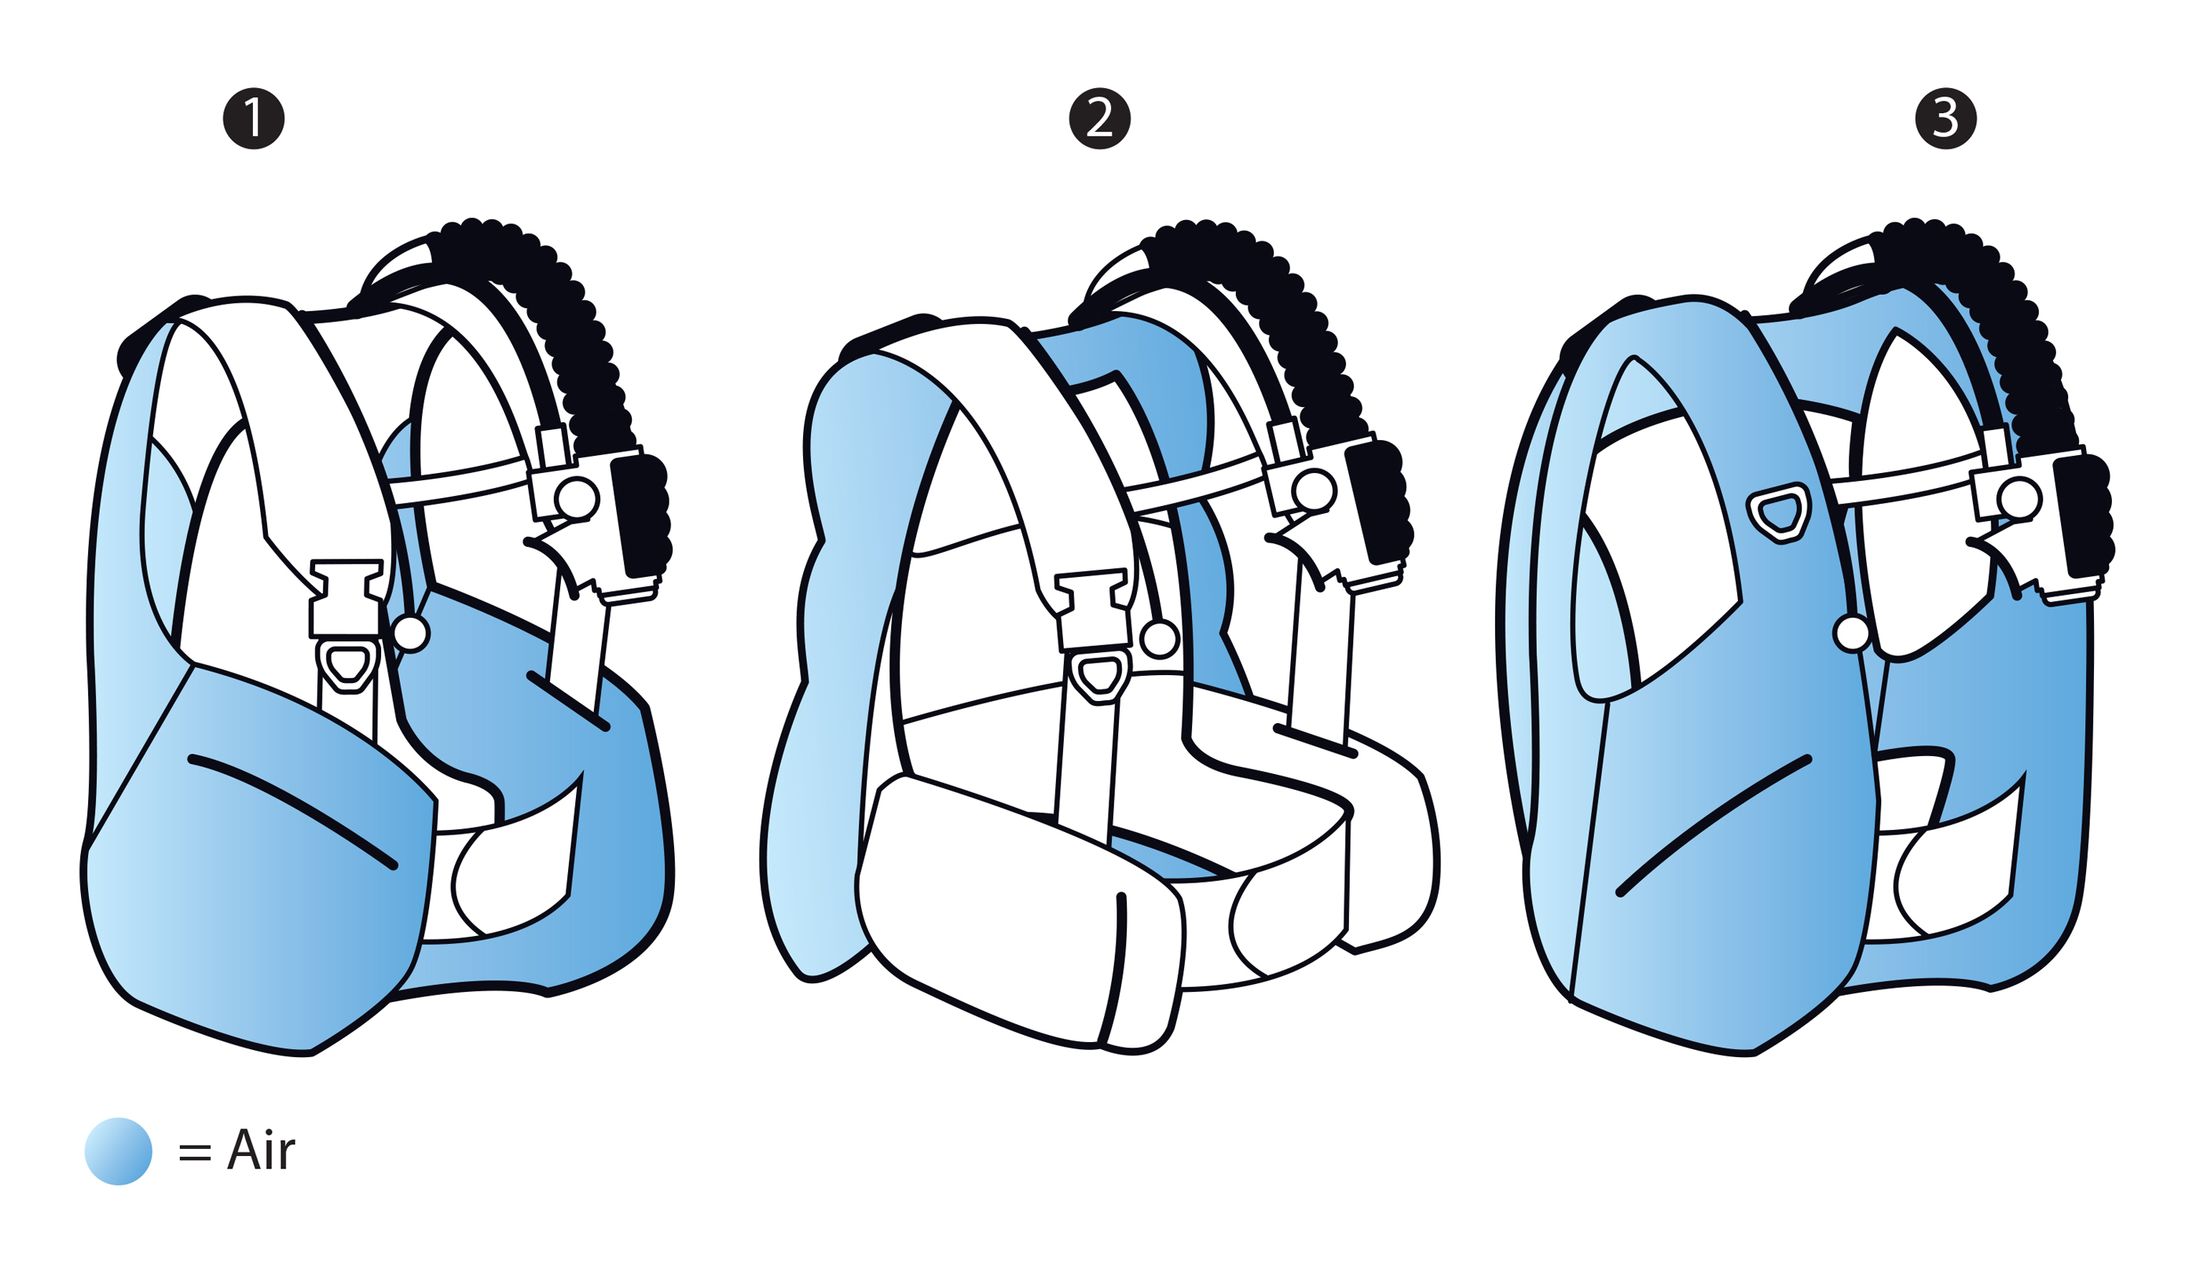
Buoyancy Compensator (BC)
What it's for:floating at the
surface, controlling descent and ascent,
staying neutral during the dive.
Descend: let air out slowly.
At depth: your suit compresses → add small amounts of
air to stay neutral.
At the surface: fill the BC → positive
buoyancy.
Most important choice: fit and lift (enough lift to
keep a fully equipped diver afloat at the
surface).
Made of coated nylon; styles: single/double
bladder, back-mount (wing), hybrid.
Inflate: by mouth (oral inflator)
or power inflator (low-pressure hose from the first
stage, press button).
Deflate: deflate button on the inflator or
pull dump valve. Dump / overpressure
valves at shoulder and back (back valve lets air out when
you're head-down).
⚠️ Air rises to the highest point of the BC → to
deflate: get vertical, hold the inflator up
high, press deflate (or pull the dump).
Some BCs have pneumatic inflate/deflate controls that work in the
swimming position.
Neutral buoyancy → you move effortlessly and
use less air.
Weight system
Weights offset the positive buoyancy of your body and
suit.
⚠️ Belts and pockets must release easily in an
emergency.
Weight belt:right-hand release;
to ditch: release, hold it away from your body, drop
it.
Weight-integrated BC: weights in
quick-release pockets, no belt; holds you in the right
swimming attitude.
⚠️ Don't overweight. Good buoyancy is the best way
to protect the environment (you won't touch the reef).
BC care
After diving: run fresh water into the bladder
(through the inflator), swirl it upside down, then drain through
the oral inflator with the BC upside down. Use BC
cleaner from time to time (removes salt crystals).
Remove the weights before washing a
weight-integrated BC.
Store 1/3 inflated on a BC hanger, cool and
dry.
⚠️ Service once a year (airway, bladder, inflator),
however little you dive.
The SSI Equipment
Service Program (p. 63–64)
Purpose: keep all components of the Total Diving
System working at their best (optimal)
performance.
Take your logbook to every service so the
technician can record it (useful when you upgrade).
System
Components
What the service covers
Delivery
Regulator, alternate air source, cylinder
1st + 2nd stage fully stripped and cleaned; HP/LP seats, dynamic
O-rings, exhaust valves, HP filters replaced;
performance tested to warranty specs
Information
Dive computer, analog instruments, logbook
Computers, SPGs, depth gauges, dive timers checked for
accuracy; batteries replaced if needed
Buoyancy
BC, inflator, weights
BC checked for leaks, strap tension,
seams; inflator rebuilt; bladder rinsed with
conditioner; overpressure valves tested
Visual Inspection (+ Visual Plus)
Cylinder
Yearly inside/outside check for rust and corrosion
(DOT, CGA, local laws). Visual Plus recommended for
aluminium cylinders (neck and threads)
Exposure
Wetsuit, drysuit
Small wetsuit repairs in-house; drysuit repairs by authorised
technicians
SCUBA Assembly (p. 65–66)
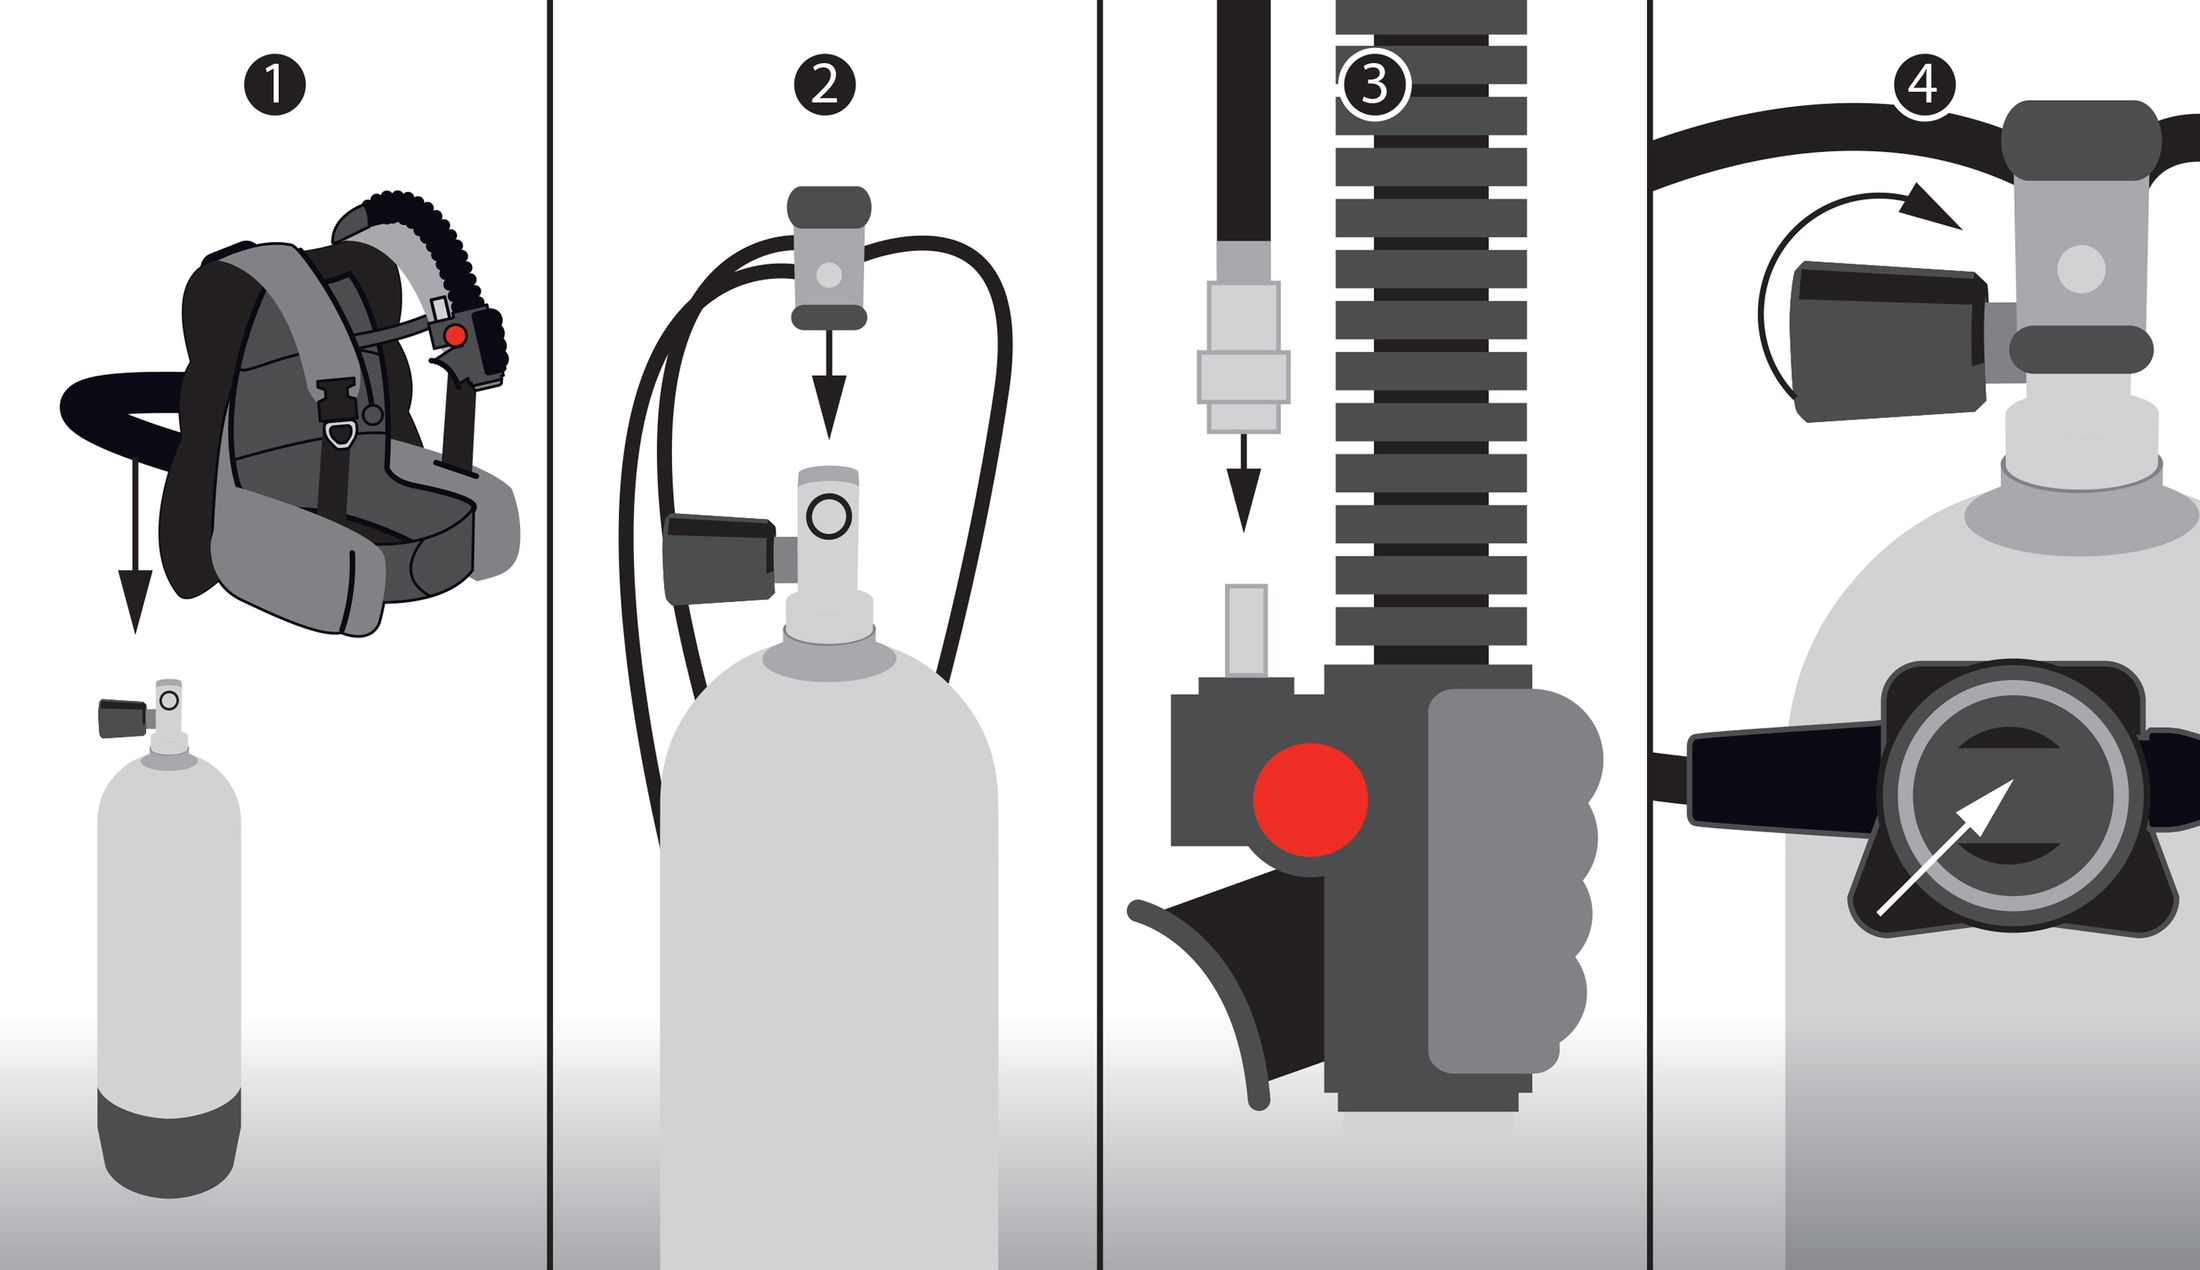
Assembly order:
Soak the BC cylinder strap first → so the cylinder
doesn't come loose underwater.
Cylinder valve faces away from you.
Set the BC height on the cylinder (height strap if
present).
Secure the BC to the cylinder.
Check the O-ring (yoke) or DIN O-ring for
cuts.
Standing behind the cylinder: primary regulator on the
right, Information System on the left; tighten
gently.
⚠️ Before opening the air: inhale gently on the
primary and alternate → you should not be able to
breathe.
Connect the power inflator hose to the BC.
Point the gauges down and away from you, close to
the cylinder.
Open the valve slowly all the way, then back ½
turn.
Fully inflate the BC, test dump/overpressure
valves, leave it inflated to check for leaks, then let
the air out.
Press the purge to check regulator and air. ⚠️ Good
air is colourless, odourless, tasteless. Any
smell or taste → DO NOT DIVE with that cylinder (risk of carbon
monoxide, Section 3); if unsure, change the cylinder. Then breathe from
both second stages.
Tuck regulators and gauges into the BC and lay the unit
down.
Disassembly: reverse order → close the
valve, ⚠️ purge all air from the regulator
before removing it from the cylinder.
The Accessory System (p.
66–67)
Extra gear for specific types of diving (e.g. camera + housing for
photography).
Item
Key points
Dive light
Brings back true colours lost at depth; for day,
night / limited visibility and wreck
dives
Dive bag
Durable for air travel; wheels, pockets, separate regulator
bag for carry-on, mesh bag at the
destination
Night, wreck and ice diving need special
training.
⚠️ Owning a multi-tool does not authorise you to
repair your scuba gear. Only a trained
technician should service it; DIY repairs can void the
warranty and affect performance.
The Basic Rules of Scuba (p.
68–69)
Learn them in this order:
#
Rule
Why / how
1
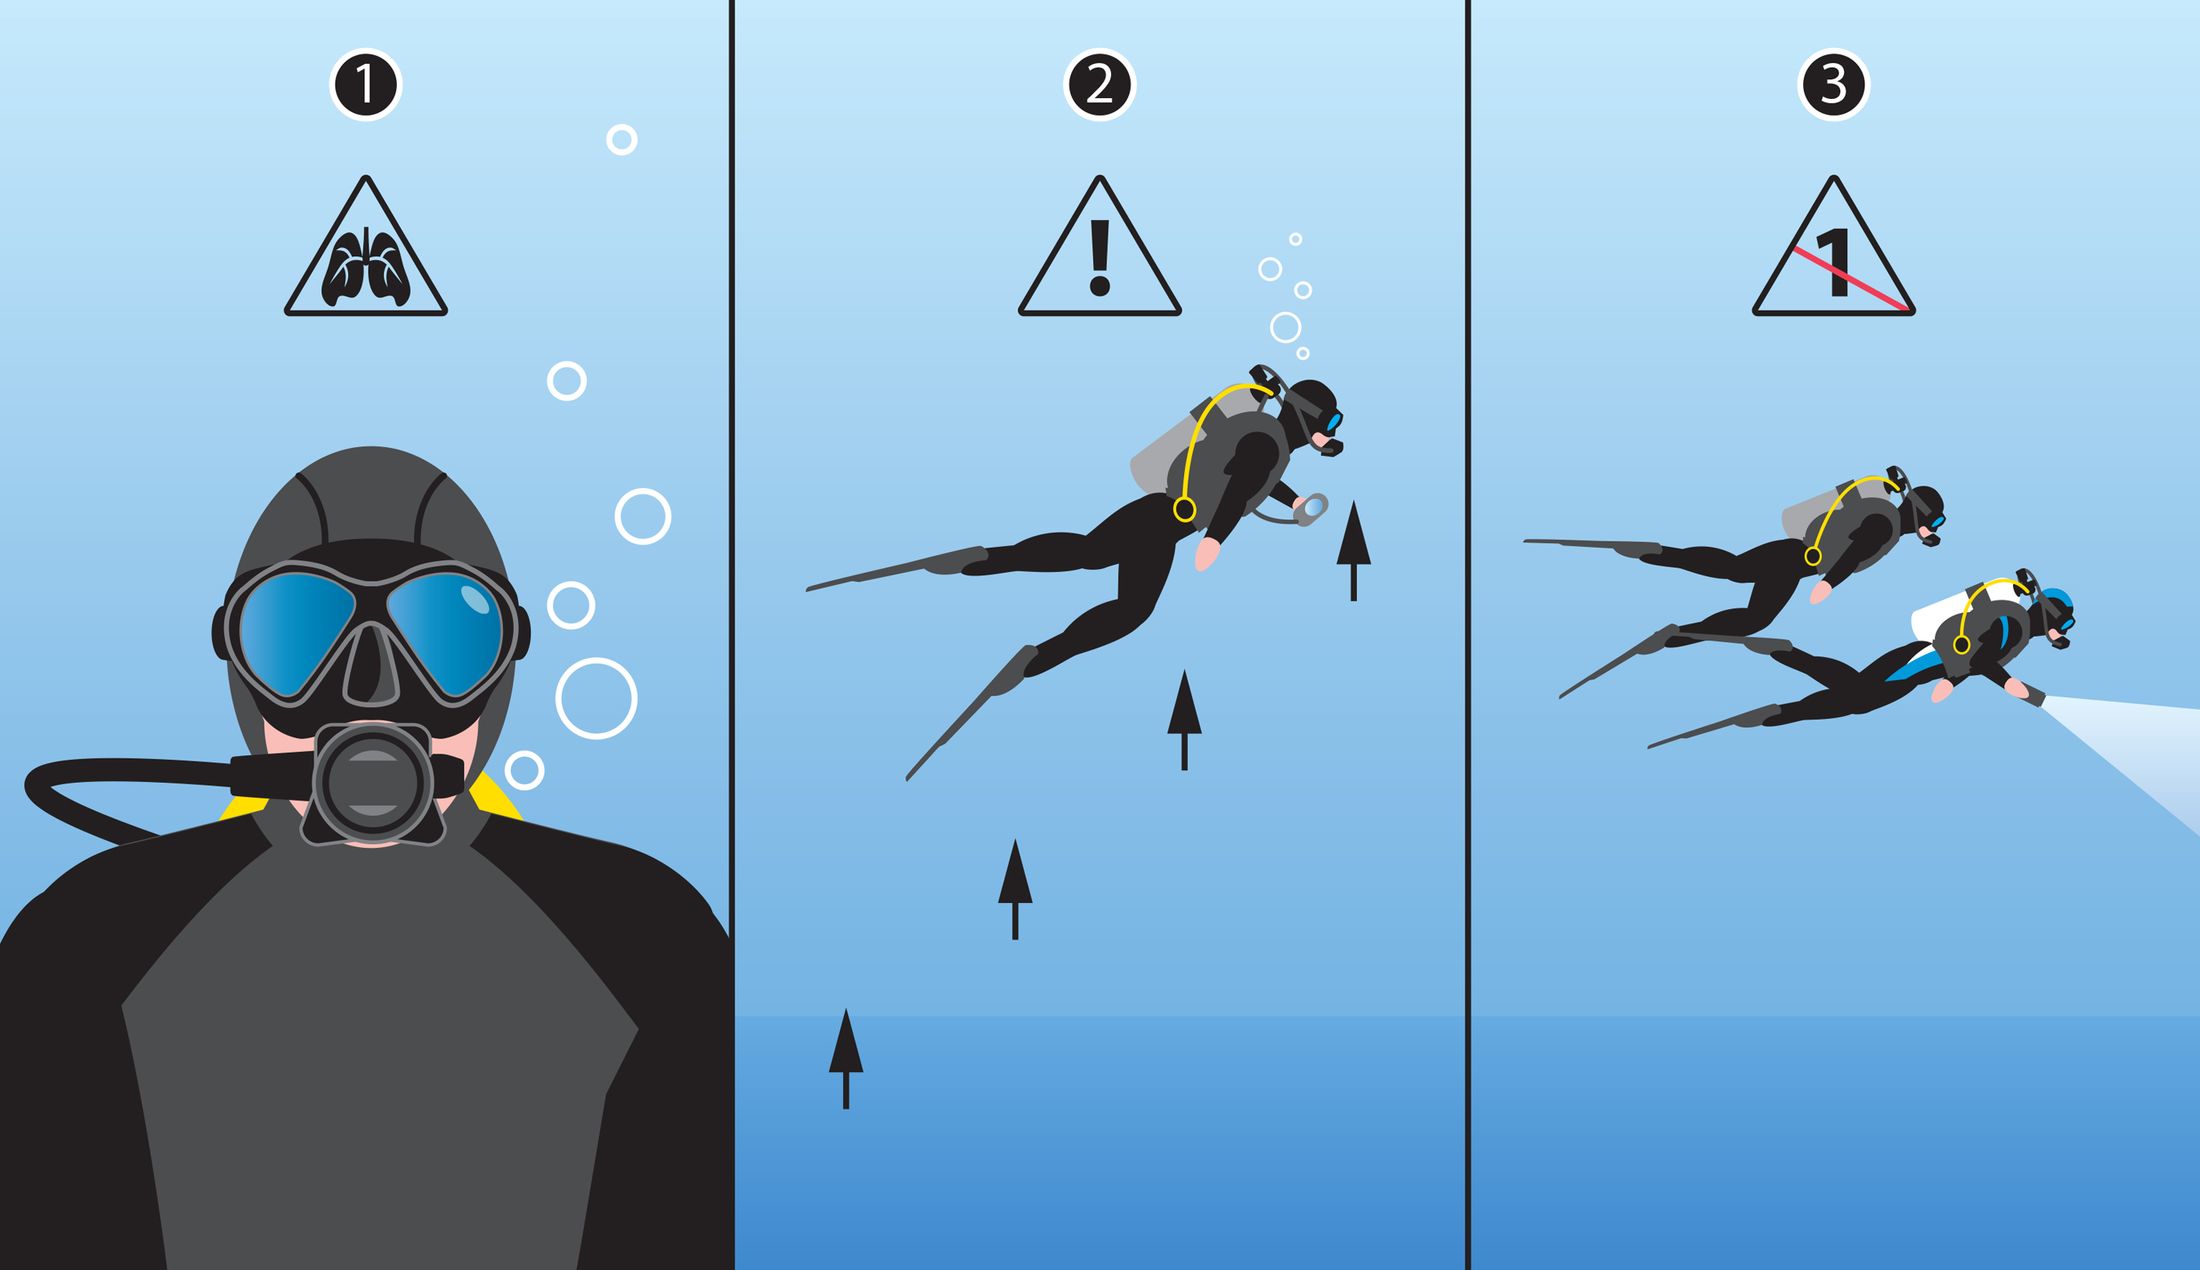
Breathe continuously!
⚠️ Never hold your breath. Holding your breath
while ascending → air in the lungs expands (Boyle's
Law) → lung overexpansion injury. Breathe
slowly and rhythmically; if the regulator is out of your mouth,
exhale a small stream of bubbles
2
Ascend slowly and maintain control!
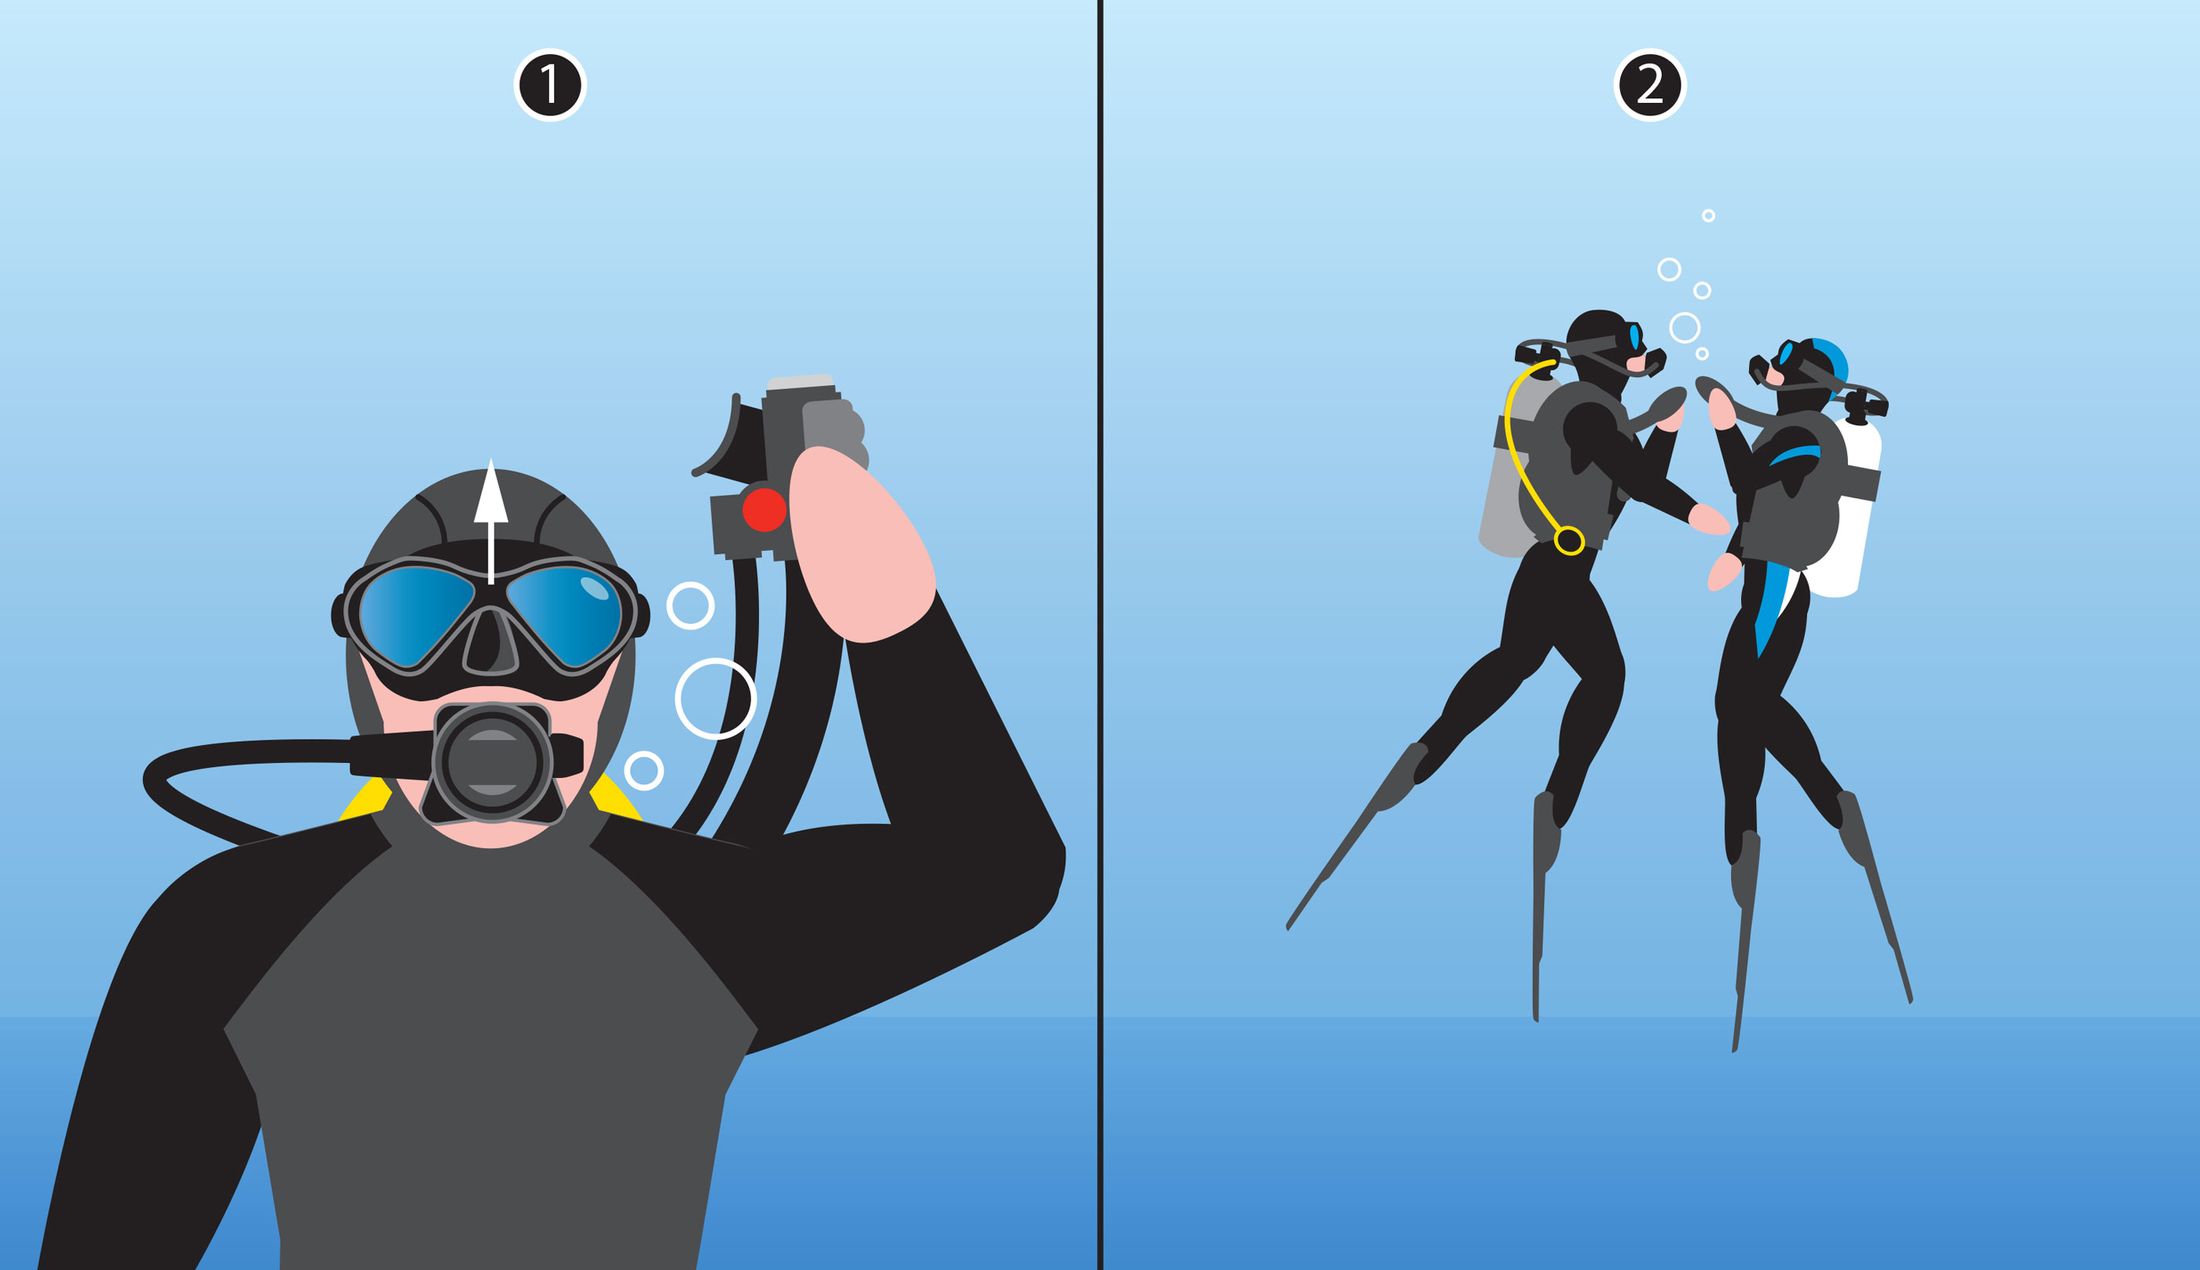
Watch your computer; ⚠️ never faster than 9 m/min.
Most computers have an ascent-rate alarm
3
Never dive alone or beyond your level of
training!
Always dive with a buddy; your maximum depth is limited by
your training
Summary (p. 69)
SSI recommends owning a personally fitted Total
Diving System and using it during training → more comfort on open water
dives.
Section 3
– Breathing Gas and the Effects on Your Body
Introduction to Pressure
Injuries (p. 73)
Pressure injuries on ascent are among the
most serious in diving, and also the easiest to
prevent. They mostly happen to poorly trained divers or because
of poorly maintained or unsuitable equipment.
Prevented by: good breathing patterns, knowing your
fitness and limits, understanding how injuries happen,
dive planning and good technique, and a
well-maintained Total Diving System that you use
correctly.
Basic
Respiratory and Circulatory Anatomy (p. 74–75)
Lungs
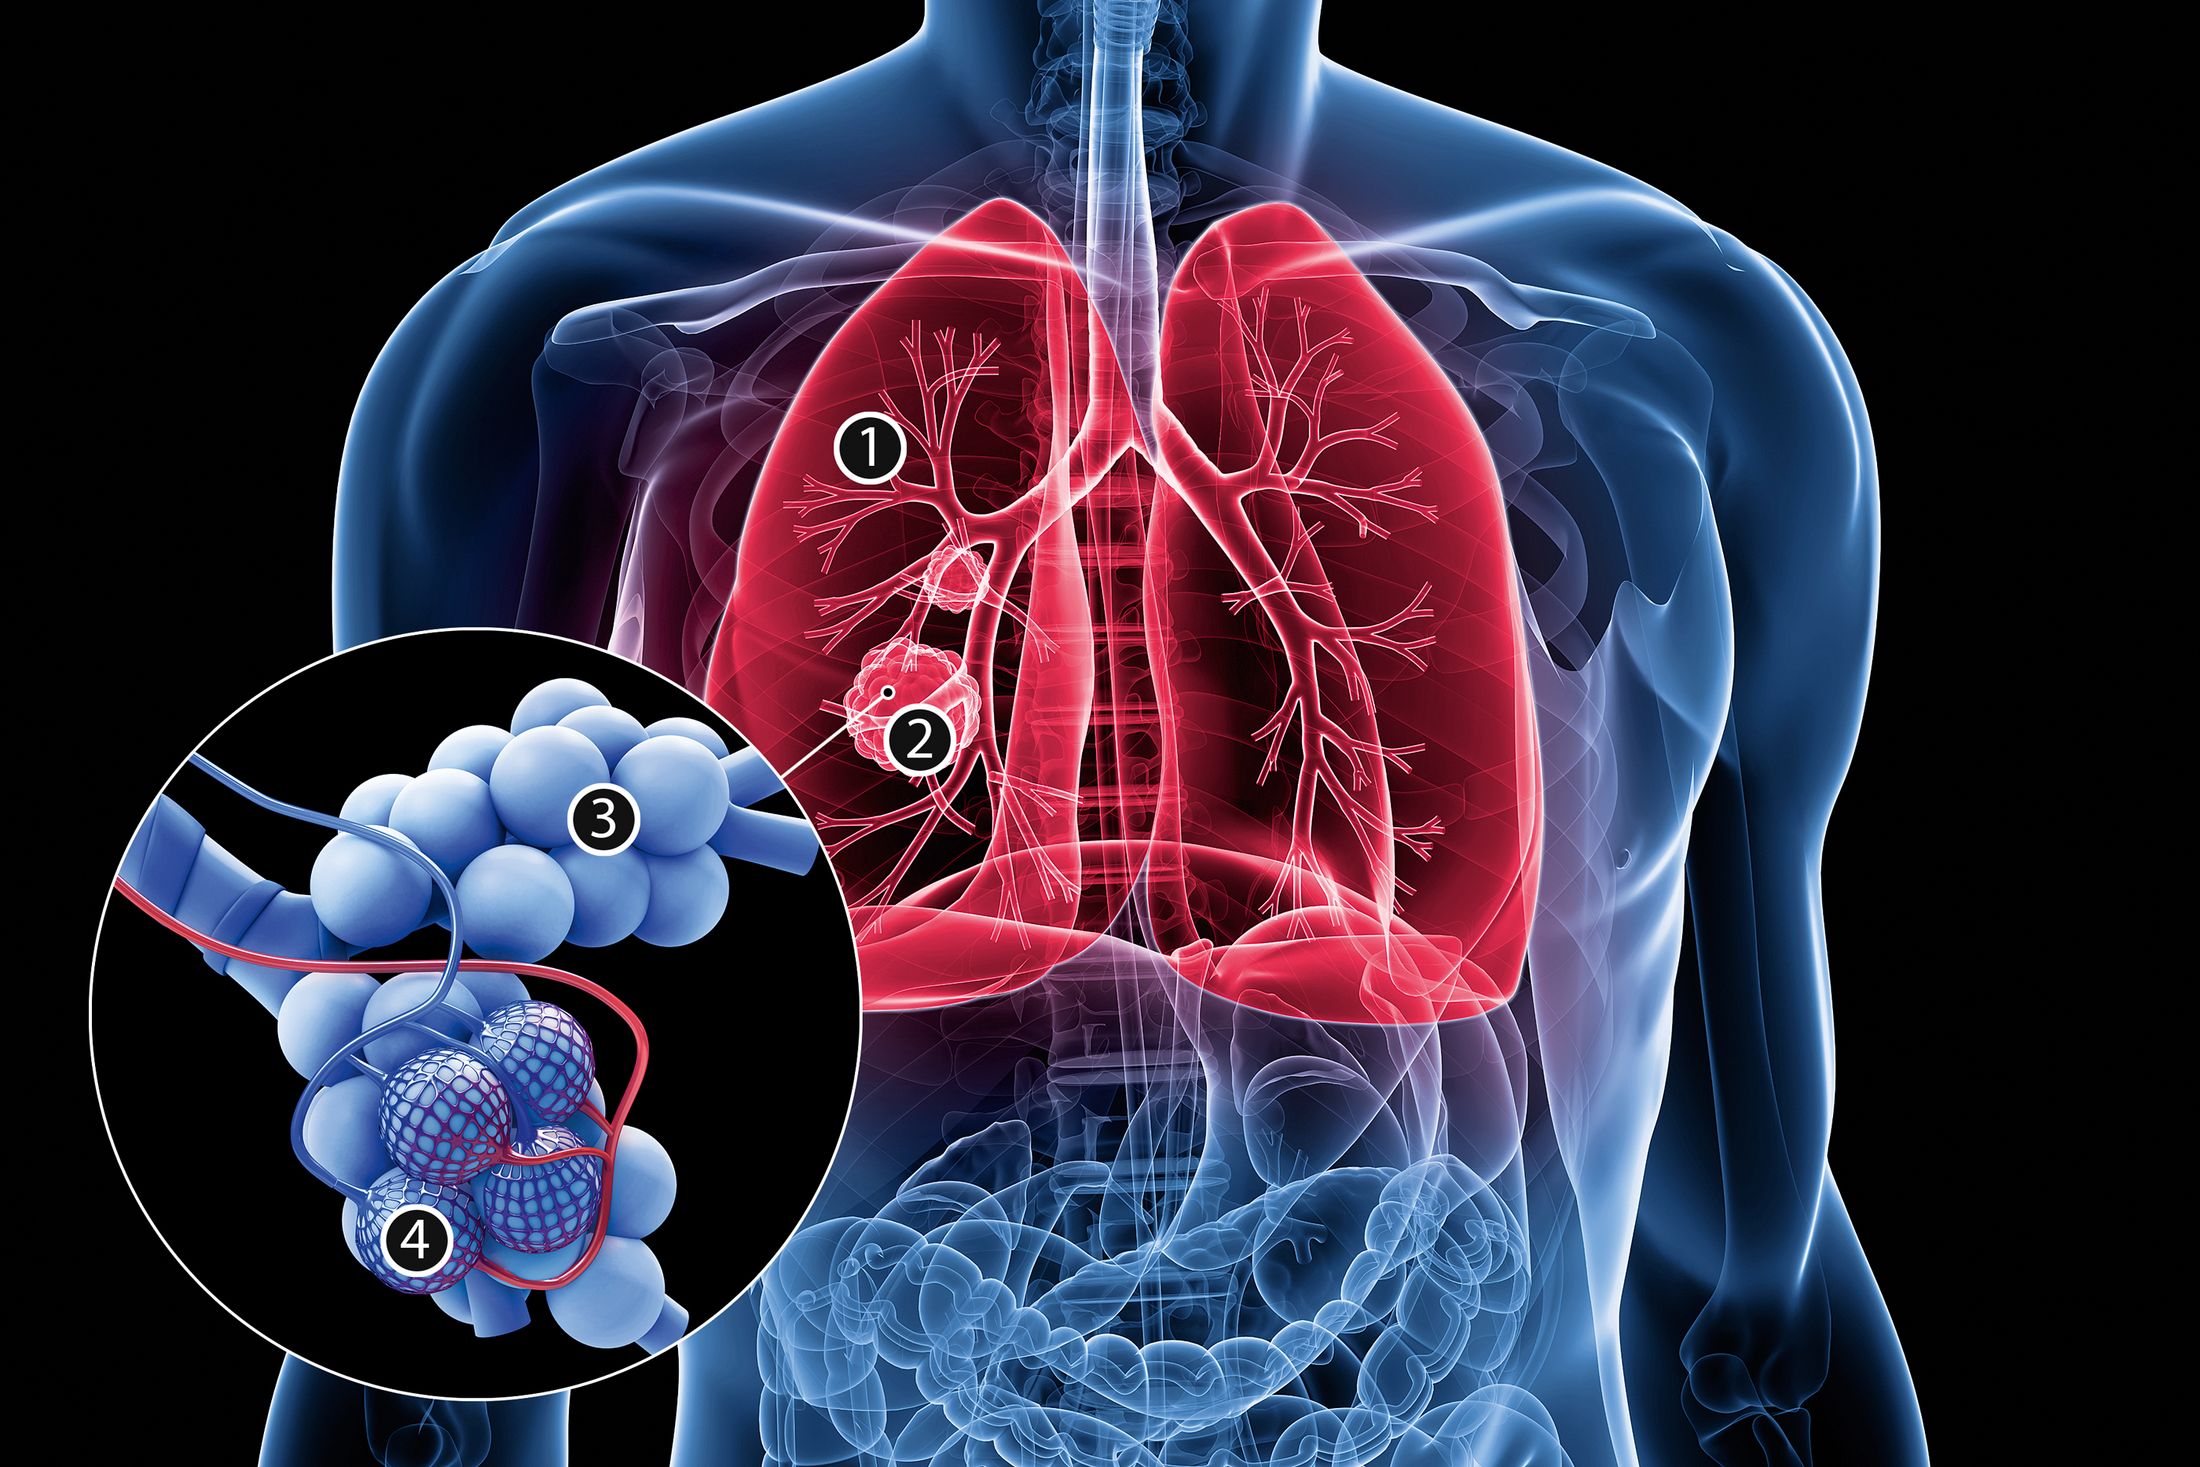
About 300 million alveoli (tiny air sacs) in
grape-like clusters at the ends of the bronchiole
branches.
Total lung volume is only about 5–6 litres, but the
alveoli have a very large surface area → their walls are very
thin → easily damaged by sudden or long-lasting pressure
changes.
⚠️ Gas exchange (O₂ and N₂ into the blood, CO₂ out of it) happens
through the walls of the alveoli.
Circulation
Capillaries = small, thin-walled vessels that
connect arteries to veins. The pulmonary capillary bed
surrounds the alveoli.
Blood arriving at the lungs is low in O₂ and high in
CO₂. O₂ moves from the alveoli into the blood, and CO₂ moves
from the blood into the alveoli to be breathed out.
Diffusion = gas moving from higher to lower
concentration. O₂ and CO₂ diffuse in opposite directions.
Path of the blood: lungs → pulmonary
vein → left side of the heart →
aorta (largest artery) → arteries → tissue capillaries
(O₂ goes into the tissues, CO₂ comes out) → veins → right side
of the heart → pulmonary arteries → lungs.
Pulmonary veins are the only veins that
carry oxygen-rich blood.
Arteries carry blood away from the
heart.
Effects of Pressure on
Ascent (p. 76)
Boyle's Law also works in reverse: as pressure
drops on ascent, the gas in your lungs
expands. (On descent, the same law causes "squeeze"
injuries; see Section 1.)
Example: fill your lungs (5 L) at 30 m (4
bar) and ascend without exhaling → the gas
expands to 20 L at the surface (4×).
Any flexible air space taken from 30 m to the surface grows
4× (e.g. 6 L → 24 L).
⚠️ The lungs can only handle an overpressure of about 0.12
bar = only 1.2 m of ascent with full lungs and
a held breath (pressure changes by 0.1 bar per metre of
sea water).
Overexpansion Injuries (p.
76–87)
Overexpansion injury = expanding air stretches the
lungs past their limit, and the alveoli tear at about 0.12
bar overpressure.
Cause (all four injuries): holding your breath while
ascending. Ascending too fast and diving with chest congestion
also raise the risk. Gas escapes into the blood or into the tissues of
the chest.
These injuries are very rare in well-trained divers. They are
prevented by knowledge, planning, continuous rhythmic
breathing, proper equipment and good skills.
⚠️ Never let freedivers or snorkellers breathe from your
regulator, not even at 1 m.
The diver may not notice the injury. There may be only a
pulling feeling in the chest. Blood in the
mouth is possible but usually absent.
The injuries often happen together, not one at a
time.
The four lung
overexpansion injuries
Injury
Where the air goes
Signs / symptoms
Arterial Gas Embolism (AGE): most
serious
Bubbles go into the pulmonary capillaries → pulmonary vein → left
heart → aorta → carotid arteries → brain. They keep
expanding on ascent and block small vessels
(embolus).
Symptoms come immediately and get worse fast:
unconsciousness/coma, breathing and circulation
failure, loss of motor control or paralysis, headache,
vertigo, problems with vision, hearing or speech. Can look like a
stroke (slurred speech, confusion, weakness in limbs,
possibly on both sides).
Pneumothorax: 2nd most
serious
Air gets between the lung lining (pleura) and the rib
cage → the lung collapses and pressure on the
heart can affect circulation.
Same as mediastinal emphysema, but breathing is
harder, especially if both lungs have collapsed. The heart may
stop filling with blood → can be fatal.
Mediastinal emphysema
Air goes into the mediastinum (area around the
heart) and presses on the heart and large blood vessels.
Chest pain, breathing difficulty, weakness,
collapse, cyanosis (blue lips and nail beds).
Subcutaneous emphysema
Air goes into the mediastinum, then up along the
windpipe into the area around the collarbone and
neck.
Swelling in the neck with
crepitation (crackling when you touch it),
voice changes, possible breathing difficulty.
AGE key facts
⚠️ The brain can be permanently damaged if blood
flow is not restored within 4–5 minutes (lack of oxygen
= hypoxia).
Unconsciousness often happens before surfacing or within 4–6
minutes after.
⚠️ A diver who surfaces unconscious or passes out within 6
min after surfacing must be treated as an
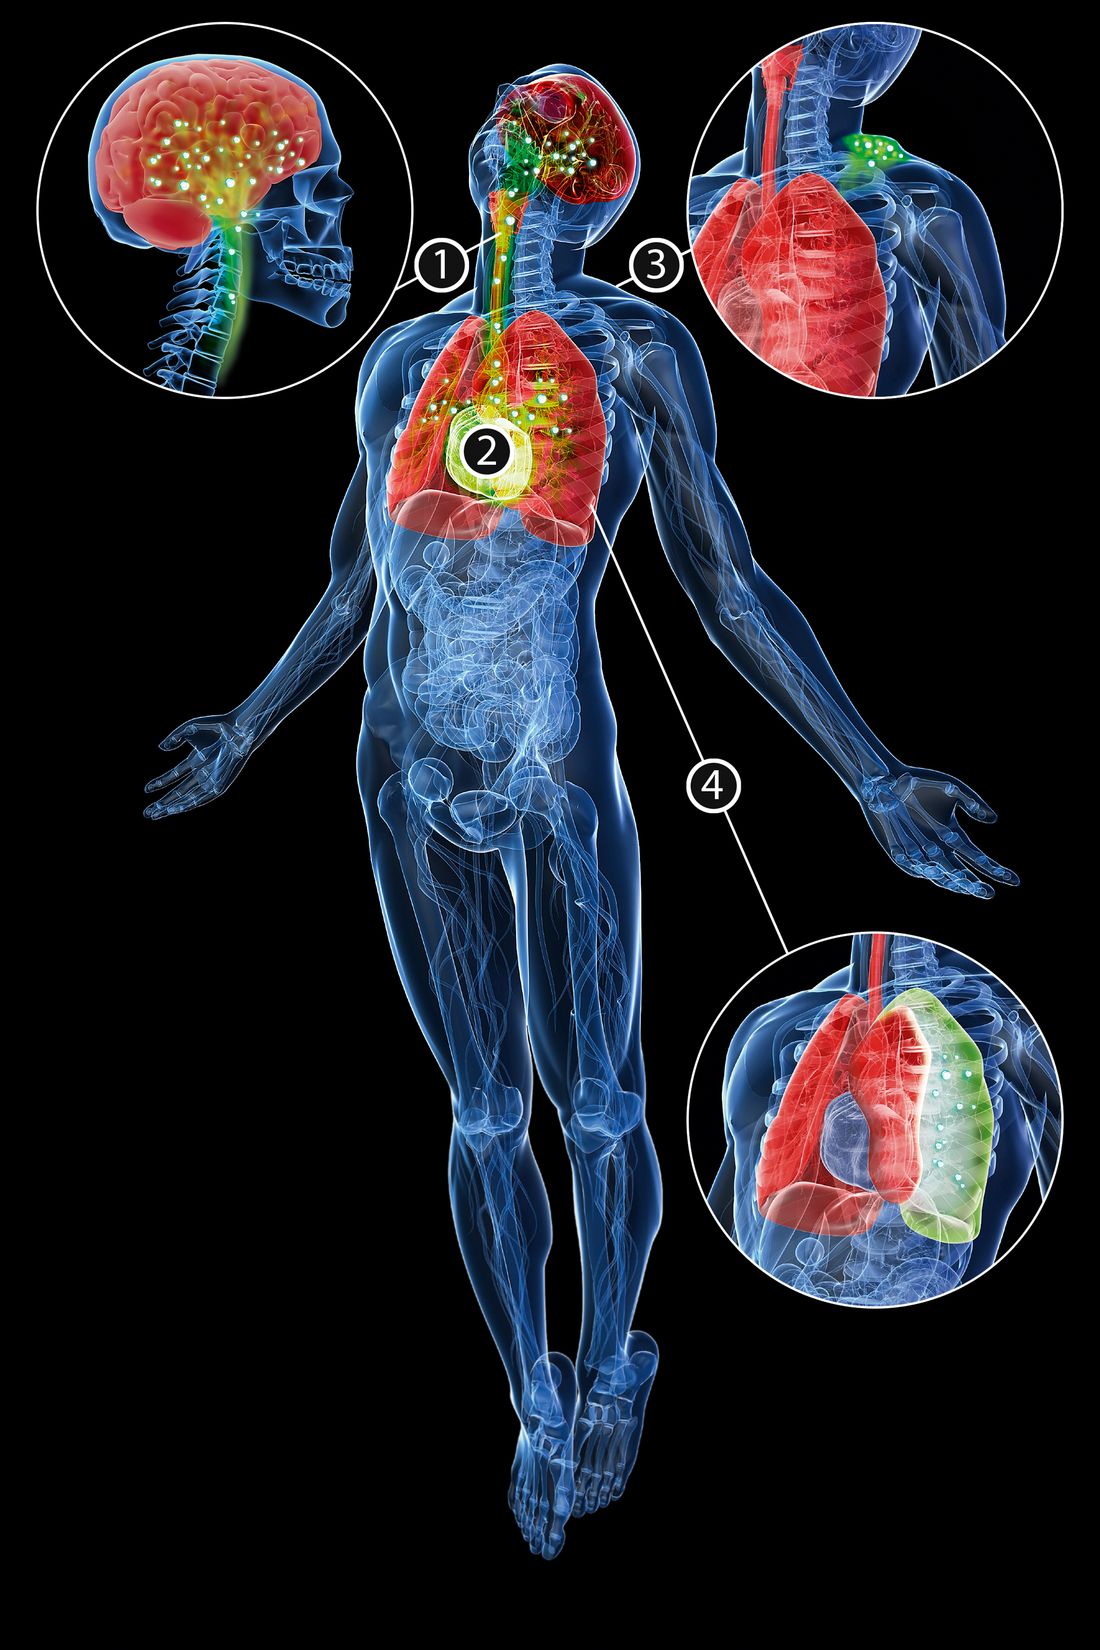
embolism and needs immediate recompression.
Unconsciousness is often the only sign.
AGE and neurological DCS can't be told apart (even
by a hyperbaric doctor) except by the dive
history.
Prevention
⚠️ Never hold your breath. Breathe
continuously, steadily and rhythmically. Never breathe
explosively or irregularly.
Don't dive with respiratory congestion. After
serious lung disease (e.g. tuberculosis, pneumonia → possible scar
tissue), get a chest X-ray to check fitness to
dive.
Don't smoke. It makes the alveoli less elastic, so
they tear more easily. Stay cardiovascularly fit.
Good, personally fitted, well-maintained equipment,
used properly. Effortless buoyancy control
matters.
⚠️ Ascend slowly: no faster than 9 m/min.Look up while ascending: this keeps your airway open
and stops you hitting things above you.
Chest surgery, lung illness that needed a hospital stay, or
long-term medication → see a diving medicine doctor
(contact DAN for a referral).
First aid
Get your SSI Dive Professional right away, then:
Treat for shock
Give oxygen (if qualified)
Be ready to do CPR (if qualified)
Get medical help (emergency room +
recompression chamber) as fast as possible
⚠️ First take the diver to the nearest Emergency Department
to be stabilised, then to a chamber if needed.
Reasons: chambers are often not staffed 24 h, few can provide advanced
life support, and the problem may not be diving-related (e.g. a
heart attack mistaken for a diving injury).
Decompression
sickness (DCS): background (p. 80)
DCS (historically caisson disease) was first
described by Paul Bert. Breathing gas under pressure
forces nitrogen into the body. It stays dissolved while
the pressure stays the same. Ascend too fast → it comes
out of solution as bubbles (= free-phase
gas) in the tissues and blood.
Bert's work led to recompression chambers and to
J.S. Haldane's stage decompression tables (bringing the
diver up to shallower depths in steps). The same calculations are still
the basis of today's tables and computer
algorithms.
Partial pressure = the part of the total pressure
that one gas in a mixture provides (= its fraction × absolute
pressure).
Dalton's Law: the total pressure of a gas
mixture = the sum of the partial pressures.
Henry's Law: the amount of gas that
dissolves into a liquid is directly proportional to the partial
pressure of that gas (and also depends on how
soluble the gas is).
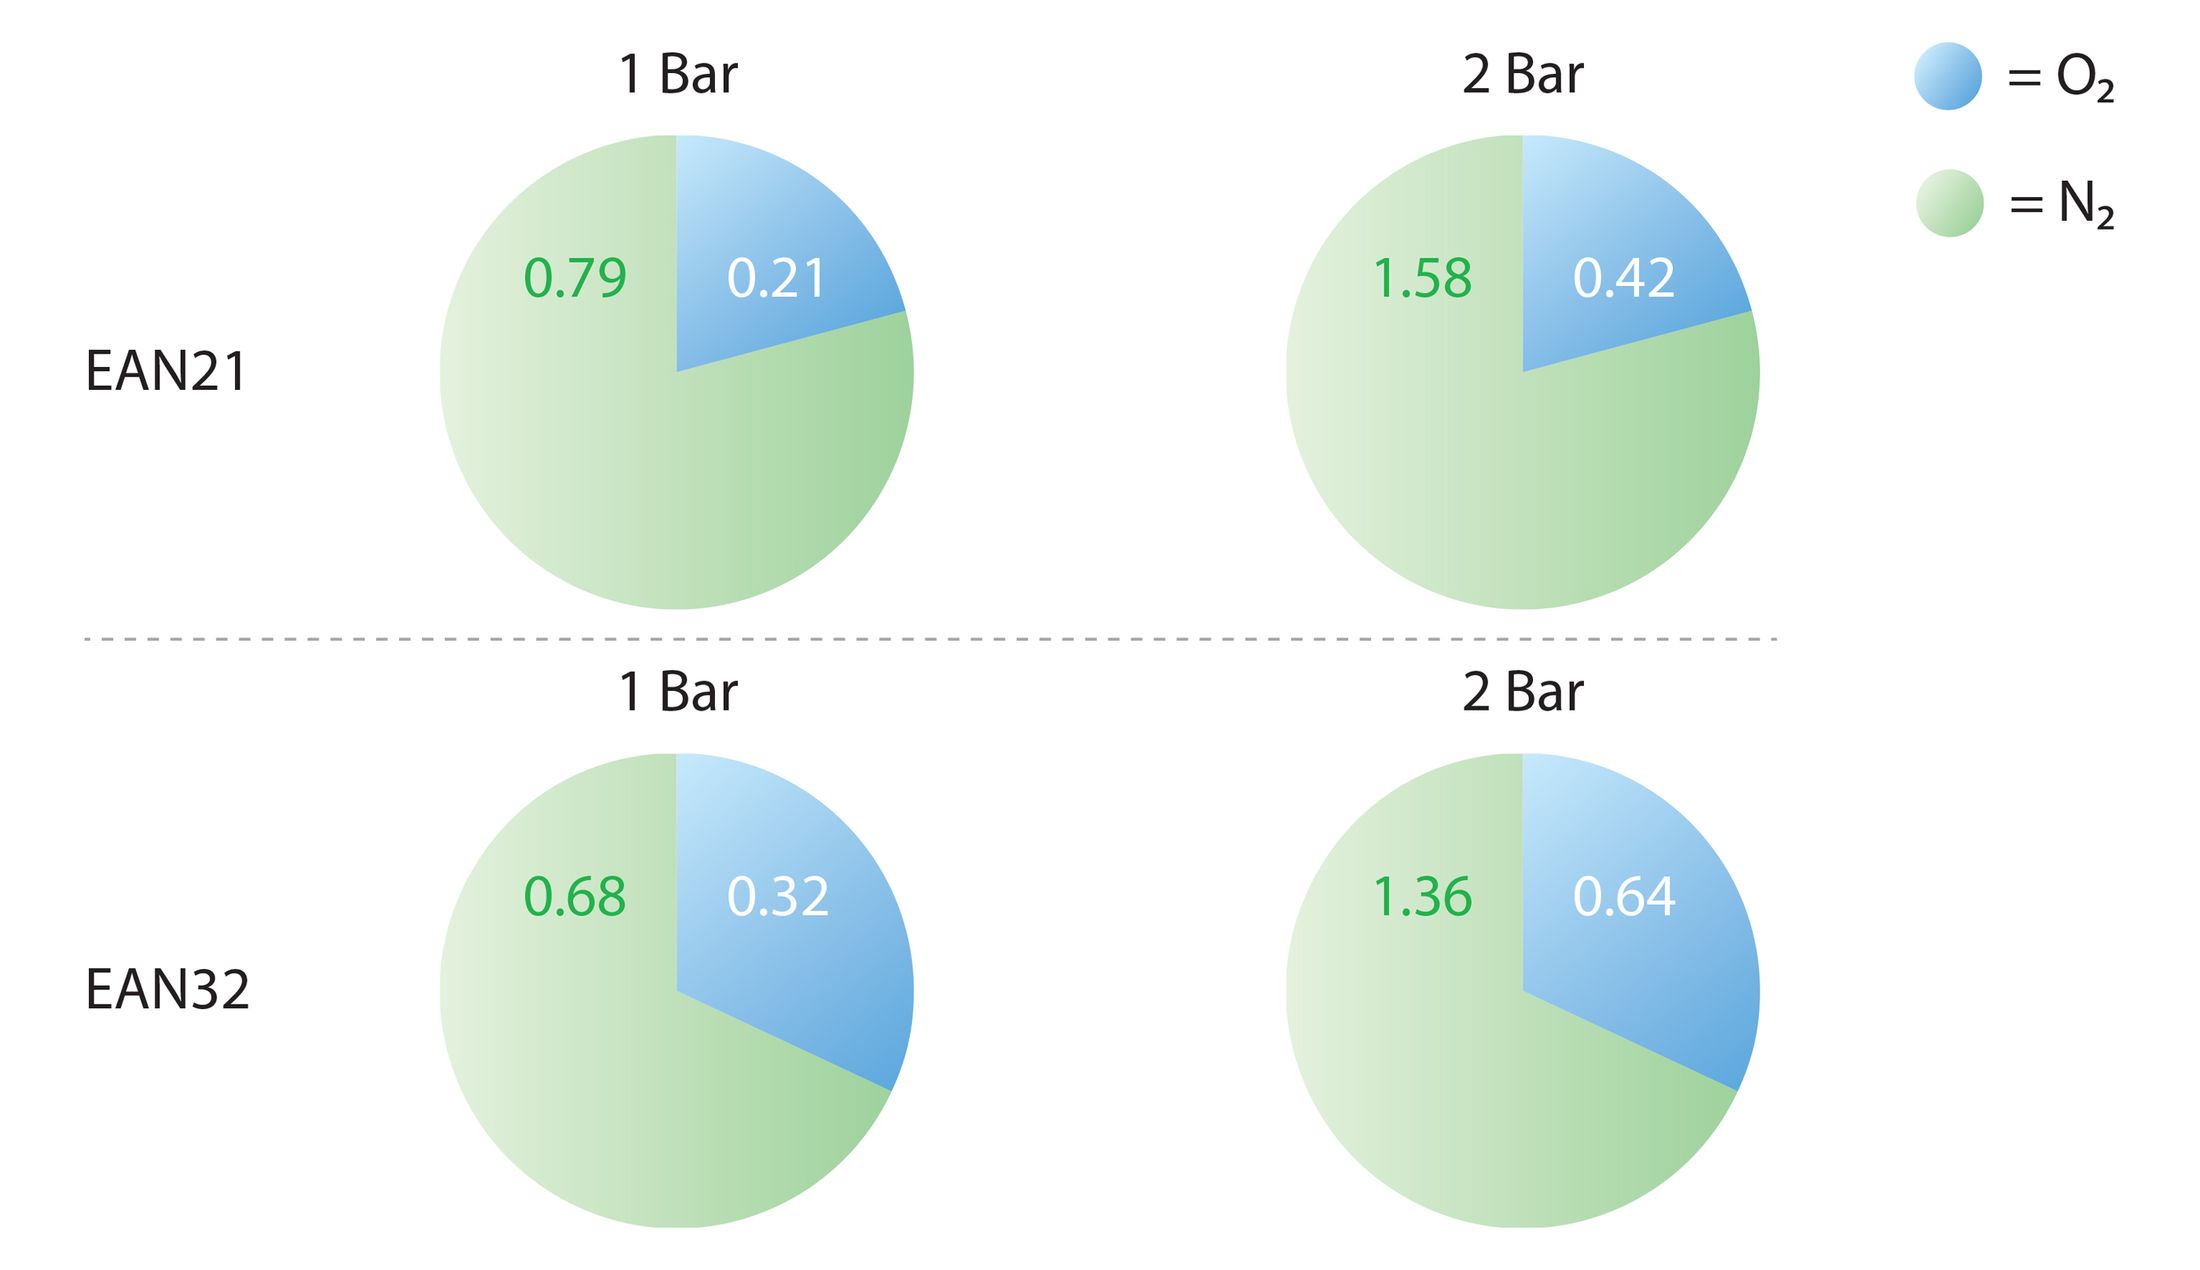
Gas
Pressure
ppN₂
ppO₂
Air (EAN21)
1 bar (surface)
0.79 bar
0.21 bar
Air (EAN21)
2 bar (10 m)
1.58 bar
0.42 bar
Nitrox EAN32
1 bar
0.68 bar
0.32 bar
Nitrox EAN32
2 bar
1.36 bar
0.64 bar
Nitrogen uptake and release
(p. 81–82)
At the surface, your body is saturated with N₂ at the alveolar ppN₂
(0.79 bar). At 10 m (2 bar), ppN₂
doubles to 1.58 bar (2 × 0.79).
Gradient = the difference between the
partial pressure of a gas inside the body and outside it (e.g.
1.58 − 0.79 = 0.79 bar). The gradient pushes N₂ from
the lungs into the blood, and from the blood into the tissues.
Diffusion = gas moving from higher to lower
concentration. The speed depends on the gas you breathe.
Perfusion = how much blood a tissue gets.
Good blood supply → absorbs and releases N₂ quickly = "fast
tissues"
Poor blood supply → slow = "slow tissues", e.g.
fat (adipose tissue): holds a lot of
N₂ but has little blood flow → takes a long time to saturate
→ ⚠️ How fast you saturate varies with
depth and the blood supply of each
body part. It is not a fixed rate.
Stay at one depth long enough → saturated (no more
N₂ absorbed). Saturated at 10 m = almost
double the N₂ you have at the surface.
Desaturation = on ascent the process reverses: N₂
goes from tissues → blood → lungs → breathed out.
⚠️ The body tolerates a high saturation gradient
(fast descent) but not a high desaturation
gradient (fast ascent).
The body can handle some supersaturation. If the
pressure difference gets too big, N₂ forms bubbles in
tissues and blood → decompression illness (DCI).
Haldane and Workman (p. 82–83)
Model
Idea
Haldane's Critical Ratio
The body tolerates about a 2:1 pressure ratio. In
theory you could stay at 10 m (2 bar) for as long as
you like and come straight up. Go deeper than 10 m and you can exceed
2:1. The deeper, the faster you reach it.
Workman's Critical Difference (US Navy, NEDU)
What matters is the nitrogen ratio → 2:1 revised to
1.58:1 (2 bar × 0.79 = 1.58). Workman's maximum allowed
N₂ per tissue on surfacing = "M-value". M-values vary
with depth, so the difference between dissolved N₂ and
ambient ppN₂ is the key factor. This model is the basis of most
modern tables and computers.
Altitude
Tables and computers assume you surface at sea level (ppN₂
0.79 bar).
⚠️ When diving above 300 m altitude (e.g. a
mountain lake), air pressure and ppN₂ are lower → use altitude
tables or a computer set for altitude.
Flying is like altitude diving → don't fly for
at least 24 h after many consecutive days of
diving.
Nitrogen physiology in brief
N₂ is inert (the body does not use it). It enters
through breathing and dissolves in blood and tissues.
Tissues with good blood flow absorb N₂ faster. Some tissues (fat)
can hold more.
Uptake grows with depth and ppN₂ (Henry's
Law).
On surfacing you may be supersaturated → ⚠️
ascent rate is critical.
More N₂ than the M-value on surfacing → bubbles
block blood flow → DCS, which can affect any
part of the body.
⚠️ Pregnant women should not dive (how a fetus
absorbs and releases N₂ has not been studied enough).
DCS in one line: you stay too long at depth
and surface too fast, the tissue tolerance is
exceeded, and excess N₂ bubbles out into the
blood and tissues.
DCS: symptoms,
prevention, treatment (p. 84–85)
Decompression sickness
Cause
Too much N₂ absorbed + ascent too fast / too little decompression →
bubbles
Main symptom
Joint pain: deep and persistent (joints have poor
circulation → off-gas poorly)
Other symptoms
Itchy skin rash (where skin is thin), vision
problems, paralysis, weakness, loss of manual
dexterity, vertigo, numbness, breathing
difficulty, headache, unconsciousness, memory loss, nausea
Prevention
1. ⚠️ Plan your dive and dive your plan (= best
prevention); stay within your training · 2. Keep checking your computer:
depth, remaining time, gas, slow ascent, safety
stop 5 m for 3–5 min · 3. Be well-rested and
well-hydrated (drink plenty of water all day) · 4. Judge your
fitness honestly · 5. No heavy exercise in the 6 h before a
dive · 6. Stay warm (suitable thermal
protection)
Treatment
Decided by medical staff, usually
recompression. The sooner it starts, the less tissue
damage.
You can get DCS (rarely) even when you follow all the rules →
any symptom after any dive: get checked by an
expert.
If medical help is not immediately available (all
overexpansion injuries and DCS):
Call EMS and follow their instructions for care and
transport
Treat for shock, monitor vital signs
Oxygen (if qualified)
CPR if needed (if qualified)
⚠️ NEVER take a diver back underwater to recompress
them.
⚠️ Always have an emergency plan: phone numbers and
radio frequencies (coast guard, lifeguards, etc.) in your logbook.
Factors that increase DCS
risk (p. 85–86)
These interfere with N₂ uptake and release → talk to a doctor
before diving: illness · age · alcohol or drugs ·
extreme heat or cold · old injuries · tendency to blood clots · obesity
· medication · lack of sleep · extreme fatigue ·
dehydration
Proper ascent techniques (p.
86–87)
Rule of thirds (starting with 210
bar): 70 bar for exploring, 70
bar to get back to the ascent point, 70 bar
for the ascent and safety stop.
⚠️ Ascent no faster than 9 m/min + safety stop on every
dive: 5 m for 3–5 min.
On ascent: look up and hold the inflator
hose up to control your ascent.
Buoyancy control = the single most important skill
in recreational diving. Fatigue and discomfort make your decisions
worse.
Flying After Diving (p. 87)
Aircraft cabins are not pressurised to sea-level
pressure → risk of DCS if your body still holds extra N₂.
⚠️ Wait at least 24 h after diving before flying or going to
altitude above 2,500 m.
⚠️ More than one dive a day on several days in a row, or
decompression dives → wait longer than 24 h.
Nitrogen Narcosis (p. 87–90)
First described in the early 1900s by divers
working below 30 m: "rapture of the
deep".
Probable cause: N₂ at high partial pressure soaks into the
fatty myelin sheath around nerves and slows
nerve signals across synapses. It feels more like an
anaesthetic than euphoria.
Nitrogen narcosis
Cause
High ppN₂ at depth
Depth
Usually from about 30 m (4 bar,
ppN₂ 3.2 bar). Gets worse with depth.
Can start shallower. Experience does not
prevent it; every diver is affected.
Symptoms (in order of increasing depth)
1. light-headedness, numbness,
overconfidence/euphoria · 2. unusual behaviour · 3.
loss of dexterity · 4. dizziness · 5. abnormal vision and hearing · 6.
can't reason or follow the dive plan · 7. careless
about own safety · 8. short-term memory loss, losing
track of time
Only dive deeper than 18 m after more
training and experience
Treatment
Ascend to a shallower depth (the symptoms go
away)
⚠️ The real danger: it starts subtly, so the diver
may not notice until it is too late.
Oxygen toxicity (p. 89–90)
Oxygen toxicity
Cause
Breathing O₂ at too high a partial pressure: ppO₂
approaching 1.6 bar
Limits
Theoretical depth limit on air: 65 m (far below
recreational limits) · pure O₂: 6 m (1.6 bar) · ⚠️
SSI: never exceed ppO₂ 1.4 bar
Symptoms
ConVENTID: Convulsions,
Visual problems, Ear problems,
Nausea, Twitching,
Irritability, Dizziness.
Muscle twitching (especially in the face) is the most
reliable sign. ⚠️ A convulsion can come with no
warning.
Prevention
Never use pure O₂ as your main gas · always
analyse your tank when using a gas other than air · max
ppO₂ 1.4 bar
Treatment
Symptoms stop once ppO₂ is lowered. Usually
no lasting damage; injuries come from the
convulsion itself.
Carbon Dioxide
Buildup (Hypercapnia) (p. 90–92)
CO₂ build-up (= CO₂ excess / hypercapnia)
speeds up DCS, nitrogen narcosis and oxygen toxicity,
and is the root cause of many diving accidents.
CO₂ is produced by metabolism. More
exertion → more CO₂.
CO₂ is the body's main trigger to breathe (the
breathing centre at the base of the brain raises the
breathing rate).
CO₂ buildup (hypercapnia)
Cause
Skip-breathing / shallow breathing,
overexertion, poor equipment, deep dives
Signs / symptoms
distress and anxiety · headache
(blood vessels in the brain widen) · confusion, irrational behaviour ·
drowsiness, unconsciousness
Prevention
⚠️ Breathe continuously: never save gas by slowing
or skipping breaths · good, fitted,
maintained equipment · stay within the 30
m limit · stay neutrally buoyant to save
effort · overexerting? Stop (and surface carefully if
you can't catch your breath)
⚠️ At depth you breathe CO₂ at a higher partial pressure → you
may not recover at depth from effort that you could
handle at the surface.
Carbon monoxide (CO)
poisoning (p. 91–92)
CO poisoning
Cause
Contaminated tank air: compressor intake
too close to engine exhaust (e.g. on a boat), or the
compressor overheating so its lubricants burn
How it works
CO binds to haemoglobin 200× more readily than O₂ →
the blood can't carry enough O₂. The body is slow to get rid of
it, so the effects last even after the source is gone. At depth
the high ppO₂ hides it → ⚠️ symptoms often appear on
ascent.
Signs / symptoms
Red lips and nail beds · headache · dizziness ·
nausea · weakness · uncoordinated movements · confusion ·
unconsciousness · breathing failure
Prevention
Get your fills only from an SSI Dive Center or reputable
operator. Unsure? Ask to see their current gas
analysis.
Treatment (immediately)
1. Fresh air · 2. Oxygen (if
qualified; pure O₂ helps clear CO faster) · 3. Be ready for
CPR (if qualified) · 4. Call emergency
services / take to an emergency medical centre
CO is the most serious breathing-gas contaminant:
even a small amount can be fatal.
Summary (p. 93)
Almost every diving emergency comes from diver
error. Failures of good, personally fitted equipment are
extremely rare.
Prevent all of these conditions with: quality equipment +
training, short- and long-term fitness, and
diving within your training: reasonable depths,
slow ascents, no-decompression dives
only.
Condition
Cause
Key sign
First response
AGE
Breath-hold on ascent
Unconscious at surface / within 6 min
Shock, O₂, CPR, ER → chamber
Pneumothorax
Breath-hold on ascent
Breathing difficulty, collapsed lung
Same
Mediastinal emphysema
Breath-hold on ascent
Chest pain, blue lips
Same
Subcutaneous emphysema
Breath-hold on ascent
Neck swelling, crackling
Same
DCS
Too much N₂ + fast ascent
Joint pain
Same; never recompress in water
Narcosis
High ppN₂ (~30 m)
Euphoria, poor judgement
Ascend
O₂ toxicity
ppO₂ > 1.4–1.6 bar
Twitching, convulsions
Lower ppO₂ (ascend)
CO₂ buildup
Skip-breathing, overexertion
Headache, anxiety
Stop, rest, breathe
CO poisoning
Contaminated air
Red lips/nail beds
Fresh air, O₂, CPR, EMS
Section
4 – The Value of a Dive Buddy and Executing Your Dives
The Value of a Dive Buddy (p.
98–102)
Why a buddy
⚠️ Never dive alone. Extra gear and good fitness
cannot make up for the added risk of solo diving.
A buddy gives you:
a second Total Diving System (spare gas and
gear)
psychological well-being
someone to help you underwater / in an
emergency
A buddy shares the fun and helps in all
phases: planning, suiting up, pre-dive equipment check, entry,
during the dive, post-dive gear care, logging. A good buddy knows your
gear as well as their own.
⚠️ Buddy distance: never farther away than you
would want to swim if you were out of gas → in practice 1–2 body
lengths max.
Being and choosing a buddy
Being a good buddy takes practice, communication and
planning. Agree on the purpose of the dive and
how to do it before you go in.
You may always decline a buddy you don't feel
comfortable with. Trust your instincts. Your comfort and
confidence matter most.
You must be able to communicate on the surface and
underwater.
New divers: don't just defer to "experienced" divers. Say what you
feel.
Two SSI divers → same training, gear that fits together. Plan every
phase together.
Choosing a dive site
(Section Review)
Consider: purpose of the dive, how
difficult the site is, and an honest assessment of your
own and your buddy's skills and fitness.
Why plan dives: dive
computers
⚠️ The main reason to plan a dive and follow the
plan: to prevent accidents.
Key rule: track the dissolved nitrogen in your
blood/tissues over the whole day and week → the only
practical way is a dive computer.
A computer tracks depth, bottom time, ascent rate (and
descent), surface intervals, number of dives per day/week,
warns if you ascend too fast, works out repetitive-dive time and logs
everything.
Backup if the computer fails: the SSI Dive Tables
(Appendix).
Key terms
Term
Meaning
Depth
Deepest point of the dive, even if only for a
moment
Bottom Time
From start of descent → start of
ascent
Total Dive Time
From start of descent → reaching the surface
(includes ascent + stops)
Surface Interval
Time out of the water or on the surface between
dives: from surfacing → start of next descent
Repetitive Dive
Dive started more than 10 min and less than 12 h
after a previous dive
No-Decompression Limit (NDL)
Maximum time at a depth without a mandatory
decompression stop on the ascent
No-Decompression Dive
Depth/time that allows a direct ascent to the
surface
Residual Nitrogen
Excess nitrogen still dissolved in blood/tissues
after a dive (and all earlier dives in a series). The
computer tracks it.
Decompression Dive
Exceeds the NDL → mandatory deco stops, no direct
ascent possible
More depth, more time, more dives per day/week → more
nitrogen absorbed. Too deep or too long → you can't go straight
up = decompression diving.
⚠️ Decompression diving is beyond Open Water Diver.
On every dive:
Ascend no faster than 9 m/min
Stay within your computer's no-decompression
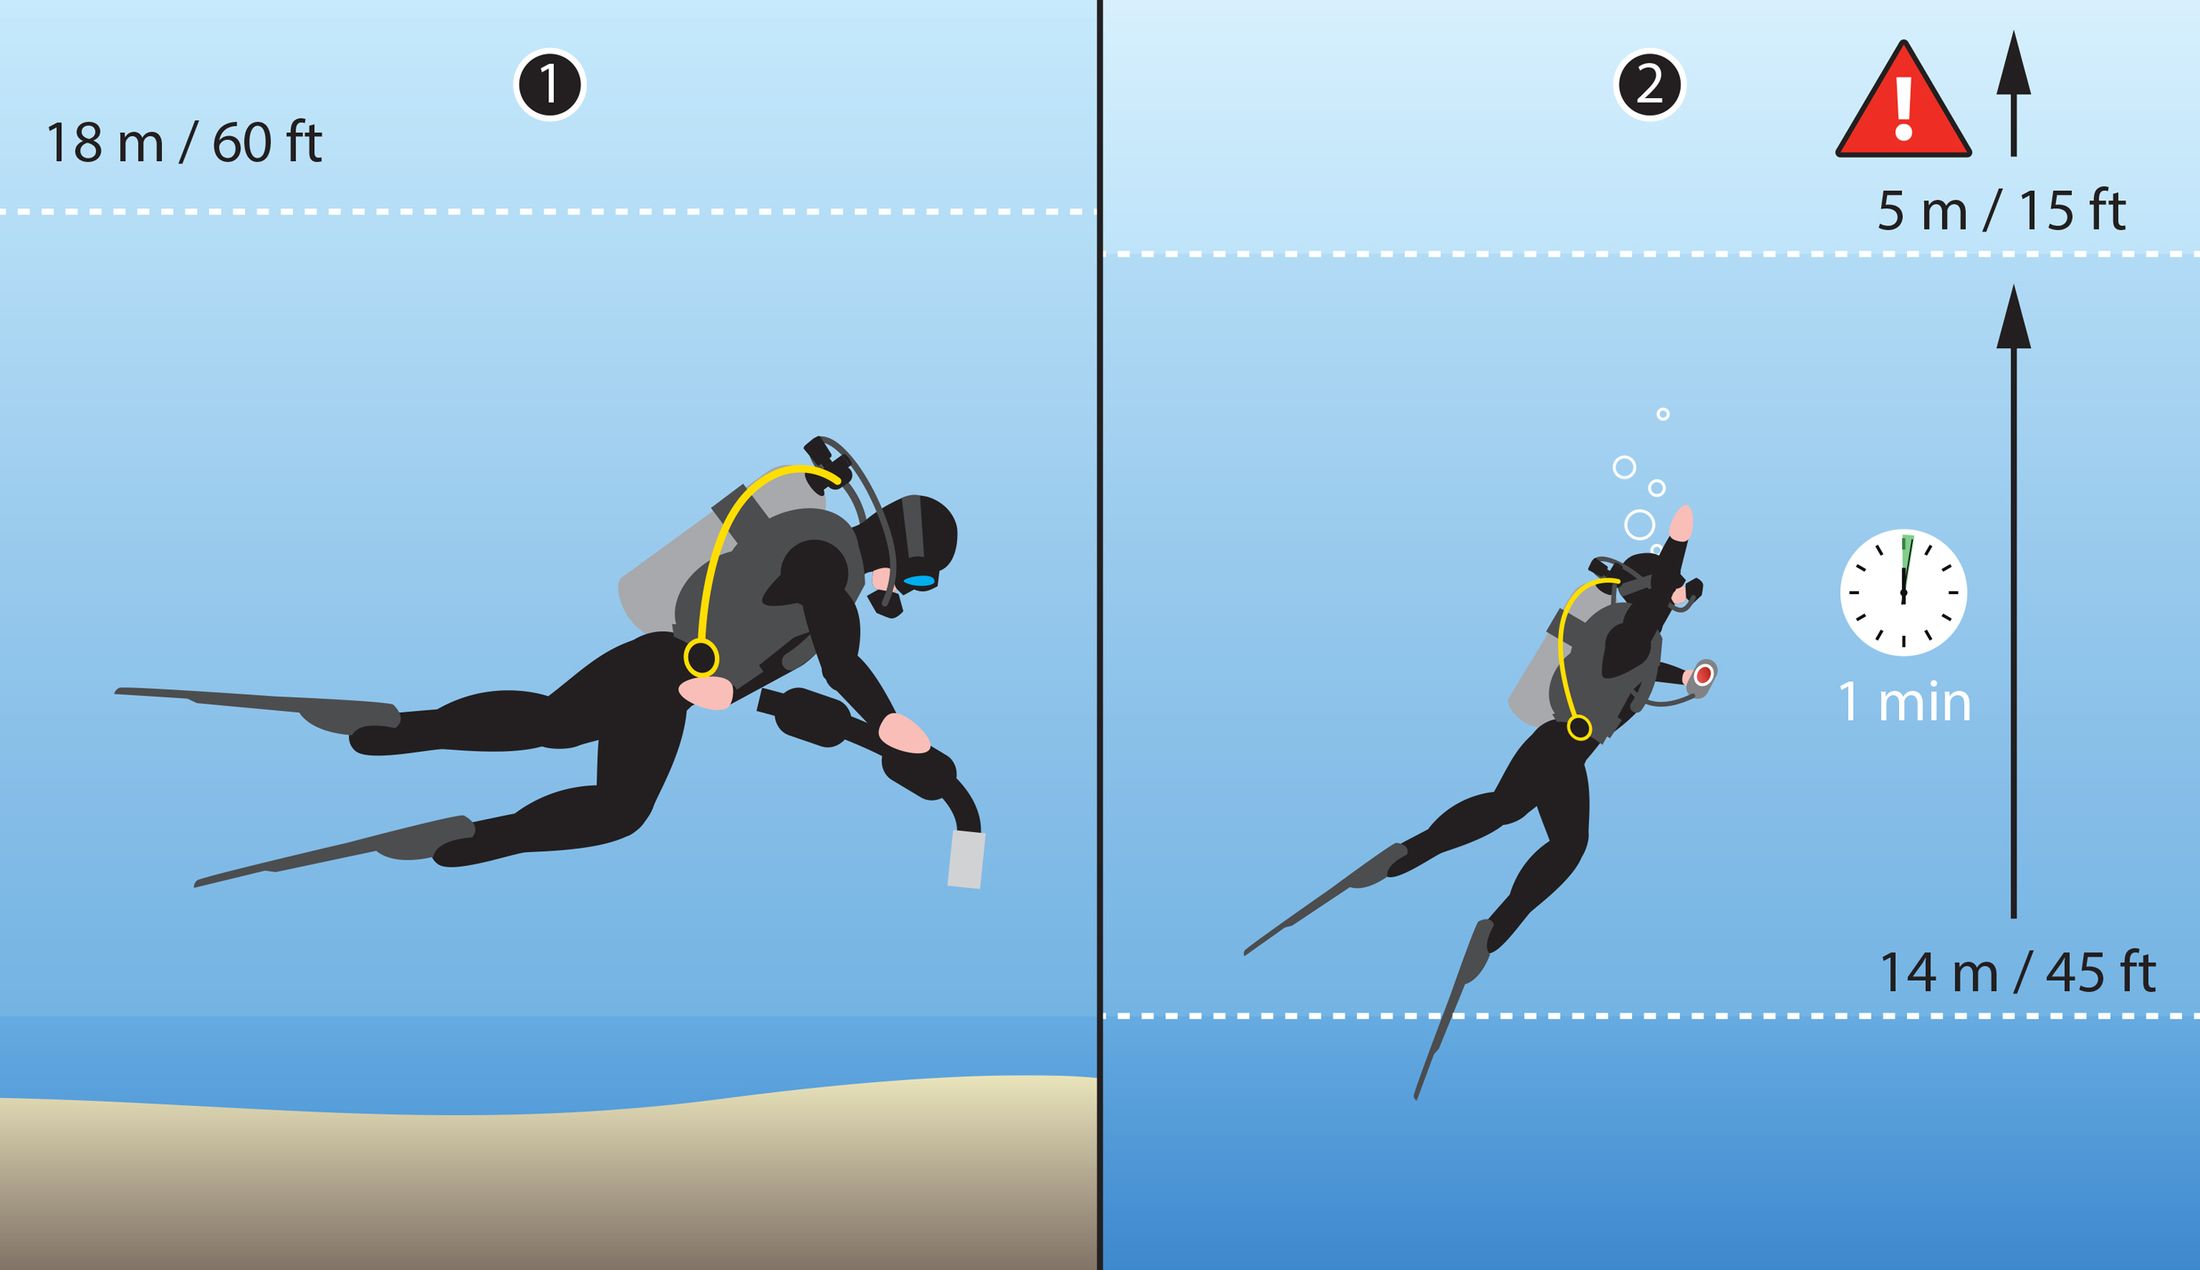
limits
Safety stop at 5 m for 3–5 min
The computer tracks nitrogen so that you stay within the NDL
on each dive.
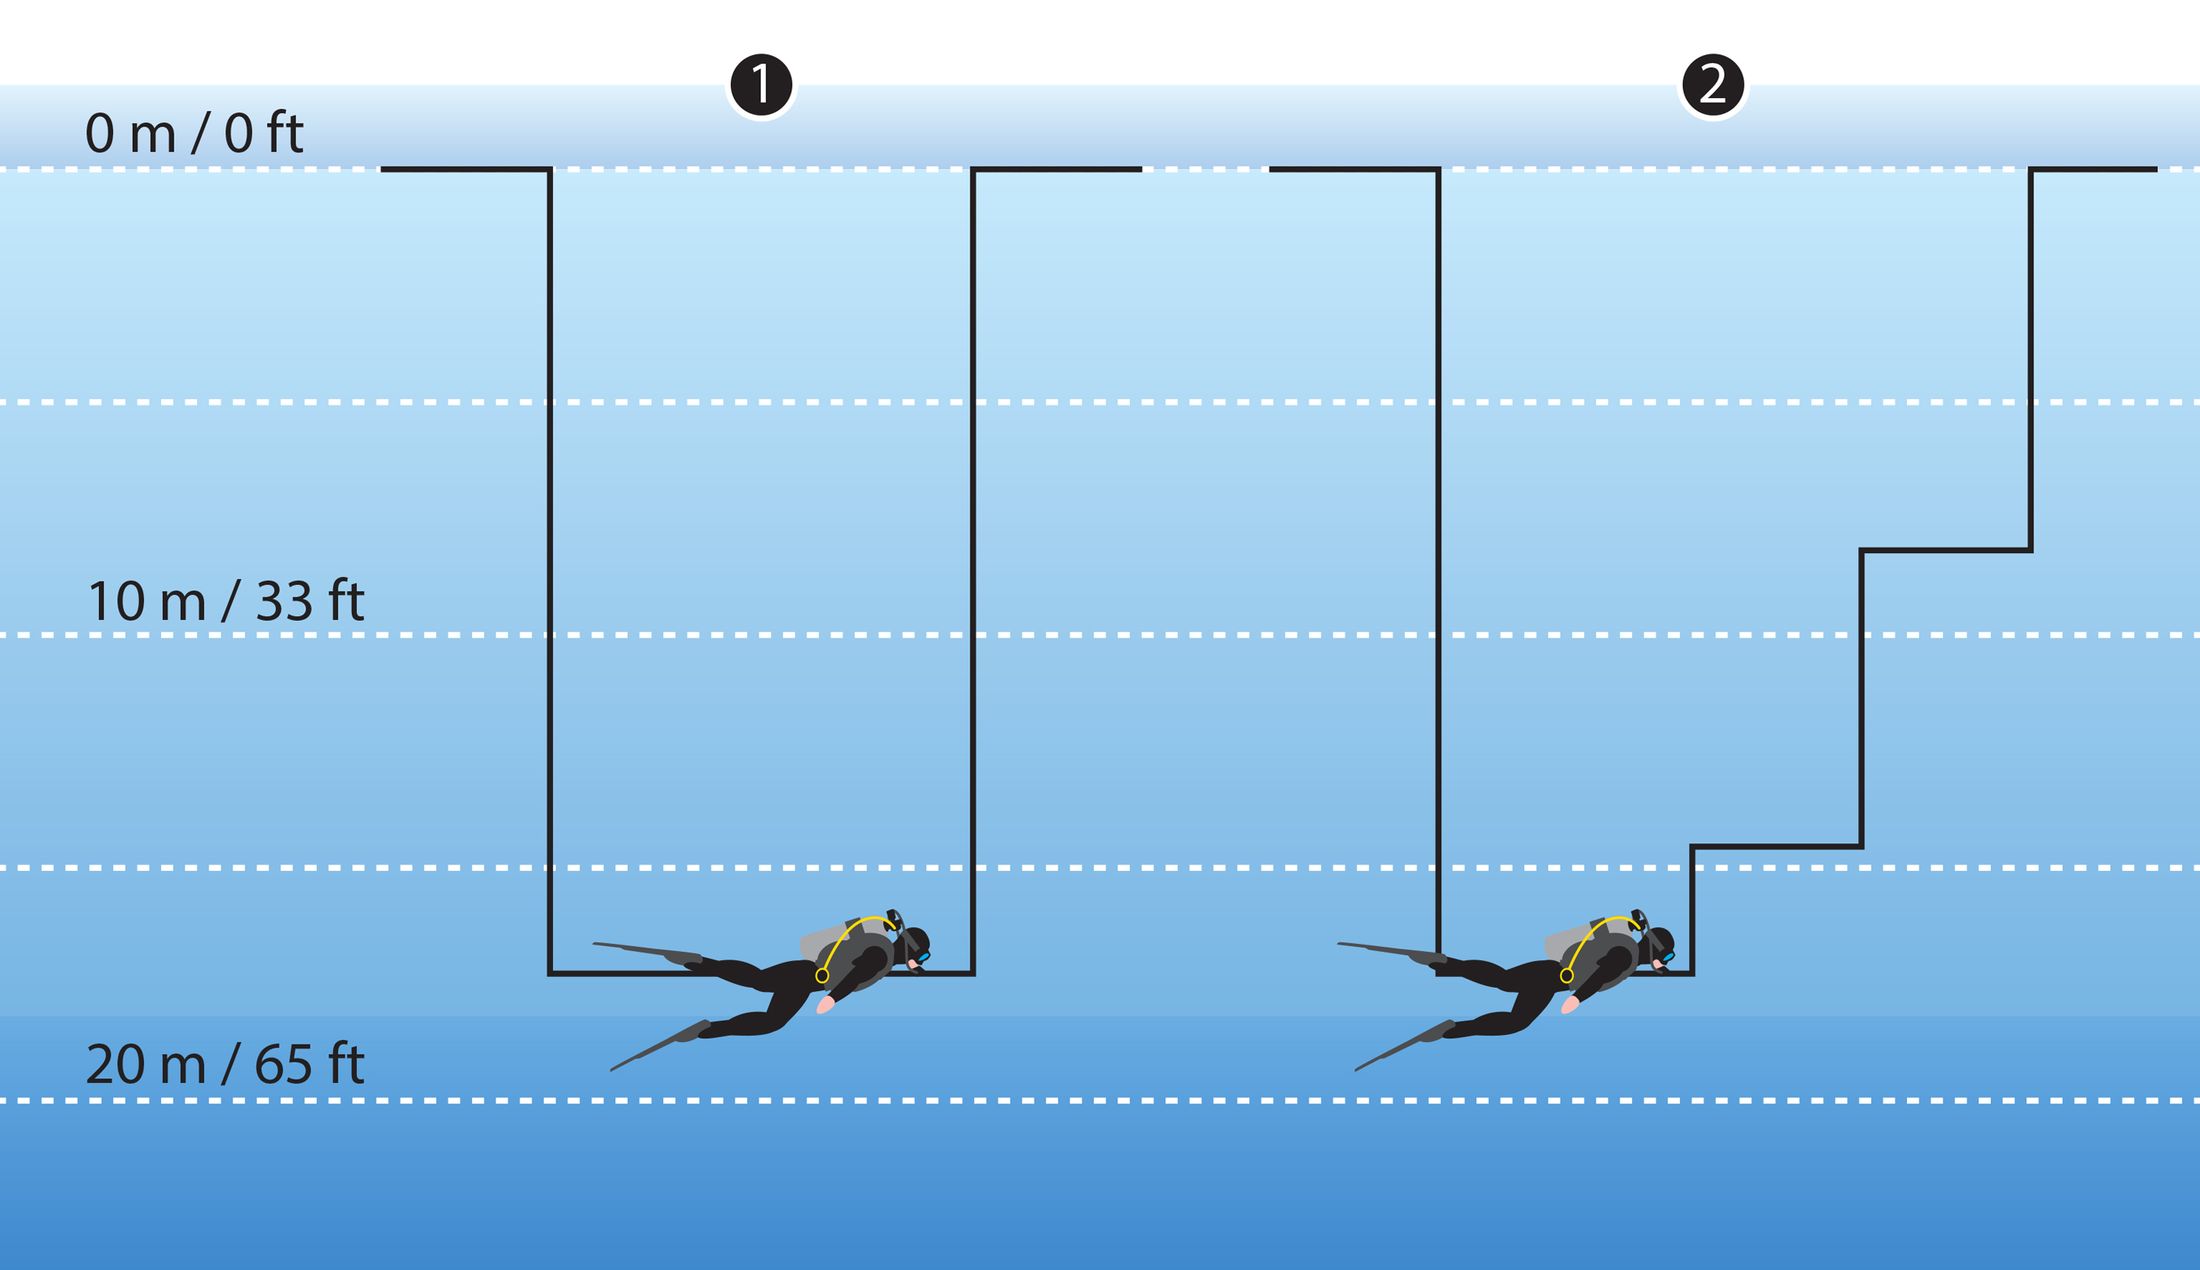
Dive profiles
Dive tables can only plan a
single-level dive (down to one depth and back up).
Most real dives are multi-level. Computers
recalculate continuously as depth changes →
more no-deco time than tables. They are made for
repetitive dives on consecutive days.
⚠️ A computer cannot guarantee you won't get DCS.
Read its manual and follow it.
6 dive-computer guidelines
Each diver has their own computer. ⚠️ Never
share one with your buddy. Then if yours fails you can use your
buddy's to get back.
Check the battery before diving.
Stay within the computer's limits and obey
all warnings.
Follow the ascent-rate display / audible
alarm.
Stay within your limits and be
conservative.
Plan carefully and have a contingency plan in case
the computer fails.
⚠️ Computer fails during a dive: signal buddy →
start ascent → watch ascent rate on buddy's
computer → do a longer than normal safety stop
→ don't dive again for at least 24 h.
Pre-dive briefing
Given by the dive pro on boats and in groups. Diving on your own →
do it with your buddy.
⚠️ Do a briefing before every dive, however
experienced you are.
It covers 10 items:
Objective of the dive
Conditions
Dive plan
Communication
Buddy check list
Equipment familiarization
Entry and exit procedures
Lost buddy procedure
Emergency procedures
Go / No-Go decision
The manual only names the buddy check as a briefing item. It does
not list the steps, which are taught in your pool sessions.
⚠️ Lost buddy(Section Review): search for
no more than 1 minute: turn 360° and
look up and down. Then make a normal
ascent to the surface (and meet up there).
⚠️ Anyone may call off any dive, at any time, for any
reason, even when already suited up.
Proper Procedures
for Shore Diving (p. 102–105)
Reading the water
Good conditions: light surf, low-energy
waves, a long interval between wave sets, a
slow rip current toward the site.
Surf: the bottom of the wave "feels" the seabed and
slows down → the top builds up and breaks forward.
Deep canyon near shore → lower
waves (light surf)
Reef just offshore → higher
surf
→ Watching the waves tells you about the bottom.
Low-energy waves: unstable, keep breaking, the most
common surf. Light shines through the front of the wave. Most of the
energy is on top → bend low into the
wave.
Rip currents: water from broken waves flows
back out to sea as backwash, on the
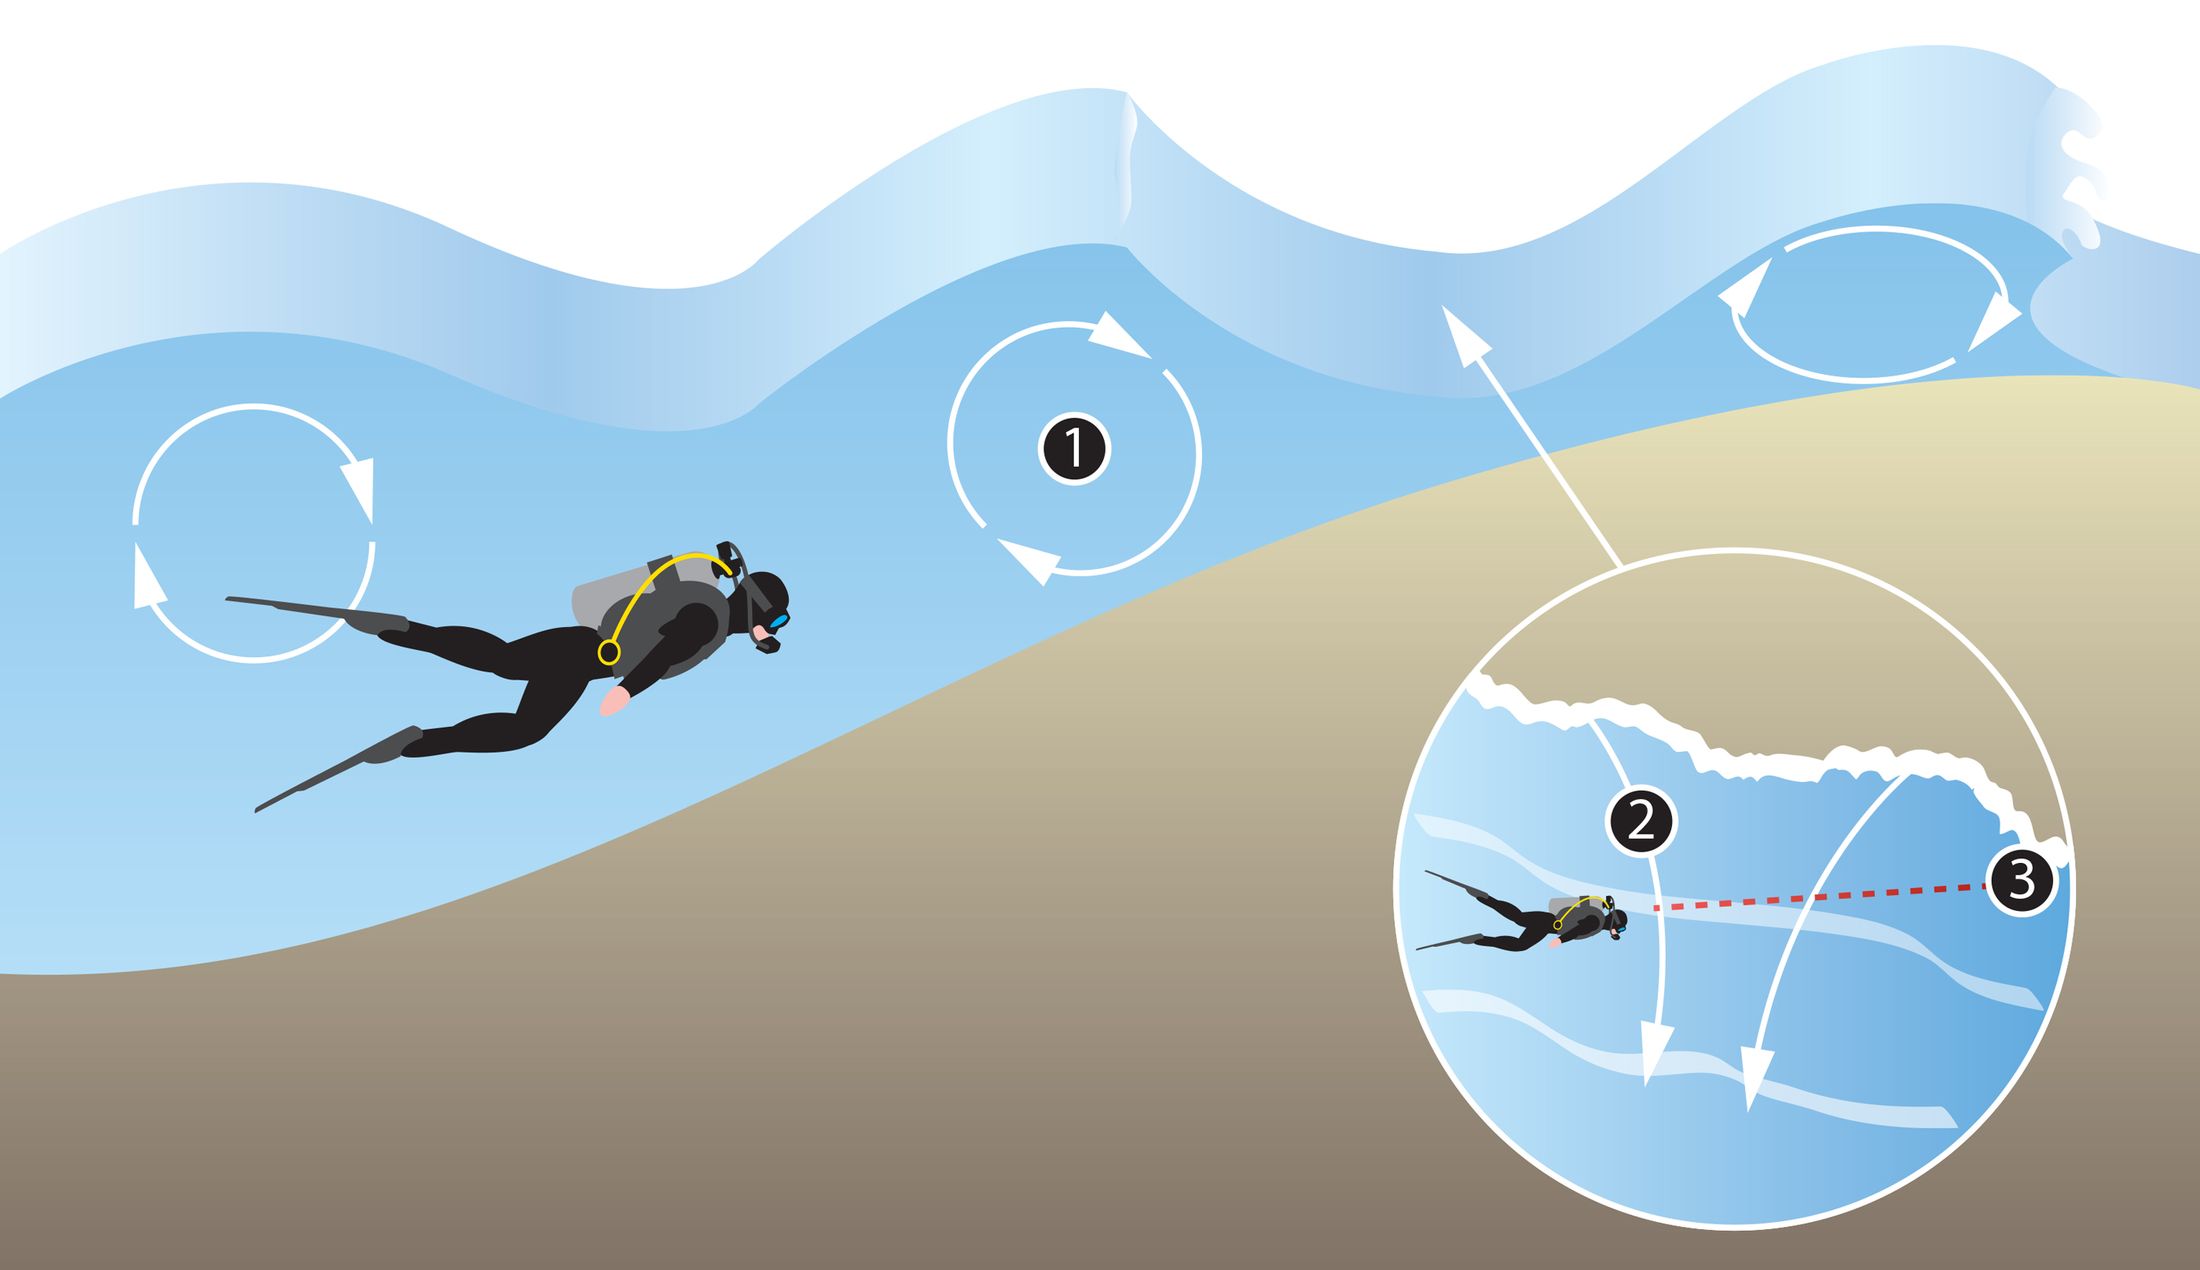
surface (not at depth). It drains out through channels
or cuts in sand bars and reefs near the beach.
Escape a rip: swim diagonally / parallel to the
shore, not against it (figure).
Information sources
Local SSI Dive Center = best source for a site.
Also local lifeguards / rescue teams.
Navy / Coast Guard: location of the nearest
recompression chamber.
DAN (Divers Alert Network):
non-profit. Main job: emergency medical advice
and help for diving accidents. Non-emergency: dan.org /
daneurope.org.
Write emergency phone numbers in waterproof
ink in your logbook.
Shore dive checklist (10
items)
Surf conditions
Currents
Distance from beach to dive area
Depth and bottom composition
Water temperature (surface and depth)
Visibility
Access from the beach
Compass headings
Special hazards (boats, surfers, marine life …)
Fish & game rules, other local concerns
Surf entry (3 steps)
Hold hands with your buddy. Protect your
mask with your free hand.
Look over your inside shoulders and shuffle
backward, keeping physical contact.
⚠️ Time the entry for a lull between wave
sets.
Getting through the surf
Keep moving. When a wave hits: brace and
lean into it, front leg bent, rear leg straight and dug into
the sand.
Stay low: a wave is strongest at its
crest.
Move fast and hard between waves. Don't stop. Rest
in the calm water past the surf zone.
⚠️ If you fall: stay down, don't try to stand up.
Keep kicking and your buddy will pull you out.
Chest-deep → roll onto your stomach and kick out
past the surf line.
Past the surf line, switch from regulator to
snorkel to save cylinder gas.
Boat diving
Plan your gear setup and dressing so you're ready when the
boat reaches the site. Ask the captain/divemaster when to suit
up.
Seasickness: ask a diving
physician for medication. Tell the group leader so you can
get in the water first. Prepare everything before
arrival to spend less time on deck.
The entry/exit technique depends on conditions and the captain →
listen in the briefing.
⚠️ Boats rise and fall with the swell. Get on or off a ladder or
dive deck when the boat dips into a wave trough.
Executing the Dive (p.
105–109)
Entering the water
Most common entry: giant stride (boat or jetty).
BC slightly inflated. Take one long step out,
looking forward, not down.
One hand: holds mask + primary second
stage. Other hand: holds weight system
+ information system (gauges).
⚠️ Check that the entry area is clear of divers and
obstacles, whatever the entry.
Weighting and gas weight
Breathing gas weighs about 0.0013 kg per
litre.
An aluminium 12 L cylinder holds about 3 kg
of gas at 200 bar.
Properly weighted with a full AL 12 L → about 3 kg negative
at the start, close to neutral at the safety
stop.
Neutral buoyancy = the most comfortable and efficient way to
dive.
Controlled descent
Upright at the surface: release BC air until the water
covers the top of your head.
Stop venting, exhale, and roll forward into a
horizontal (prone) dive position.
First breath → about 1 m deep and
neutral. 1 m = where you start
equalizing and stage the descent.
Then repeat: stop, adjust buoyancy, equalize, descend…
⚠️ Ear squeeze: go back up to where it's relieved,
hold that depth, equalize again.
Descend like a plane on final approach (gradual,
controlled). Only do this after you can hold neutral buoyancy
mid-water.
Train yourself to exhale at the start of every
descent.
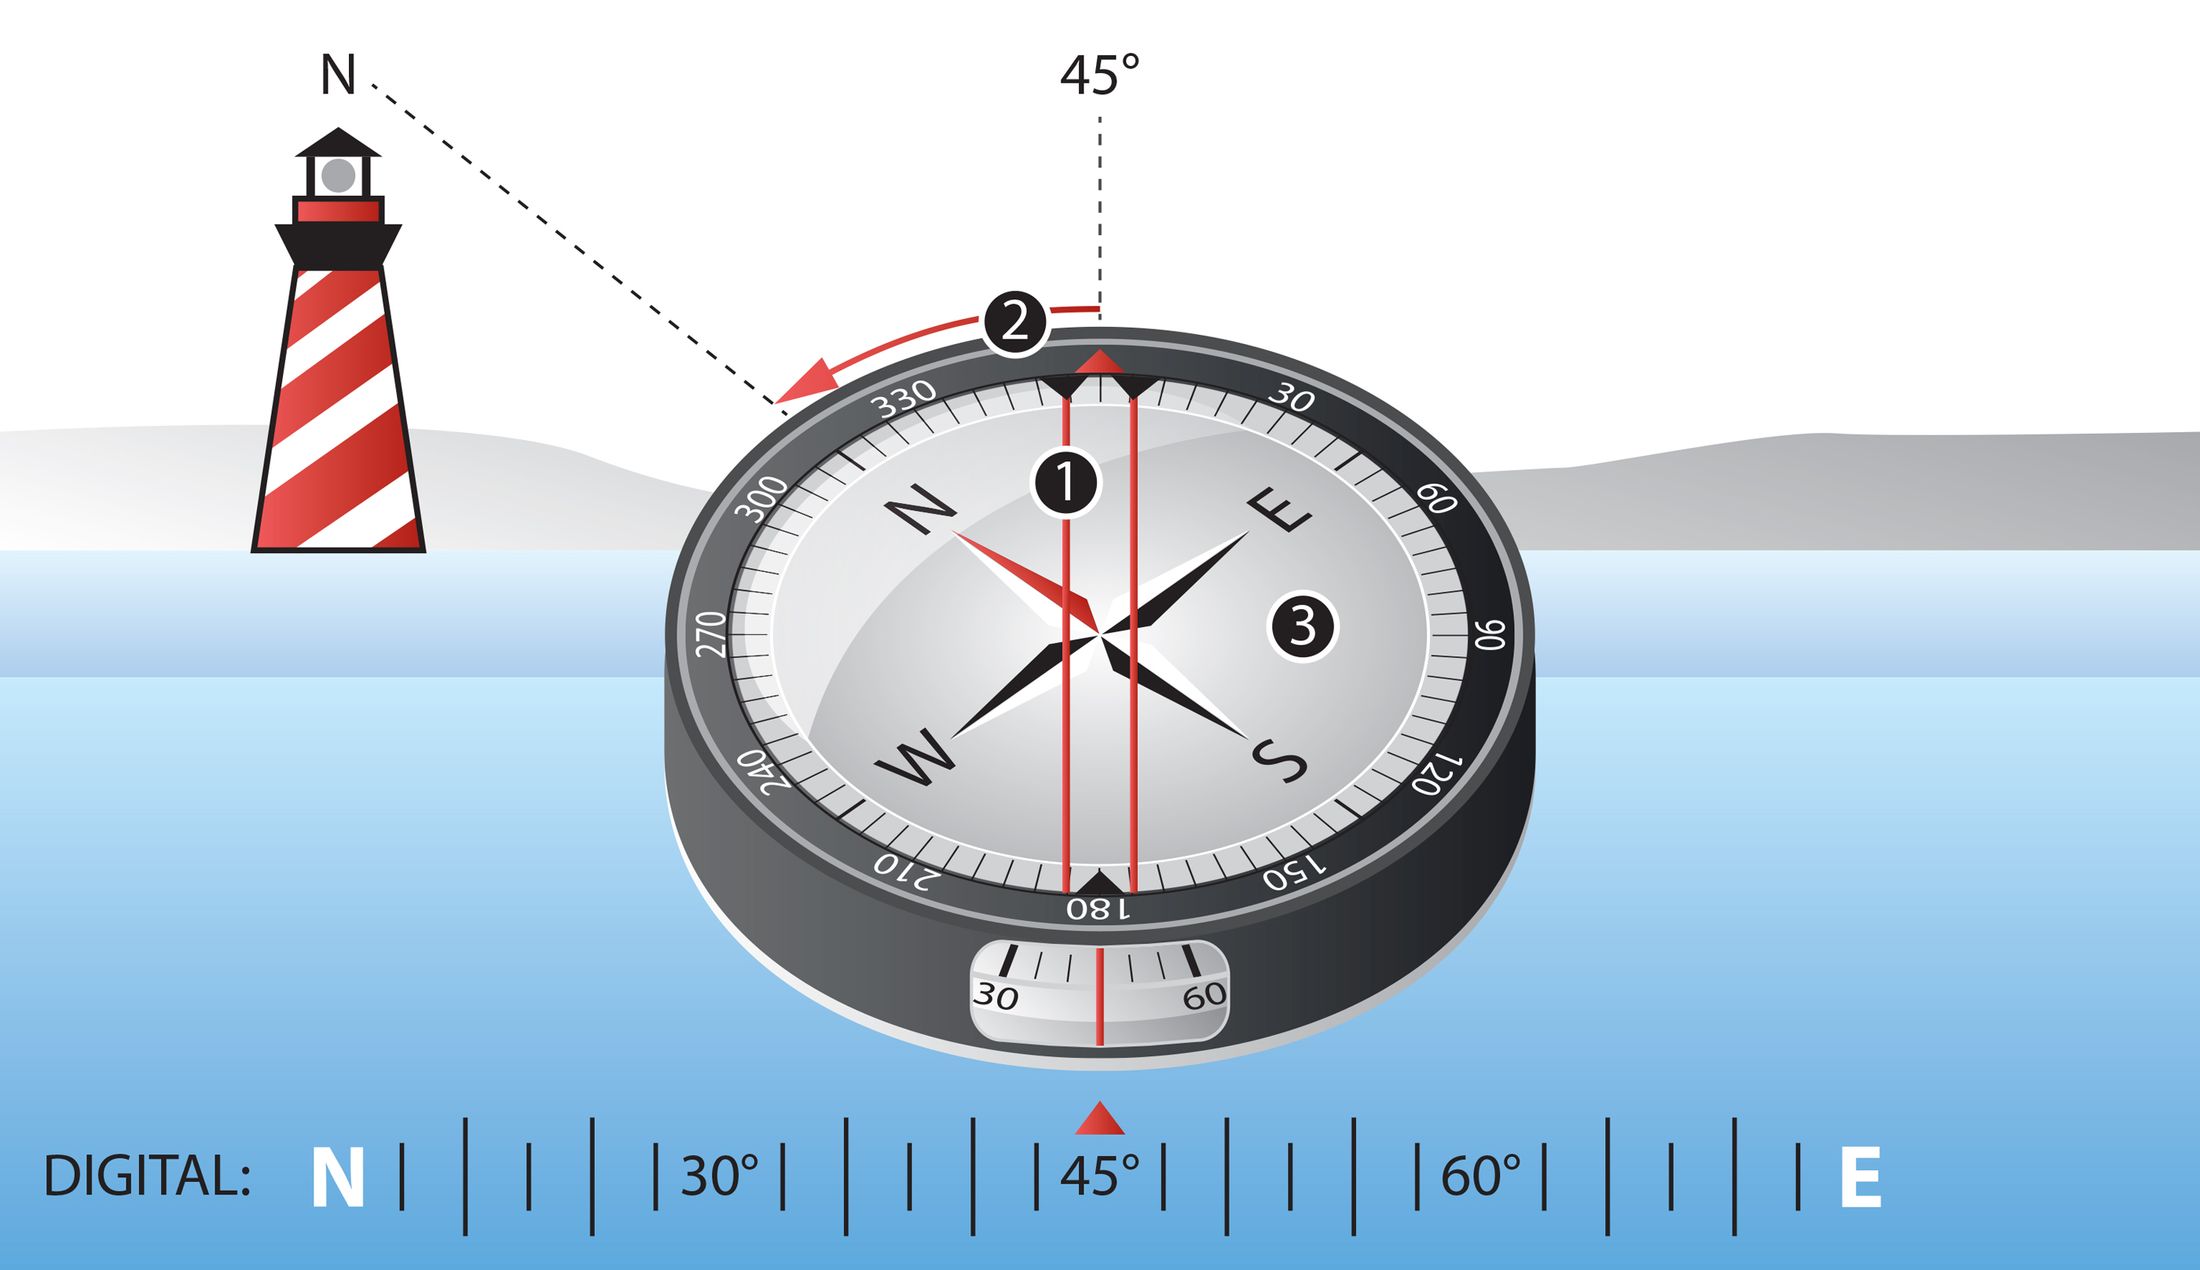
Navigation (compass)
Goal: get back to the entry point without a long surface
swim. Use a compass or natural
landmarks (e.g. coral heads).
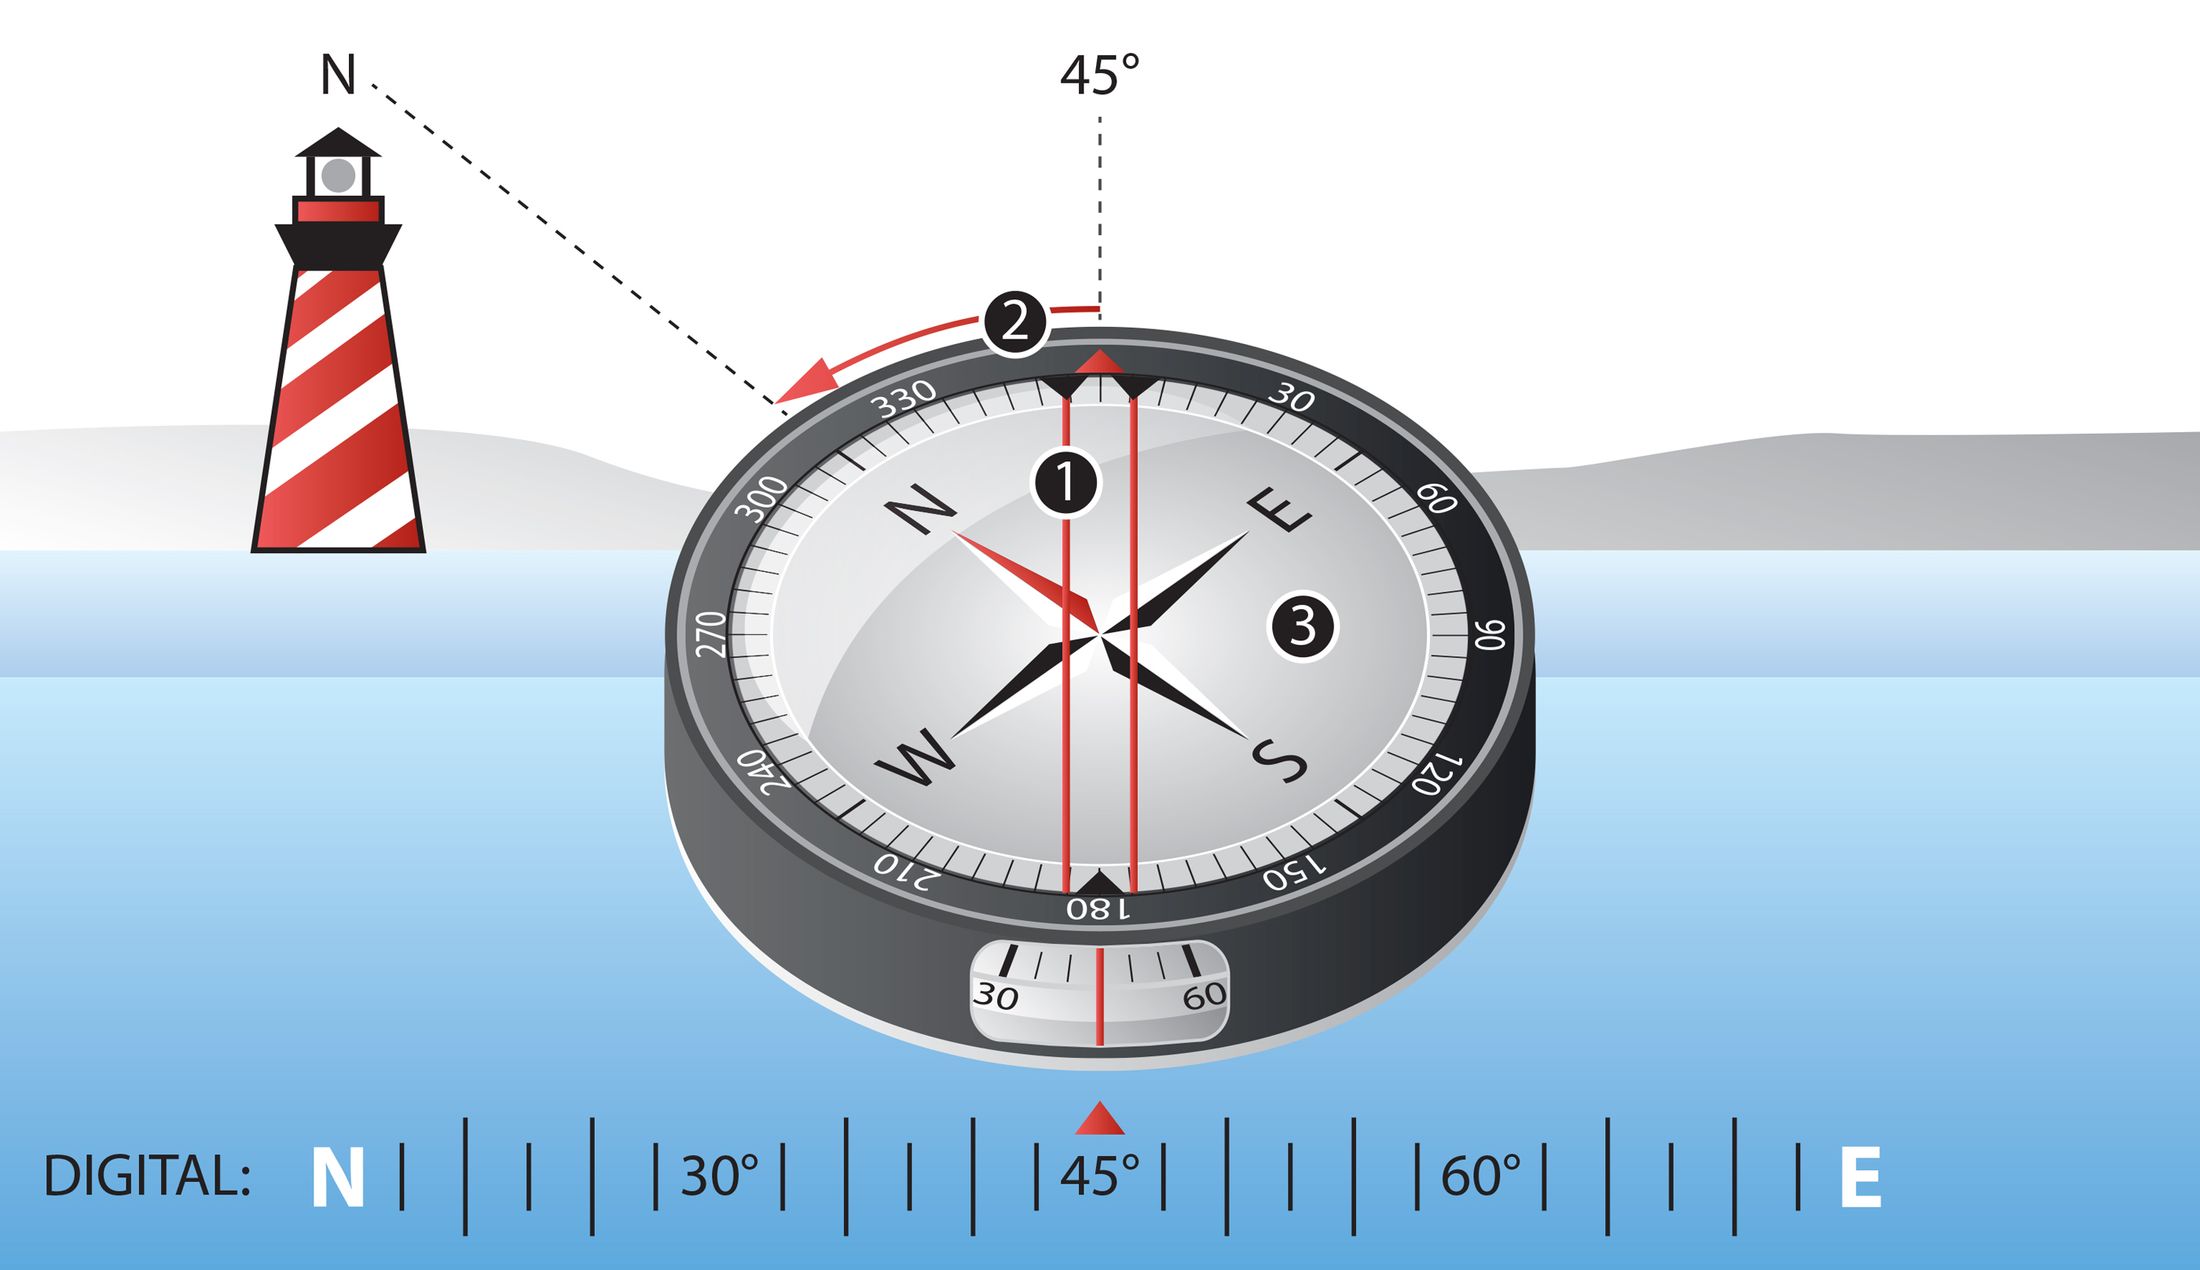
Compass part
Function
North-seeking needle
Points to magnetic north. Your constant
reference.
Lubber line / side window
Your direction of travel (azimuth). Align your body
with it.
Rotating bezel
360° scale with witness marks. You
turn it to set a heading.
Bezel: 0/360° = N, 90° = E, 180° = S, 270° = W.
Usually marked every 5° and numbered every
30°.
Type 1: degree scale on the bezel,
runs clockwise.
Type 2: scale in the compass body,
does not rotate, runs
counterclockwise, has a sight
window.
Navigating to a sighted object (3 steps)
Point the compass at the object.
Rotate the bezel until the witness marks
are over the north-seeking needle.
Consumption goes up with cold,
too much weight, stress, a
thick suit, swimming against current.
It goes down with experience and
comfort.
It also depends on gender, height, lung volume
(women often use slightly less).
Track your rate in your logbook.
Formulas
SAC (Surface Air Consumption) = litres per minute
at rest at the surface (1 bar).
SAC = AC × V ÷ (t × P)
AC = gas used (bar), V = cylinder
volume (L), t = time (min), P =
absolute pressure at depth (bar)
Consumption at depth (L/min) = SAC × bar at
depth
Gas needed (L) = SAC × bar at depth × minutes
Usable gas (L) = (fill pressure − 50 bar reserve) × cylinder
volume. ⚠️ Never plan with the 50 bar
reserve.
Time at depth (min) = (usable gas ÷ SAC) ÷ bar at
depth
Worked
example 1: find your SAC, then your time at 30 m
Dive: 12 L cylinder, 200 bar, 20 m
for 40 min total underwater time (descent + bottom +
ascent + 3–5 min stop at 5 m). Gas used: 150 bar.
Absolute pressure at 20 m: 20 ÷ 10 + 1 = 3
bar
SAC = 150 bar × 12 L ÷ (40 min × 3 bar) = 1800 ÷
120 = 15 L/min (at 1 bar)
Usable gas: 200 bar − 50 bar reserve = 150
bar → 150 bar × 12 L = 1800 L
How long that lasts at the surface: 1800 L ÷ 15
L/min = 120 min
How long it lasts at 30 m (4 bar): 120 min ÷ 4 =
30 min total underwater time, including the
safety stop
Worked example
2: can I do the divemaster's dive?
Divemaster plans max 30 m, 40 min.
Your SAC = 15 L/min, 12 L at 200 bar.
Always calculate for the deepest depth (biggest safety
margin).
30 m = 4 bar → consumption = 15 × 4 = 60
L/min
Gas needed = 60 L/min × 40 min = 2400
L
Gas available without reserve = (200 − 50) × 12 =
1800 L → 1800 ÷ 60 = only 30 min at 30
m
→ Not enough. Shorten your time underwater to keep
a margin.
Don't stack several new experiences in one dive.
Spread them over several days.
Equipment care
and logging your dive (p. 113–114)
After the dive: rinse and store your gear, then
fill in your logbook.
The computer records only some data. The logbook also records
how much weight you used with which exposure suit, your
thermal protection, interests and sightings.
The logbook is:
an accurate record of your personal info and
dives
an information resource for future dives
a place for medical/emergency info (e.g. emergency
numbers)
the record of your certification dives and
courses
Log your gas consumption too, to watch it improve
(and spike when you see your first shark).
Recognition:
4 specialties + 24 dives → Advanced Open
Water card (free)
Diver Stress & Rescue + 50 dives →
Master Diver
Section 5 –
The Ocean and Your Diving Opportunities
The Ocean (p. 118–128)
Why the ocean matters
Earth's surface is about 71 % water (USGS: over
1.38 million km³ of water).
Oceans formed from vapours (from Earth's formation and volcanic
activity) that condensed and fell as rain into low spots.
Rain and underwater volcanoes washed minerals in → salt water.
Salinity ≈ 3.5 %, rich in nutrients = basic food for
sea life.
Why the ocean is vital for life on land:
Home to many of the first links in Earth's food
chain (plants → small organisms → larger ones; waste and decay
recycle nutrients).
More than 85 % of the oxygen in the atmosphere
comes from marine plants.
Ocean plant production is about 10× that on
land.
All fresh water (rain, snow, glaciers, lakes, rivers) is ocean water
that evaporated, and it all flows back to the sea = one water
cycle.
Why inland water is fresh: evaporation leaves the
salt behind in the sea, and freezing (polar/mountain
ice) removes what salt is left.
Divers must help keep the oceans clean and unpolluted.
Marine life in general
Many water animals have not learned to fear humans
→ you usually get to see them.
Most variety: coral reefs in equatorial waters,
where the food chain begins.
The coral reef
Corals = colonial animals (polyps) that attach
permanently to a hard surface and build limestone
skeletons around themselves → these build up into reefs.
Reef-building corals live with algae called
zooxanthellae inside them (food source; the algae give
the coral oxygen, the coral gives the algae CO₂). The algae need
sunlight → the big, colourful reefs are in the well-lit surface
water (photic zone) of tropical seas, upper ~100
m.
Deep-water corals exist too: reefs down to 2000 m,
some corals deeper than 1830 m.
Most healthy reefs formed about 200–300 million years
ago.
What reefs do: home and protection for many animals, food for some;
coral eaten by animals ends up as sand.
⚠️ Avoid all contact with coral, for two reasons:
Protect yourself: some corals are sharp or brittle
→ cuts and abrasions; some sting.
Protect the coral: fins, dragging gear and
cylinders break it. Even a touch rubs off its protective mucous
coating → injury and infection.
→ Secure your equipment, keep good buoyancy, stay a
comfortable distance from the reef. Look, don't touch.
Hard corals
Soft corals
Elkhorn (very sharp, common in the Caribbean)
Gorgonians (soft, flexible)
Staghorn (like elkhorn but more cylindrical)
Sea fan (shallow 30–60 cm tall;
deep water up to 3 m across)
Brain coral
Black coral
Star coral (floral bursts on rocks)
Red coral
Lettuce leaf coral (looks soft but is hard)
Carnation tree soft coral
Fire coral: not a real coral but a
hydroid; its nematocysts give a
burning sting → keep away
Other reef animals
Group
Examples
Key facts
Worms (segmented)
Feather duster, Christmas tree worm (tube worms)
Live in sand or calcareous tubes; you only see the filter-feeding
end
Mollusks: gastropods
Snails, abalone, conch
Oldest form of mollusk; 35,000+ species
Mollusks: bivalves (two shells)
Clam, oyster, mussel, scallop
Almost as many species as gastropods
Cephalopods
Squid, octopus, chambered nautilus
Largest invertebrates; several arms; move by
pushing water out of the mantle
Marine only, none in fresh water; five-sided radial
symmetry; internal skeleton of small bones
Vertebrates
Fish, mammals
Most visible life in open water
⚠️ Harvesting crustaceans (where allowed): know and
follow the local minimum sizes, numbers allowed, hunting hours
and seasons.
Reef fish are territorial: big fish claim several
metres, tiny fish just a few centimetres.
About 40,000 fish species worldwide.
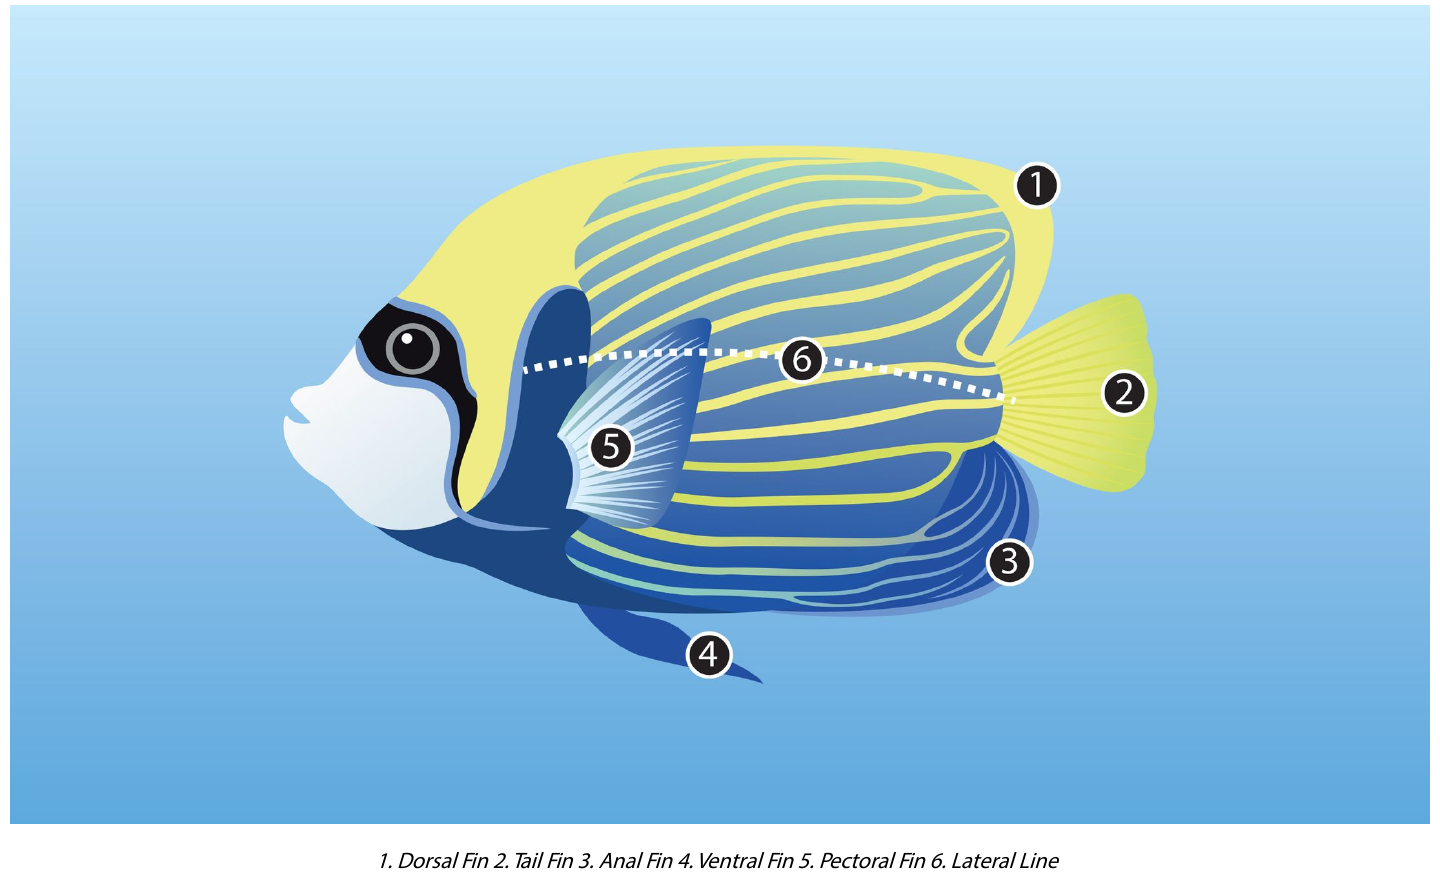
Fish identification
Parts of a fish: 1 dorsal fin · 2 tail fin · 3 anal fin · 4
ventral fin · 5 pectoral fin · 6 lateral line
Angelfish:87 species in 7 genera.
Flat (laterally compressed) bodies, bright colours, not eaten. Juveniles
often look completely different from adults. Common ones: Grey
angel (Caribbean, grey spots) and Emperor
angelfish (tropics, yellow and blue stripes). Large angelfish
are fearless and often come up to divers.
Butterflyfish (e.g. banded, spot fin): often
confused with angelfish; tame.
Other reef fish: soldierfish, squirrelfish, surgeonfish,
triggerfish; groupers and snappers (up to 3
m) down to tiny fairy basslets; hamlets, gobies, blennies,
damselfish; odd shapes (frogfish, pufferfish, trunkfish, batfish,
seahorse); flatfish (flounder, rays); schooling fish (jacks, grunts,
snappers).
Cold-water marine life
The bottom is mostly rock, with kelp
beds along some coasts. Less colourful than reefs, but often
more marine life, including marine
mammals (sea lions, seals, dolphins, whales).
Pacific Northwest: kelp, wrecks, wolf eels, seals,
and the world's largest octopus.
Kelp diving: move slowly and carefully,
never struggle. Get a proper kelp orientation (ask a local SSI
Dive Center) before trying it. Where kelp reaches the surface it forms a
"bed" that you cross with the kelp crawl.
⚠️ Tangled in kelp:stay calm, move slowly,
free yourself bit by bit. Your buddy helps.
Artificial reefs (oil rigs, shipwrecks) shelter
small fish, which attract bigger ones: yellowtail jacks, tuna, bonito,
mackerel, barracuda, sometimes sharks.
Potentially Harmful
Marine Life (p. 128–133)
Humans are not natural prey to anything in the sea;
nearly all injuries are avoidable.
⚠️ Marine animals hurt people only in defence: when
touched or surprised, when their territory is invaded, or when they are
teased.
Injuries come from the diver's negligence, ignorance or
aggressive behaviour (on purpose or not).
⚠️ Most common injury: the animal is
surprised and instinctively protects itself, e.g. the diver
brushes against, grabs or steps on something unseen, or on something not
known to be dangerous.
First-aid rule of thumb: spines and stingers → hot
water (as hot as the victim can stand without scalding).
Jellyfish tentacles → vinegar. Always get
medical help.
Animal
Danger
How to avoid
First aid
Scorpionfish (sculpin)
Camouflaged like a rock on the bottom (coastal waters); painful
sting, not fatal
Keep a safe distance from reef and bottom
Remove visible spines, hot water, emergency
care
Stonefish
Like scorpionfish but more dangerous; mostly
Pacific; almost impossible to spot
Same
Same
Lionfish
Pretty, but a powerful sting
Don't touch
Same
Moray eel
Bites if disturbed while resting in its hole; shy
and nocturnal (swims freely at night)
Don't reach into holes or crevices
–
Jellyfish, Portuguese man-of-war
(coelenterates)
Nematocysts inject venom on contact; they don't
look dangerous
Don't touch
Leave the water, don't touch the stingers,
vinegar or ammonia (or commercial anti-sting), medical
help. Toxins are heat-labile → immersion in 42–44 °C
water also works
Sea wasp
Most dangerous coelenterate. Tentacles up to
10 m; 15 cm of tentacle can kill an
adult. Extreme pain, then unconsciousness and stopped breathing
within 90 min
Don't touch
Lots of vinegar or ice, remove tentacles very
carefully, pressure bandage, monitor vital signs,
transport to emergency care
Fire coral
Burning sting (hydroid)
Keep your distance
–
Cone shell
Venomous stinger inside the shell; can be deadly;
doesn't attack, divers pick it up thinking it's harmless
Never pick up a shell you can't identify
Hot water flush, immediate medical
help
Sea urchin
Sharp spines → puncture wounds; spines break off in
the skin
Watch where you put hands, knees and feet
Tolerably hot water (pain relief), remove visible
spine pieces, scrub with soap and water. See a doctor
if near a joint or infected
Rays (stingray, butterfly, bat, round ray)
Buried in sand; stepped on or attacked → venomous tail
barb → bleeding, swelling, vomiting, faintness
Watch the bottom; don't provoke (disturbed rays usually swim
away)
Leave the water, hot water,
medical help
Sharks and barracuda
Sharks are fast and strong and get excited by
blood. "Ferocious" behaviour comes from
provoking them or chumming (throwing
in bait). In a natural, unbaited setting they are graceful and
timid and often flee from sudden movement.
Most commonly seen = least aggressive:nurse shark, sand shark. More
aggressive:tiger, great white, mako,
hammerhead.
⚠️ Some sharks are unpredictable and can be dangerous, but
almost only when provoked.
Barracuda: looks fierce and may follow divers, but
is gentle, intelligent and curious.
Dangerous animals are often regional → ask your
local SSI Dive Professional what lives there, how to recognise and avoid
it, and what to do if injured.
Protecting the environment
"Look and don't touch. Take only pictures, leave only
bubbles."
3 things you can do:
Stay neutrally buoyant at all times.
Keep equipment secured, with nothing dangling to
hit the reef.
Always be a responsible diver.
The freshwater environment
Inland sites: lakes, rivers, quarries, ponds,
mines. Visibility is often lower than in the ocean → consider
the Night and Limited Visibility course.
Freshwater life:eels, crawfish (crayfish),
bass, pike, perch, catfish, trout, carp, crappie, gar (also
walleye, and aquarium species like neon tetra, discus, freshwater
angelfish).
Crayfish = small freshwater cousin of the lobster.
Freshwater clams exist too.
The freshwater food chain centres on floating or rooted
plants, and also on freshwater shipwrecks
(e.g. Great Lakes, Mackinac Straits).
Marine parks
Many sites are marine parks protected by law
against hunters and collectors.
⚠️ Divers must respect and follow the local park
regulations and help protect the corals and marine life.
Diving Opportunities (p.
133–134)
Experience opens up "bucket list" dives: great whites (Africa), blue
sharks (North Atlantic), whale sharks and sailfish (Mexico), sea lions
(Baja California), hammerhead schools (Galápagos), soft corals and giant
clams (Fiji), potato cods (Great Barrier Reef), manta rays (Yap,
Hawaii), humpback whales (Dominican Republic), manatees (Florida).
Truk Lagoon = top wreck site (Japanese fleet sunk in
1944).
Summary (p. 135)
Mostly a recap. New facts about threats to the ocean:
Overfishing; land disruption releases
sediments that smother corals;
pollution contaminates marine life and comes back to us
in seafood.
Burning fossil fuels → CO₂ → greenhouse effect warms the
ocean → stressed corals turn white (bleaching) and can
die.
CO₂ also changes the ocean's pH → harder for corals
to build their skeletons.
Corals are the sentinels of ocean health (like
canaries in a mine): they are very sensitive to environmental
change.
Section 6 –
Your Scuba Diving Experiences and Beyond
Taking Care of Yourself (p.
139)
Fitter diver = adapts better underwater and enjoys diving more.
⚠️ No alcohol or drugs before diving (not even the
night before). Dive staff can bar you from diving if
you're not fit to dive.
Drink enough (non-alcoholic, water is
best) → prevents dehydration.
Eat a light, non-gaseous breakfast and eat sensibly
through the dive day.
Wear exposure protection: over several dives/days
your body temperature drops → the same water feels colder by the end of
a trip.
Don't smoke: it works against respiratory health
and diving.
Learn to handle stress and help a buddy → Diver Stress &
Rescue specialty.
Avoiding Panic (p. 140–142)
4 causes of panic
Cause
What it is / how to avoid it
Breathing difficulty
Low/out of gas or a poor breathing pattern → watch your gauge, plan
to surface with at least 50 bar, breathe slowly
and evenly
Environmental conditions
Water movement, low visibility, drop-offs, entanglement, hazardous
marine life, cold, claustrophobia, losing your buddy → talk them through
in the pre-dive briefing
Equipment
Unfamiliar, badly fitting or poorly working gear →
own your gear, keep it serviced, pre-dive check
every dive
Comfort and ability
Diving beyond your ability/comfort → stress → panic. Stay within
your limits
⚠️ You always have the right to decline a dive if
you feel uncomfortable or conditions may exceed your ability.
Signs of panic in another
diver
Erratic, uncoordinated movements
Wide-eyed, fearful look
Fast, erratic breathing, bubbles "exploding" from
the regulator
Vertical in the water, kicks ineffective
Flailing arms, trying to "climb" out of the
water
Can't get positive buoyancy at the surface
→ Watch all divers around you, not only your buddy.
Responding to a panicked
diver
Panic at depth
Panic at the surface
1. Locate your alternate air source (first
step)
1. Fill your own BC completely (first step)
2. Approach, look for the cause
2. From a distance, calmly tell the diver to get
positive buoyancy
3. Face the diver, get their attention (your
presence often calms them)
3. If needed, approach, ditch their weights and
inflate their BC
4. Too erratic / threatens your safety → back off
until they calm down
4. Help them find the most comfortable breathing
position
5. If they grab you → go under the surface; they
will usually let go
⚠️ Most important rule: never needlessly endanger
yourself. Get extra help if needed.
You can help with entanglement or air sharing, but you are
not trained for a diver in advanced
panic.
Preventing panic in
yourself (5 techniques)
Respond properly – trained responses must be
automatic. "3-R Rule": Regain control, Respond,
React.
Take specialty training for the diving you do (most
incidents = breaking the Basic Rules of Scuba or doing something
untrained).
Honestly evaluate your limits – ⚠️ don't
dive if you feel, for any reason, you shouldn't. Don't let
anyone pressure you.
Maintain your Total Diving System (SSI Equipment
Service Program).
Add only one new variable at a time (e.g. not night
+ wreck + boat dive at once – learn each first). No shortcut for
experience.
Proper
Response to Difficult Situations (p. 142–143)
Good planning + training → less panic, calm and
methodical problem solving.
4 Basic Rules of Scuba:
Breathe continuously
Ascend slowly and maintain control
Never dive alone or beyond your limits
⚠️ Stop, Breathe, Think, Act (new in this
section)
Out of air = the most critical
situation, needs immediate attention.
Out-of-air signal: flat hand moved side to side
across the throat.
Stop, Breathe, Think, Act
Step
What you do
1. Stop
Fight the "fight or flight" shock/adrenaline urge;
a panicked uncontrolled ascent would be serious
2. Breathe
If you still have air: several deep, even breaths →
calm, rational decision
3. Think
Weigh options → choose dependent or
independent action
4. Act
Act decisively, trust your training. The whole
thing takes only seconds
Decision Matrix (p. 144–151)
Out of air: options
in order of preference
"I'm out of air and…"
Correct response
Type
Buddy is close enough to help
1st choice: Sharing Air
Dependent
Surface is closer than my buddy (alone,
shallower than 18 m)
Controlled (Emergency) Swimming Ascent
Independent
Buddy lost and too deep for a
swimming ascent (deeper than 18 m)
Emergency Buoyant Ascent = last
resort
Independent
OUT OF AIR → Stop, Breathe, Think, Act
   │
   ├─ Buddy close enough? ── YES → SHARE AIR (dependent)
   │
   └─ NO (alone) ─┬─ shallower than 18 m → CONTROLLED SWIMMING ASCENT (independent)
                  └─ deeper than 18 m   → EMERGENCY BUOYANT ASCENT (independent, last option)
The book uses "Emergency Swimming Ascent" and
"Controlled Swimming Ascent" for the same thing.
⚠️ A swimming ascent in deep water with no buddy
nearby is wrong → that's the Emergency Buoyant Ascent
case.
Situation 1 – Sharing
Air (dependent action)
Recipient (out of air) swims to
donor, gives the out-of-air
signal.
Donor faces recipient and gives him the primary
regulator (the one in the donor's mouth).
Donor switches to his own alternate air source.
Donor stays in control.
Both hold each other's right BC shoulder strap with
their right hand.
Both hold their BC exhaust hose in the left hand,
then ascend together.
Goal: get both divers to the surface safely.
Sharing the primary has proven to be the
most effective way to share air.
Situation
2 – Controlled Swimming Ascent (independent, shallower than 18 m)
First: Stop, Breathe, Think, Act (panic may
return).
⚠️ Keep the regulator in your mouth until the
surface – as pressure drops you may get another breath
(Boyle's Law).
⚠️ Exhale smoothly and continuously all the way up:
head tilted up (keeps airway open), hand
up. Air in the lungs expands on ascent.
Ascend as controlled as possible.
At the surface: ditch weights, get positive
buoyancy.
Situation
3 – Emergency Buoyant Ascent (independent, deeper than 18 m)
First: Stop, Breathe, Think, Act.
Release your weight system – a weight belt held at
arm's length before dropping so it can't snag on your
gear.
⚠️ Exhale smoothly the whole way, head back
looking up, hand up, regulator in your
mouth.
This is the only time you may exceed the 9
m/min ascent rate – but still not reckless or panicked.
⚠️ Arch out at 5–3 m to slow down (area of
greatest relative pressure change). Recognize it by the
water suddenly getting lighter and clearer.
At the surface: get positive buoyancy.
⚠️ Only if all 3 apply: (1) out of air, (2)
buddy too far, (3) too deep for a swimming ascent. Risky →
last option, trained only in pool/confined
water. Memorize the procedure.
Being a Responsible Diver
SSI Responsible Diver Code – I pledge to:
Dive within the limits of my ability and
training
Evaluate conditions before every dive and make sure
they fit my capabilities
Know and check my equipment before and during each
dive
Respect the buddy system
Accept responsibility for my own well-being on
every dive
Be environmentally conscious on every dive
Getting Certified and
Referral Dives
Referral dives: do the open water dives at another
(e.g. holiday) resort. Your SSI Dive Center sends the paperwork; the
referral instructor signs off; your home center issues a temporary or
final card.
Continuing Education
Open Water Diver = "license to learn", not a
license to do all types of diving.
Resorts require proof of specialty training for
e.g. deep, night, nitrox dives. Each specialty gives
its own card.
Pro path: Dive Guide → Divemaster → Assistant Instructor → Open
Water Instructor.
Levels of Experience &
Recognition
11 Levels of Experience, each = a range of dives;
upgrade at an SSI Dive Center (staff checks the
logbook).
Program parts: logbook, Level decals, Verification Pages,
certification cards (dive count printed on the back),
SSI Embosser stamp.
Levels of Recognition (since 1992;
no training beyond OWD needed, any agency's cert counts):
Level
Dives
Card
5
100
Century
7
300
Silver
9
500
Gold500
10
1000
Platinum1000
Pro
5000
Platinum Pro5000
Summary (p. 152–153)
To be certified: complete all academic, pool/confined water and open
water sessions, pass the final exam with at least 80 %,
and have the training record + logbook signed and dated
by instructor and student.
Failed exam → study again and take an alternate
version later.
Appendix –
Dive Planning With the SSI Dive Tables
Dive Planning
With The SSI Dive Tables (p. 156–158)
Most divers use a dive computer today, but you must
still be able to plan single and repeat dives with the SSI Dive
Tables.
The tables have 3 parts: Table 1 (no-decompression
limits + group letter), Table 2 (surface interval → new
group letter), Table 3 (residual nitrogen time +
adjusted limit, on the back of the slate).
Use the AIR depth column. The EAN32/EAN36 columns
are for nitrox (not part of this course). The small numbers under each
depth are the PO₂.
Key terms
Term
Meaning
Bottom Time (BT)
From the start of descent until you begin
your direct ascent to the surface (table definition)
Depth
The deepest point of the dive, however
briefly you were there. Plan 9 m but look at something at 12 m
→ use 12 m
No-Decompression Dive
A dive within the time limit for its depth, so you can
ascend directly to the surface without decompression
stops
No-Decompression Limit (NDL)
Maximum time at a depth that still allows a direct ascent
Decompression Dive
A dive that exceeds the NDL → needs planned
decompression stops. ⚠️ Not recreational diving, beyond
this course
Doppler Limits
The NDLs used by SSI: more conservative than the
U.S. Navy limits, based on Doppler ultrasound research
Group Designation Letter (Repetitive Group,
RG)
Letter A–K given after a dive. Shows how much
residual nitrogen is left in your tissues (later letter
= more nitrogen)
Surface Interval (SI)
Time out of the water between dives: from surfacing
until the start of the next descent
Repetitive Dive
Any dive started more than 10 min and less than 12
h after a previous scuba dive
Residual Nitrogen
Extra nitrogen still dissolved in your body after a surface
interval
Residual Time (RT)
That leftover nitrogen expressed as minutes already spent at
the planned depth of the repeat dive. RT = 0 on the
first dive
Adjusted No-Decompression Limit
NDL for a repetitive dive after RT is taken into account (Table 3,
bottom number). Your actual bottom time must stay below
it
Total Time (TT)
TT = BT + RT. Used in Table 1 after a repetitive
dive to get your new group letter
Table 1: The
No-Decompression Limits Table (p. 159–160)
Shows how long you can stay at a depth and still ascend
directly to the surface.
Columns: depth (m) on the left → Doppler
NDL (min) → actual dive times in the steps → group
letter at the bottom.
Doppler no-decompression limits (air):
Depth (m)
3 / 4.5 / 6
7.5
9
10
12
15
18
21
24
27
30
34
37
40
NDL (min)
no limit
245
205
160
130
70
50
40
30
25
20
15
10
5
Rules for Table 1
Depth not in the table → round UP to the next
greater depth (16 m → use 18 m).
Time not in the table → round UP to the next
greater time (36 min → use 40 min).
The NDL column is the maximum. The numbers in the
row are the times you actually dive (e.g. 9 m for 35
min, not the full 205 min).
Read straight down from your time to get your
group letter. This letter decides how long your surface
interval must be before the next dive.
Example: first dive, 16 m
for 36 min
Planned 15 m, but the deepest point was 16 m →
round up to 18 m.
NDL at 18 m = 50 min → 36 min is within the
limit.
In the 18 m row, 36 min is not listed → round up to 40
min.
Read down → Group G (you are a "G-diver").
Slate: D 16 · RT 0 · BT 36 · TT 36 · RG G.
Table 2: The Surface
Interval Table (p. 161)
The triangle below Table 1 is the Residual Nitrogen
Timetable for Repetitive Dives (= Surface Interval Table).
Group letters run down the diagonal. To the left of each letter are
time windows (h:min, e.g.
1:16–1:59).
How to use it: start at your group letter → go
left to the window containing your SI
→ read down that column → new group
letter.
A longer SI moves you further left → an earlier
letter (less nitrogen).
Surface interval rules
⚠️ SI less than 10 min → treat both dives as
one continuous dive. The shortest window in the table
is 0:10.
SI of 12 h or more → no residual time any more
(window tops out at 12:00).
Dives after an SI of <10 min or >12 h are
not repetitive dives.
Example: SI of 1:30 after
the G dive
Start at G → go left to the window
1:16–1:59 (1:30 falls inside it).
Read down → new group E.
Table 3: The
Residual Nitrogen Times Table (p. 162)
After an SI you still carry residual nitrogen, so
you plan the next dive as if you had already been underwater for
some time.
Enter with the new group letter (column, from Table
2) and the planned depth of the repeat dive (row, left
side). Each box has 2 numbers:
Top = Residual Time (RT): minutes you count as
already spent at that depth.
Bottom = Adjusted No-Decompression Limit: maximum
actual bottom time for this dive. ⚠️ Your dive must
stay below it.
N/L = no limit (all boxes in the 3 m and 6 m
rows).
Adjusted limits are calculated for the Doppler
limits only.
Example:
second dive to 12 m for about 40 min, as an E-diver
Table 3: row 12 m × column E →
RT 49 / adjusted NDL 81.
Planned 40 min < 81 min → OK.
Repetitive Dives
and the Dive Profile (p. 163–165)
Record every dive on the dive profile on your
slate: RG before the dive, D (depth),
RT, BT, TT, RG after
the dive, SI, and RG for the next dive.
Getting the group
after a repetitive dive
Use Total Time, not bottom time: TT = BT +
RT.
Look up TT in Table 1 at the depth of the
repetitive dive → new group letter.
Example continued
After dive 2 (12 m, actual BT 40 min, RT 49):
TT = 40 + 49 = 89 min.
Table 1, 12 m row → 89 not listed → round up to
100 min → Group I.
Surface interval 1:30 again:
Table 2: start at I → window
1:30–2:02 → read down → Group F.
Dive 3 to 6 m as an F-diver:
Table 3: row 6 m × column F →
RT 159 min, adjusted NDL N/L.
3, 4.5 and 6 m have no set NDL
(also blank in Table 1) → shallow enough for almost unlimited bottom
time, even on a repeat dive. You still have an RT (159
min).
Whole day at a glance:
Step
Dive 1
SI
Dive 2
SI
Dive 3
Depth used
16 → 18 m
12 m
6 m
RT
0
49
159
NDL / adjusted NDL
50
81
N/L
BT
36 → 40
40
–
TT
36
89 → 100
–
Group
G
1:30 → E
I
1:30 → F
Table use: plan smart
Do the deepest dive first and shallower
dives later in the day.
Keep repetitive dive depths moderate.
→ Longer bottom times and shorter surface intervals. Using the
tables badly can cut your dive day short.
Safety rules printed
on the tables (p. 157)
⚠️ Safety stop:3–5 min at 5 m on
all dives deeper than 9 m.
⚠️ Omitted decompression (NDL exceeded by
accident):
NDL exceeded by
What to do
less than 5 min
Ascend normally to 5 m, stop at least 10
min (longer if air allows)
5 to 10 min
Stop at 5 m for at least 20 min
(longer if air allows)
→ In both cases: no more diving for at least 24
h.
⚠️ The tables are based on U.S. Navy tables made
for Navy divers. Recreational divers should use them
conservatively. Decompression sickness can
still occur even if you use them correctly.
Congratulations! (p. 166)
Academic part done. Next come the pool/confined water skills and the
open water assessment dives with an SSI instructor.